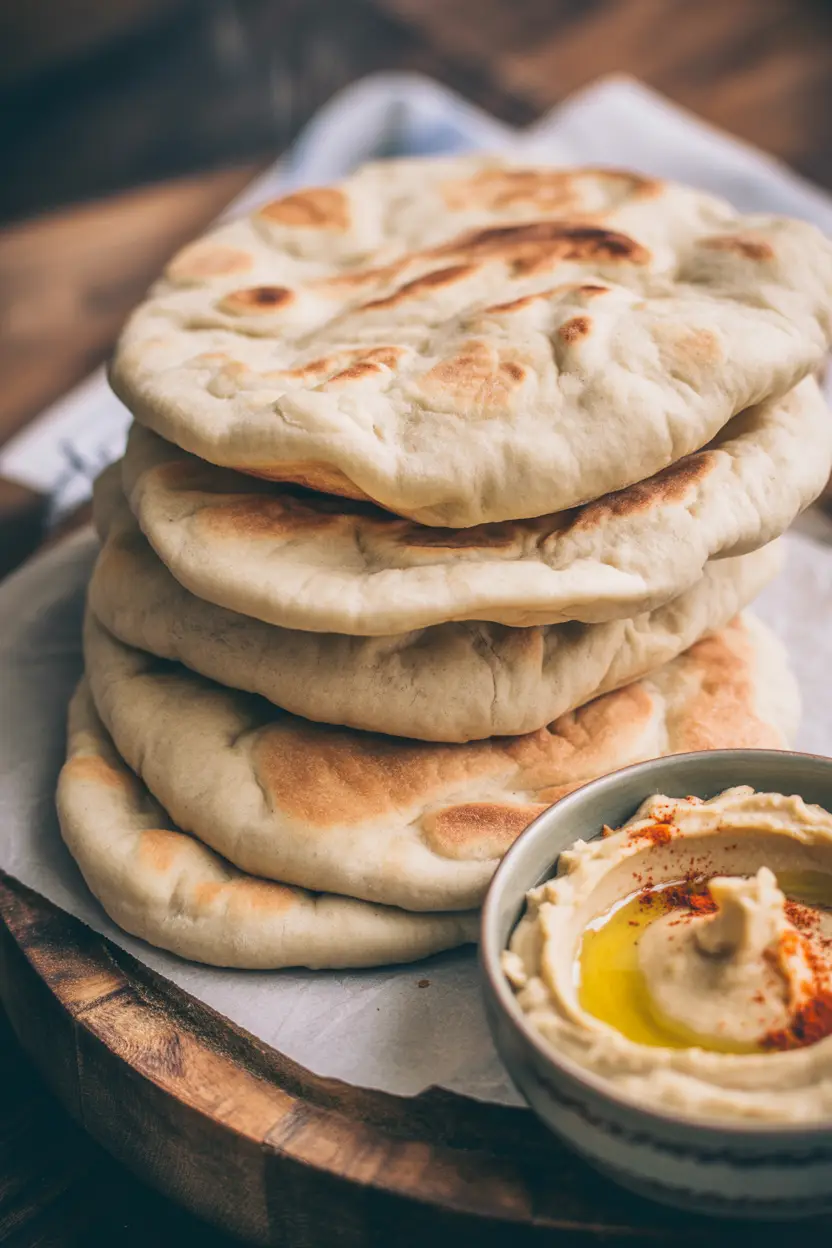
There is something oddly magical about tearing into warm, fluffy pita bread that just came out of your own skillet.
And no, it’s not because you’ve turned into a master baker overnight (though that would be cool). It’s because you took the time to make something that feels real. Like wholesome, bouncy dough kind of real. Like, tear it open and the steam hits your face kind of real.
And even if you’ve never worked with yeast before, I promise you can totally pull this off.
So whether you’re trying to recreate that dreamy Mediterranean wrap you had last weekend or you just want a better excuse to eat hummus (which is very valid), this recipe is the one you need in your life.
Let’s get you there.
Why You Might Fall in Love With This Recipe
Let’s be real. Pita bread at the store is fine. It gets the job done. But homemade? It’s warmer, fluffier, and honestly just hits different. You’ll get that signature puff. You’ll get that soft center. And most importantly, you’ll probably impress yourself.
Also, this is one of those recipes that feels more complicated than it is. So when you pull off perfect pita on your first try, you’re basically a kitchen wizard.
It’s just dough. But better. And you’re going to make it like a pro.
What You’ll Need
Here’s everything you need to get started. It’s simple, flexible, and you probably already have most of this stuff in your kitchen.
| Ingredient | Amount | Notes |
|---|---|---|
| Active Dry Yeast | 2 tsp | Or instant yeast if that’s what you’ve got |
| Sugar | 1 tsp | Helps feed the yeast (and it likes that) |
| Warm Water | 1¼ cups (around 105°F) | Not hot. Not cold. Just cozy. |
| All-Purpose Flour | 3 to 3½ cups | Start with 3, add more if needed |
| Salt | 1½ tsp | Kosher or sea salt works great |
| Olive Oil | 1 Tbsp + extra for bowl | Use the good stuff if you can |
That’s it. You’re only six ingredients away from pita heaven.
Tools You’ll Want to Have
This is one of those old-school, roll-up-your-sleeves kind of recipes. But a few things will make the process smoother:
- Mixing bowl (big enough for the dough to grow in)
- Wooden spoon or stand mixer (if you want to avoid an arm workout)
- Rolling pin (or wine bottle if we’re being honest)
- Cast iron skillet or heavy pan
- Clean kitchen towel
- Measuring cups/spoons
- Optional: kitchen thermometer (to make sure your water is yeast-friendly)
Step-by-Step Instructions
1. Activate the yeast
In a large bowl, stir the sugar into the warm water. Sprinkle the yeast over the top and let it sit for 5–10 minutes. It should get a little foamy on top. If nothing happens… your yeast might be dead. Toss it and start again with fresh stuff.
2. Make the dough
Add the olive oil, salt, and one cup of the flour. Stir until combined. Then keep adding flour, half a cup at a time, until you’ve got a shaggy dough that’s not too sticky. Switch to using your hands when it starts fighting back.
3. Knead
Turn the dough out onto a floured surface. Knead it for about 7–10 minutes until it feels smooth and bounces back a little when you poke it. If it’s too sticky, just dust in a little more flour. But go easy—too much and your pitas will get tough.
4. Let it rise
Oil a clean bowl, plop your dough in, and turn it to coat. Cover with a damp towel and let it rise in a warm spot for about an hour, or until it doubles in size. Take a break. Maybe clean the counter. Maybe scroll TikTok. You earned it.
5. Divide and rest
Punch the dough down (gently). Divide it into 8 pieces and roll each one into a ball. Let them chill out under a towel for 10–15 minutes. This helps relax the dough so it’s easier to roll.
6. Roll it out
Take one ball and roll it into a circle about 7–8 inches wide and ¼ inch thick. Try to keep the thickness even so it puffs right. Repeat with the rest. And don’t stress about the shape—wonky circles still taste like victory.
7. Cook
Heat your skillet over medium-high. Once it’s hot, lay in your dough. Cook for 1–2 minutes on the first side. You should see bubbles forming. Flip and cook another 1–2 minutes. It should puff up (yay!). Stack cooked pitas under a towel to keep them warm and soft.

Pro Tips You’ll Wish You Knew Sooner
- Water temp is everything. Think “nice warm bath,” not “boiling jacuzzi.” If your water’s too hot, the yeast gets fried. Too cold, and it doesn’t wake up.
- Don’t rush the rest. Letting the dough sit before rolling makes it way easier to shape. And it helps the gluten chill, which is what we want.
- Super hot skillet = success. The key to a good puff is sudden heat. A cold pan means sad, flat pitas.
- Don’t stress about perfect circles. Seriously. Rustic is beautiful. This is not the Great British Bake Off.
- Use a damp towel while they cool. Keeps them soft and chewy instead of dry and cracker-like.
Substitutions & Variations
Sometimes you gotta work with what you’ve got. And sometimes… you just want to try something new.
| Ingredient | Swap Option | Notes |
|---|---|---|
| All-Purpose Flour | Half whole wheat flour | Adds fiber and a nutty flavor |
| Yeast | Instant yeast | Skip the bloom step and mix it right in |
| Olive Oil | Avocado or canola oil | Still works, just a little different taste |
If you want to get fancy, mix in herbs or spices like garlic powder, za’atar, or cumin. You can even brush warm pitas with olive oil and sprinkle on sesame seeds or chili flakes. Endless vibes.
Make Ahead Tips
Want to prep ahead? Totally possible.
- Make the dough the night before and store it in the fridge. Let it warm to room temp before rolling.
- You can also freeze the dough balls. Just thaw overnight, then roll and cook.
- Cooked pitas freeze great. Stack with parchment in between, seal in a bag, and reheat in the oven or toaster whenever.
Nutrition Breakdown (Per Pita)
| Calories | Protein | Fat | Carbs | Fiber |
|---|---|---|---|---|
| 160 | 4g | 1g | 31g | 2g |
Pretty solid for something so fluffy and delicious. If you go the whole wheat route, expect a bit more fiber and slightly fewer carbs. And if you load them up with veggies, lean proteins, or dips… well, now we’re talking balanced meal.
Leftovers & Storage
Here’s how to make those leftovers last:
- Keep at room temp in a sealed bag or covered basket for 2–3 days.
- Avoid the fridge—it dries out bread faster.
- For longer storage, freeze in a stack (with parchment or plastic wrap between each pita). Reheat in toaster, oven, or even over a pan.
Pro tip: wrap a pita in foil with a splash of water, and heat it in the oven at 350°F for 5–8 minutes. It’ll come back to life like it was just made.
Common Questions (FAQ)
Why didn’t my pita puff?
Probably a pan that wasn’t hot enough or dough that was too thick or uneven. Still totally edible. Try rolling thinner and cranking the heat up next time.
Can I bake these instead of using a skillet?
Yes! Preheat a baking sheet or stone at 500°F, then bake the rolled dough for about 3 minutes. Flip halfway if you want a more even bake.
Can I make mini pitas?
Of course. Divide the dough into 12 or even 16 pieces instead of 8. Great for snacks, dips, or adorable mini wraps.
Do I really need to knead by hand?
Nope. A stand mixer with a dough hook does the trick. But kneading by hand gives you a better feel for the dough—and a mini arm workout.
Can I make them gluten-free?
Not with this exact method. Pita needs gluten to create those air pockets. If you’re avoiding gluten, look into flatbreads that don’t rely on a rise.
Wrap Up
You just made pita from scratch. That’s not nothing.
You took some flour, water, and a little bit of yeast and turned it into soft, warm, pockety goodness. You created something real. Something satisfying. Something you’re probably going to make again next week.
Even if your first batch didn’t puff quite right, or you accidentally rolled one into a triangle, or the smoke alarm went off for a hot second… who cares?
You made pita. And that’s pretty awesome.
Now I want to know how yours turned out. Did you add spices? Did they puff like little balloons? Did you burn your fingers because you couldn’t wait for them to cool? Leave a comment and let’s talk pita stories. Or questions. Or bragging. All welcome here.
You’ve got this.