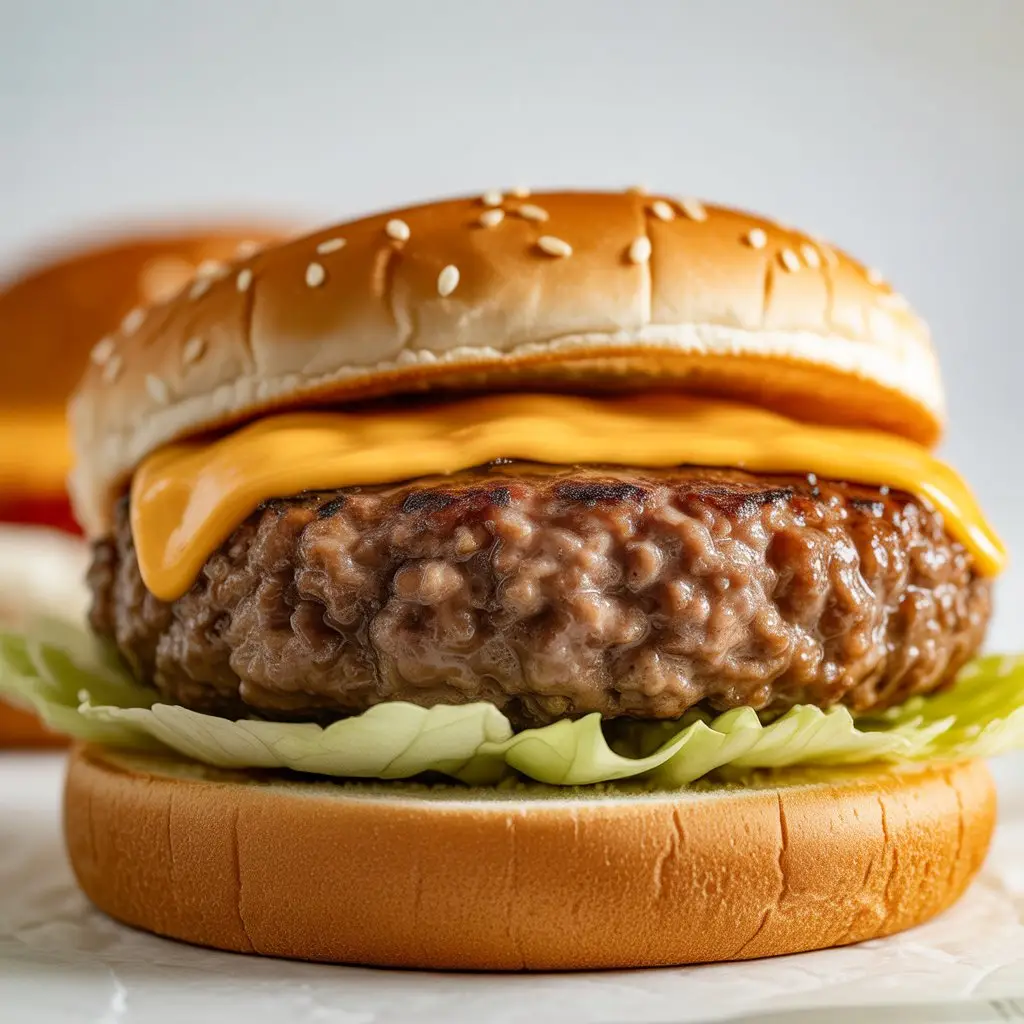
I have a confession. I’ve made some truly terrible burgers in my life. I’m talking about dry, dense, flavorless pucks of sadness that could double as doorstops.
It’s one of those things that seems SO simple, right? Ground meat, fire, bun. Done. But then you end up with a burger that crumbles into a million pieces on the grill, or one that’s weirdly dome-shaped and sends all your toppings sliding off.
Trust me, I’ve been there. It’s frustrating.
But after a lot of trial and error (and eating some very questionable burgers), I think I’ve finally cracked the code. This isn’t some fancy, complicated recipe with a million ingredients you can’t pronounce.
This is the real deal. A simple, straightforward way to make a JUICY, flavorful hamburger patty that actually stays together and tastes like a burger should.
So let’s stop making sad burgers and get this right. You can do this.
What You’ll Need
The beauty of this recipe is its simplicity. No weird fillers or binders unless you absolutely want them. This is all about letting the beef shine.
- 1 lb ground beef (80/20 is the sweet spot, I’ll tell you why later)
- 1 teaspoon salt
- 1/2 teaspoon black pepper
- 1/2 teaspoon garlic powder
- 1/2 teaspoon onion powder
- 1 tablespoon Worcestershire sauce
Tools Required
You don’t need any fancy gadgets. Keep it basic.
- A large mixing bowl
- Measuring spoons
- Your hands (the best mixing tools!)
- A grill or a heavy-bottomed skillet (cast iron is AMAZING for this)
- A spatula
How to Make The Perfect Hamburger Patty
Alright, here’s where the magic happens. Don’t blink, it’s that fast.
Step 1: Place your ground beef in the large mixing bowl. Break it up a little bit with your hands or a fork. Don’t get too aggressive with it yet.
Step 2: Sprinkle the salt, pepper, garlic powder, and onion powder over the meat. Pour the Worcestershire sauce over it all.
Step 3: Now, gently—and I mean GENTLY—use your hands to mix everything together. You want to combine the ingredients until they’re just mixed. If you overwork the meat, you’ll get tough burgers. We are not making meat-pucks today.
Step 4: Divide the mixture into four equal portions. I just eyeball it. Roll each portion into a gentle ball, then flatten it into a patty that’s about 3/4-inch thick. Make them slightly larger than your buns, because they WILL shrink.
Step 5: Here’s a game-changing trick. Press a small, shallow indent into the center of each patty with your thumb. This little dimple stops the burger from puffing up into a meatball shape while it cooks. It’s a weird-looking but crucial step.
Step 6: If you’re using a grill, get it to a nice medium-high heat. If you’re using a skillet, get it hot over medium-high heat, maybe with a tiny bit of oil. Cook the patties for about 3-5 minutes per side. The exact time depends on how you like your burger cooked.
Step 7: If you’re adding cheese, place a slice on top of the patties during the last minute of cooking and cover the grill or pan to let it get all melty and delicious.
Step 8: Remove the patties from the heat and let them rest for a couple of minutes before serving. This helps the juices redistribute, making for a SUPER juicy first bite. Don’t skip this!
Pro Tips
I’ve made a few mistakes so you don’t have to. Here are some things I’ve learned along the way.
- Fat is Your Friend. Seriously. You might be tempted to grab that super lean ground beef, but don’t. Fat equals flavor and juiciness. An 80/20 blend (80% lean meat, 20% fat) is the gold standard for a reason. It has enough fat to keep the burger moist without being a greasy mess.
- Keep Things Cold. This sounds strange, but try to work with cold meat and don’t let it sit out at room temperature for too long. When the fat in the meat warms up and melts before it even hits the grill, you lose a lot of that flavor. Some pros even chill their mixing bowls.
- Don’t Press the Patties! I know, I know. It’s SO tempting to take your spatula and press down on the burger while it’s cooking. You see it in movies! But DON’T DO IT. All you’re doing is squeezing out the precious, flavorful juices onto the flames. Just let it cook. Flip it once and leave it alone.
Possible Substitutions and Variations
Want to mix it up? I get it. Here are a few ideas to play around with.
| Ingredient | Substitution | Notes |
|---|---|---|
| Ground Beef | Ground Turkey or Chicken | These are leaner, so add a little olive oil to the mix to keep them moist. |
| Worcestershire Sauce | Soy Sauce or Teriyaki | Gives a different, but still delicious, umami flavor. |
| Onion Powder | Finely Grated Onion | Adds extra moisture and a stronger onion flavor. Just a tablespoon will do. |
| Black Pepper | A pinch of Cayenne Pepper | If you like a little kick, this is an easy way to add some heat. |
Make-Ahead Tips
Life gets busy, I totally understand. You can absolutely prep these ahead of time.
Just form the patties as instructed in the recipe. Place them on a plate or baking sheet, but separate each patty with a small square of wax paper or parchment paper.
This is key! If you just stack them, they’ll merge into one giant super-patty. Cover them tightly with plastic wrap and you can keep them in the fridge for up to 24 hours before cooking.
Nutritional Info & Diet Swaps
Here’s a rough idea of what you’re looking at, plus some ideas for different dietary needs.
Quick Nutrition Glance (per patty, estimate):
| Nutrient | Approx. Amount |
|---|---|
| Calories | 280-320 |
| Protein | 20g |
| Fat | 22g |
Note: This is just an estimate and can vary based on the exact fat content of your beef.
Dietary Adjustments:
- For Keto/Low-Carb: The patty itself is perfect. Just ditch the bun and serve it in a lettuce wrap or on top of a salad.
- For Gluten-Free: The recipe is naturally gluten-free, but double-check your brand of Worcestershire sauce. Some brands contain gluten. And, of course, use a gluten-free bun.
Leftovers and Storage
If by some miracle you have leftover burgers, don’t let them go to waste.
Let them cool down completely, then store them in an airtight container in the fridge for up to 3 days.
To reheat, I’d avoid the microwave if you can, as it can make them rubbery. A few minutes in a hot skillet or in the oven is your best bet to bring them back to life.
Frequently Asked Questions (FAQ)
Q1. Why did my burgers shrink so much and get super thick?
Ans: This is usually one of two things. First, the higher the fat content, the more it will render down and shrink. That’s normal! Second, if you didn’t do the “thumbprint trick,” the edges cook faster than the center, forcing the center to puff up and out. That little dimple is your best friend.
Q2. Can I use frozen ground beef?
Ans: Absolutely! Just make sure it’s fully thawed before you start mixing. The best way is to let it thaw overnight in the fridge. Trying to mix half-frozen meat is a nightmare and you’ll end up overworking it.
Q3. My burgers fell apart on the grill! What happened?
Ans: Oh, the dreaded crumble. This usually happens if the meat is too lean (not enough fat to bind it), if you didn’t get your grill hot enough before putting the patties on, or if you tried to flip them too soon before they formed a good crust. Be patient!
Q4. How do I know when the burger is done without cutting into it?
Ans: The best way, honestly, is an instant-read meat thermometer. It takes out all the guesswork. For medium, you’re looking for around 145°F. But if you don’t have one, you can gently press on the center. A rare burger will feel soft, while a well-done one will feel very firm.
Wrapping Up
So there you have it. It’s not about a secret ingredient or a complicated technique. It’s about a few simple rules: use fatty meat, don’t overmix, and don’t press the juices out.
Give this a try for your next cookout or even just a quick weeknight dinner. You’ll be amazed at the difference it makes.
Now I want to know, what are your must-have burger toppings? Cheese and bacon? Or do you get creative with it? Let me know in the comments below!