My Quest for the Perfect Chocolate Chip Cookie (And Why It’s Over)
I’ve been on a mission for most of my adult life. A quest, really. To find the one, true chocolate chip cookie recipe.
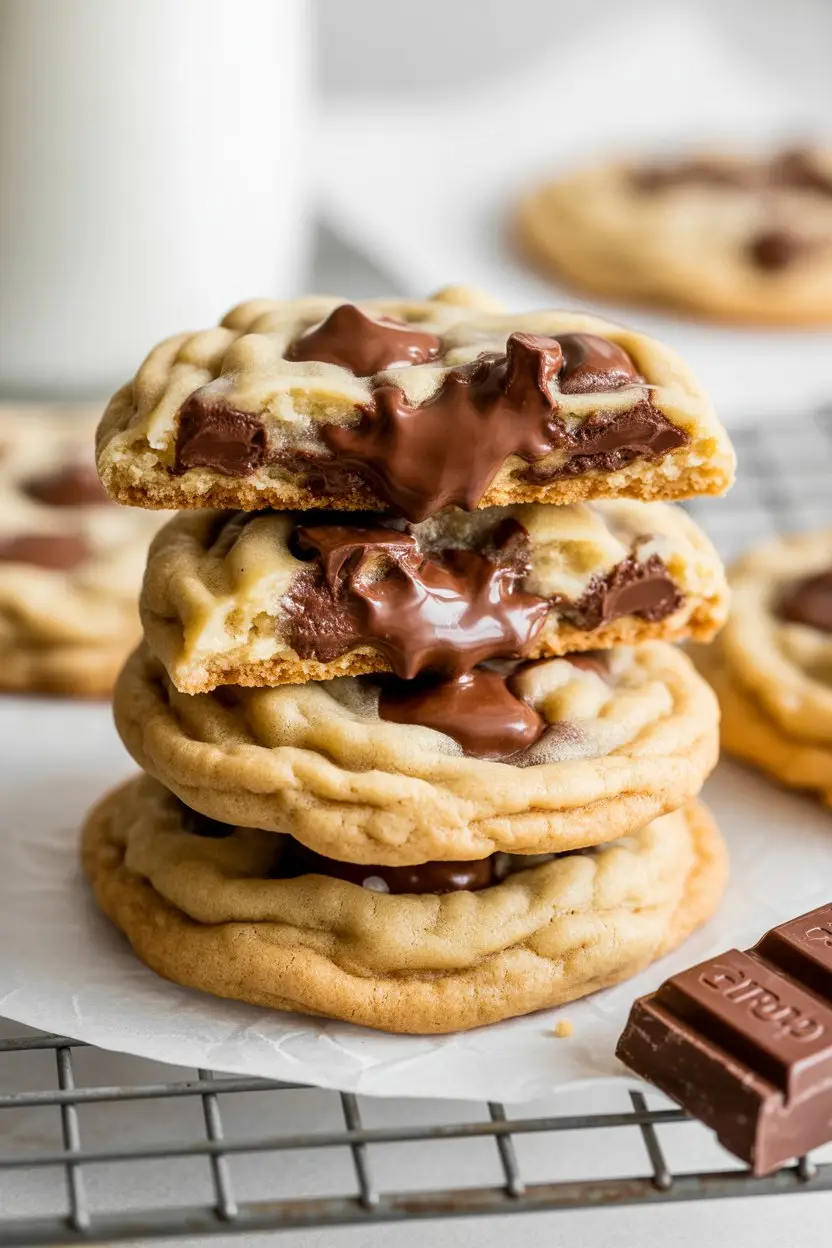
You know the one I’m talking about. Crispy, golden-brown edges that give way to a soft, gooey, melt-in-your-mouth center. A cookie that’s packed with so much chocolate it feels a little bit illegal.
For years, my kitchen has been a battlefield of failed attempts. I’ve made cookies that spread into giant, thin, greasy pancakes. I’ve made cookies that were more like hard, sugary rocks. It was a dark time.
But then, one day, the stars aligned. The butter was the right temperature, the flour was measured just so, and magic happened.
This is that recipe. It’s the one that ended my search. And I’m sharing it with you because nobody should have to suffer through bad cookie-pancakes. Nobody.
So, let’s get you set up to make a batch of cookies that will make you ridiculously happy.
What You’ll Need
Here’s the simple list of ingredients that come together to create something truly special. No weird, hard-to-find stuff, I promise.
- 1 cup (226g) unsalted butter, softened to room temperature
- 3/4 cup (150g) granulated sugar
- 1 cup (220g) packed brown sugar (light or dark works)
- 2 large eggs, at room temperature
- 2 teaspoons pure vanilla extract
- 2 1/2 cups (300g) all-purpose flour
- 1 teaspoon baking soda
- 1/2 teaspoon baking powder
- 1 teaspoon salt
- 2 cups (350g) semi-sweet chocolate chips or chunks
Pro Tips
I’ve made every mistake so you don’t have to. Pay attention to these few things, and you’ll be on the fast track to cookie perfection.
1. Room Temperature is NOT a Suggestion. Seriously. If your butter is too cold, it won’t cream properly with the sugar. If it’s too melty, your cookies will spread like crazy. Let your butter and eggs sit on the counter for about an hour before you start. It makes a HUGE difference.
2. CHILL. YOUR. DOUGH. I know, I know. You want cookies NOW. But chilling the dough for at least 30 minutes (or up to 24 hours) is the secret weapon. It prevents the cookies from spreading too much and actually makes them taste better as the flavors meld together.
3. Don’t Overmix the Flour. Once you add the dry ingredients, mix only until you can’t see any more white streaks of flour. Overmixing develops the gluten in the flour, which leads to tough, dense cookies instead of soft, chewy ones.
4. Use Chopped Chocolate. Bagged chocolate chips are fine, but they’re designed to hold their shape. If you buy a good quality chocolate bar and chop it up yourself, you’ll get those amazing puddles of melted chocolate and tiny shards running through the dough. Game changer.
Tools Required
You don’t need a bunch of fancy gadgets. Here’s the basic gear:
- Mixing bowls (one large, one medium)
- Electric mixer (stand or hand mixer) or a whisk and some arm strength
- Spatula
- Measuring cups and spoons
- Baking sheets
- Parchment paper (highly recommended for easy cleanup)
- Wire rack for cooling
Substitutions and Variations
Want to mix things up? I get it. Here are a few swaps and additions that work well.
All-Purpose Flour: Can substitute with 1-to-1 Gluten-Free Blend. Check your blend; some may need extra liquid.
Brown Sugar: Can use all granulated sugar instead. Cookies will be crispier and paler.
Semi-Sweet Chocolate: Use dark, milk, or white chocolate. Use whatever makes you happy!
Add-ins: Try chopped nuts or toffee bits. Add about 1 cup along with the chocolate.
Make Ahead Tips
Sometimes you need to plan ahead, or you just don’t want to bake all the cookies at once.
You can make the dough and store it in an airtight container in the fridge for up to 3 days. The flavor actually gets better with time!
For longer storage, scoop the dough into balls, place them on a baking sheet, and freeze until solid. Then, transfer the frozen dough balls to a zip-top bag. You can bake them straight from the freezer; just add an extra 2-3 minutes to the baking time.
Instructions
Alright, let’s do this. Follow these steps and prepare for greatness.
Step 1: In a medium bowl, whisk together the flour, baking soda, baking powder, and salt. Set it aside. This is your dry mix.
Step 2: In a separate, larger bowl, use your electric mixer to beat the softened butter and both sugars together on medium speed. Keep going for about 2-3 minutes until it’s light, fluffy, and pale in color.
Step 3: Add the eggs one at a time, beating well after each one. Then, mix in the vanilla extract. Scrape down the sides of the bowl with a spatula to make sure everything is combined.
Step 4: Turn the mixer to low and slowly add the dry ingredients to the wet ingredients. Mix only until just combined. Remember what I said about not overmixing!
Step 5: Gently fold in your chocolate chips or chopped chocolate with a spatula.
Step 6: Cover the bowl and chill the dough in the refrigerator for at least 30 minutes. This is the hard part, but it’s worth the wait.
Step 7: While the dough chills, preheat your oven to 375°F (190°C). Line your baking sheets with parchment paper.
Step 8: Scoop rounded tablespoons of dough onto the prepared baking sheets, leaving about 2 inches between each cookie.
Step 9: Bake for 10-12 minutes, or until the edges are golden brown but the centers still look a tiny bit soft. They will continue to bake on the hot pan after you take them out.
Step 10: Let the cookies cool on the baking sheet for 5 minutes before transferring them to a wire rack to cool completely. Or, you know, eat one while it’s still warm and gooey. I won’t tell.
A Little More on the Cookies
It’s nice to know what you’re eating, even when it’s a treat. Here’s a little extra info.
Nutritional Breakdown (An Estimate!)
This is a rough guide per cookie, but it can change based on your specific ingredients and cookie size.
- Calories: 220 kcal (approx.)
- Fat: 12g
- Carbohydrates: 27g
- Sugar: 16g
- Protein: 3g
Diet Swaps: For a vegan version, you can try using a high-quality vegan butter substitute and a flax egg (1 tablespoon ground flaxseed mixed with 3 tablespoons water) for each egg. The texture will be a bit different, but still delicious.
Meal Pairing: Is a cookie a meal? Sometimes. But these are amazing with a cold glass of milk, a hot cup of coffee, or plopped right on top of a scoop of vanilla ice cream.
Time-Saving Tip: Get all your ingredients measured and ready before you start mixing. The pros call it “mise en place.” I call it “not panicking and searching for the vanilla extract while my butter melts.”
Leftovers and Storage
If you somehow have leftovers, here’s how to keep them fresh.
Store the cooled cookies in an airtight container at room temperature. They should stay soft and delicious for up to 4 days.
My favorite trick: To make a day-old cookie taste fresh-from-the-oven, pop it in the microwave for about 10 seconds. It gets warm and gooey all over again.
Frequently Asked Questions
Q1. Why did my cookies spread out so much and get flat? This is the most common problem! It’s usually one of two things: your butter was too soft (melted), or you didn’t chill the dough. Chilling solidifies the fat, which means the cookies melt slower in the oven and hold their shape better.
Q2. My cookies came out hard and crunchy, not soft. What did I do wrong? This is likely from overbaking or overmixing. Pull them from the oven when the centers still look a little underdone. For the mixing part, be gentle once the flour goes in. You’re making cookies, not bread!
Q3. Can I use salted butter instead of unsalted? Yes, you can. If you do, just reduce the added salt in the recipe from 1 teaspoon to 1/2 teaspoon.
Q4. How do I get my cookies to be perfectly round and uniform? A cookie scoop is your best friend for this. It portions the dough perfectly every time, which helps them bake evenly and look like they came from a fancy bakery.
Wrapping Up
There you have it. The end of the road for my cookie quest, and hopefully the start of a new, delicious chapter for your kitchen.
Making these cookies is about more than just following a recipe. It’s about that feeling you get when you pull a perfect tray from the oven, the smell that fills your entire house, and the look on someone’s face when they take that first bite.
So go on, give it a shot. I promise you won’t regret it.
And when you’re done, come back and leave a comment. Tell me how they turned out, if you added anything wild, or if you have any questions. I’d love to hear all about it.