Some recipes feel like a little bit of kitchen magic, you know? This is one of them.
You mix up a simple cake batter, put it in a pan, and then you do something that feels completely wrong. You sprinkle a dry mix of sugar and cocoa on top.
Then, you pour hot water over the whole thing. It looks like a soupy, muddy mess. You’ll think, “There is no way this is going to work.” I promise, I thought the same thing.
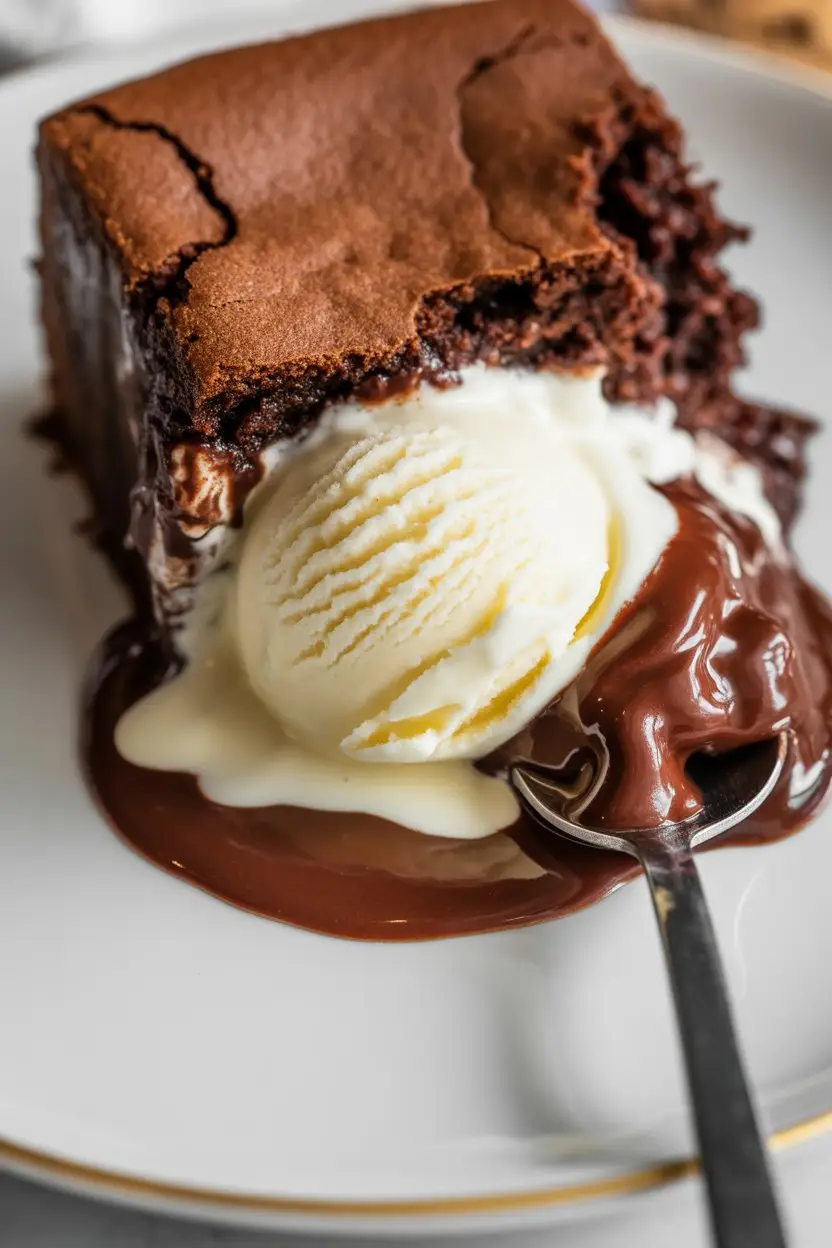
But you slide it into the oven, and while it bakes, something amazing happens. The cake rises to the top, and that soupy mess transforms into a rich, warm, gooey hot fudge sauce at the bottom.
It’s a cake with its own built-in fudge. When you need a dessert that feels like a warm hug, this is the one.
What You’ll Need
Here’s the simple stuff you’ll need to pull this off. Nothing too crazy, I promise.
For the Cake Batter:
- 1 cup all-purpose flour
- 2 teaspoons baking powder
- 1/4 teaspoon salt
- 3/4 cup granulated sugar
- 1/4 cup unsweetened cocoa powder
- 1/2 cup milk (any kind works)
- 1/3 cup melted unsalted butter
- 1 teaspoon vanilla extract
For the Fudge Topping:
- 1 cup packed brown sugar
- 1/4 cup unsweetened cocoa powder
- 1 3/4 cups boiling water
Pro Tips
I’ve made this cake more times than I can count, and I’ve messed it up a few times too. Here are a few things I learned so you don’t have to.
1. Don’t Overmix the Batter. Seriously. Once the flour is just barely mixed in, stop. If you keep going, you’ll develop the gluten too much and end up with a tough, chewy cake instead of a soft, tender one.
2. Use BOILING Water. Not just hot tap water. The intense heat is what helps the topping’s cocoa powder bloom and creates that magical separation between the cake and the sauce. It’s a key part of the trick!
3. Let It Rest. I know, it’s torture. The smell is going to fill your kitchen, and you’ll want to dive in with a spoon the second it comes out of the oven. Give it 10-15 minutes on the counter first. This lets the fudge sauce thicken up perfectly.
4. Serve it Warm. This cake is at its absolute best when it’s warm, with the gooey sauce pooling around it. A scoop of vanilla ice cream on top is basically a requirement.
Tools Required
You don’t need any fancy gadgets for this one.
- An 8×8 inch or 9×9 inch square baking pan
- A couple of mixing bowls (one medium, one small)
- A whisk or a spatula
- Measuring cups and spoons
Possible Substitutions and Variations
Don’t have something on the list? No problem. This recipe is pretty forgiving.
| Ingredient | Substitution | Notes |
|---|---|---|
| All-Purpose Flour | 1-to-1 Gluten-Free Flour | Make sure it has xanthan gum. |
| Milk | Oat, Almond, or Soy Milk | Unsweetened works best. |
| Unsalted Butter | Melted Coconut Oil | Will add a slight coconut flavor. |
| Granulated Sugar | Coconut Sugar | Can make the cake denser. |
You can also add a pinch of cinnamon or espresso powder to the cocoa powder to give it a little extra depth. Or throw some chocolate chips into the batter if you’re feeling wild.
Make-Ahead Tips
This dessert is really best made fresh, right before you serve it. The magic is in that warm, gooey sauce.
However, you can totally prep the dry ingredients ahead of time.
Mix the flour, baking powder, salt, sugar, and cocoa for the cake batter and store it in an airtight container. Do the same for the brown sugar and cocoa topping in a separate container.
When you’re ready to bake, all you’ll have to do is add the wet ingredients, assemble, and bake. It cuts the prep time down to just a few minutes.
How to Make Hot Fudge Pudding Cake: Step by Step
Alright, let’s get to the fun part.
Step 1: Preheat your oven to 350°F (175°C). Don’t grease your baking pan. It sounds weird, but it helps the cake climb the sides.
Step 2: In a medium bowl, whisk together the flour, baking powder, salt, granulated sugar, and 1/4 cup of cocoa powder.
Step 3: In a smaller bowl, mix together the milk, melted butter, and vanilla extract.
Step 4: Pour the wet ingredients into the dry ingredients and stir with a spatula just until everything is combined. Remember what I said about not overmixing!
Step 5: Spread the batter evenly into your ungreased 8×8 or 9×9 inch pan. It will be a pretty thick batter.
Step 6: Now for the topping. In that small bowl (no need to wash it), mix the packed brown sugar and the other 1/4 cup of cocoa powder. Sprinkle this mixture evenly all over the top of the batter.
Step 7: Here comes the weird part. Carefully and slowly pour the 1 3/4 cups of BOILING water over the entire surface. DO NOT STIR IT. Just pour and go. It will look like a disaster. Trust the process.
Step 8: Very carefully place the pan in the preheated oven. Bake for 35 to 40 minutes. The top should look cooked, maybe a little cracked, and the edges will be pulling away from the pan.
Step 9: Take it out and let it cool on a wire rack for at least 10-15 minutes before serving. This is crucial for the sauce to set up.
When you scoop it out, dig all the way to the bottom to get that amazing fudge sauce with every bite.
Nutritional Info and Diet Swaps
This is a dessert, so it’s meant to be an indulgence. But it’s good to have a general idea of what you’re enjoying.
| Nutrient | Estimated Amount (per serving) |
|---|---|
| Calories | ~410 |
| Fat | ~15g |
| Carbohydrates | ~70g |
| Sugar | ~50g |
| Protein | ~5g |
*Disclaimer: These are just estimates. The actual numbers can vary based on the specific ingredients you use.*
For a Vegan Version:
Use a plant-based milk (like almond or oat), and swap the butter for melted coconut oil or a good vegan butter substitute. The recipe works beautifully this way.
For a Gluten-Free Version:
Use a high-quality 1-to-1 gluten-free baking flour blend. The texture will be slightly different, a bit more delicate, but still delicious.
Meal Pairings and Efficiency
This cake is the star of the show, so you don’t need much with it.
A scoop of vanilla bean ice cream is the classic pairing. The cold cream with the warm, fudgy cake is just unbeatable. A dollop of whipped cream or even just a splash of heavy cream works too.
For efficiency, get your water boiling in a kettle while you mix the batter. That way, it’s ready to go right when you need it.
Leftovers and Storage
If you somehow have leftovers, you can store them right in the baking pan.
Just cover it tightly with plastic wrap or foil and keep it in the refrigerator for up to 3 days.
To reheat, you can pop an individual serving in the microwave for 20-30 seconds. It brings back that warm, gooey texture almost perfectly.
Frequently Asked Questions
Q1. My sauce ended up on top of the cake. What did I do wrong?
Ans: This usually happens for one of two reasons. Either the water wasn’t boiling hot, or you might have stirred it after pouring the water on top. You have to pour the boiling water gently over the back of a spoon and resist the urge to mix it in!
Q2. Can I use a different size pan? Like a 9×13 inch?
Ans: You can, but you’ll need to double the entire recipe. A single recipe in a 9×13 pan will be too thin and will likely dry out. If you double it for a 9×13, start checking for doneness around the 40-minute mark.
Q3. Is the top of the cake supposed to look cracked and dry?
Ans: Yes, absolutely! A crackly, brownie-like top is the sign of a perfect hot fudge pudding cake. It means the cake set up properly, and all that liquid gold fudge sauce is waiting for you at the bottom.
Q4. Can I use Dutch-processed cocoa powder?
Ans: You can, but it will change the flavor and reaction a bit. Natural cocoa powder is slightly acidic and reacts with the baking powder. Dutch-processed is neutral. It will still work, but the cake might not be quite as tender and the fudge sauce might be a little darker and less tangy.
Wrapping Up
There you have it. A dessert that feels a little bit like a science experiment and tastes like pure comfort.
It’s one of the easiest and most impressive-looking desserts you can make from scratch. It’s perfect for a chilly evening, a last-minute get-together, or just one of those days when you need a little magic.
So give it a try. I’d love to hear how it turns out for you. Let me know in the comments if you have any questions or if you tried any fun variations!