You know those days when you desperately need a vacation, but life just isn’t cooperating? Your calendar is packed, and your wallet is hiding. I feel that on a deep level.
That’s usually when I head to the kitchen. For me, a mini-vacation can be as simple as a flavor that transports you somewhere sunny and warm, with your feet in the sand.
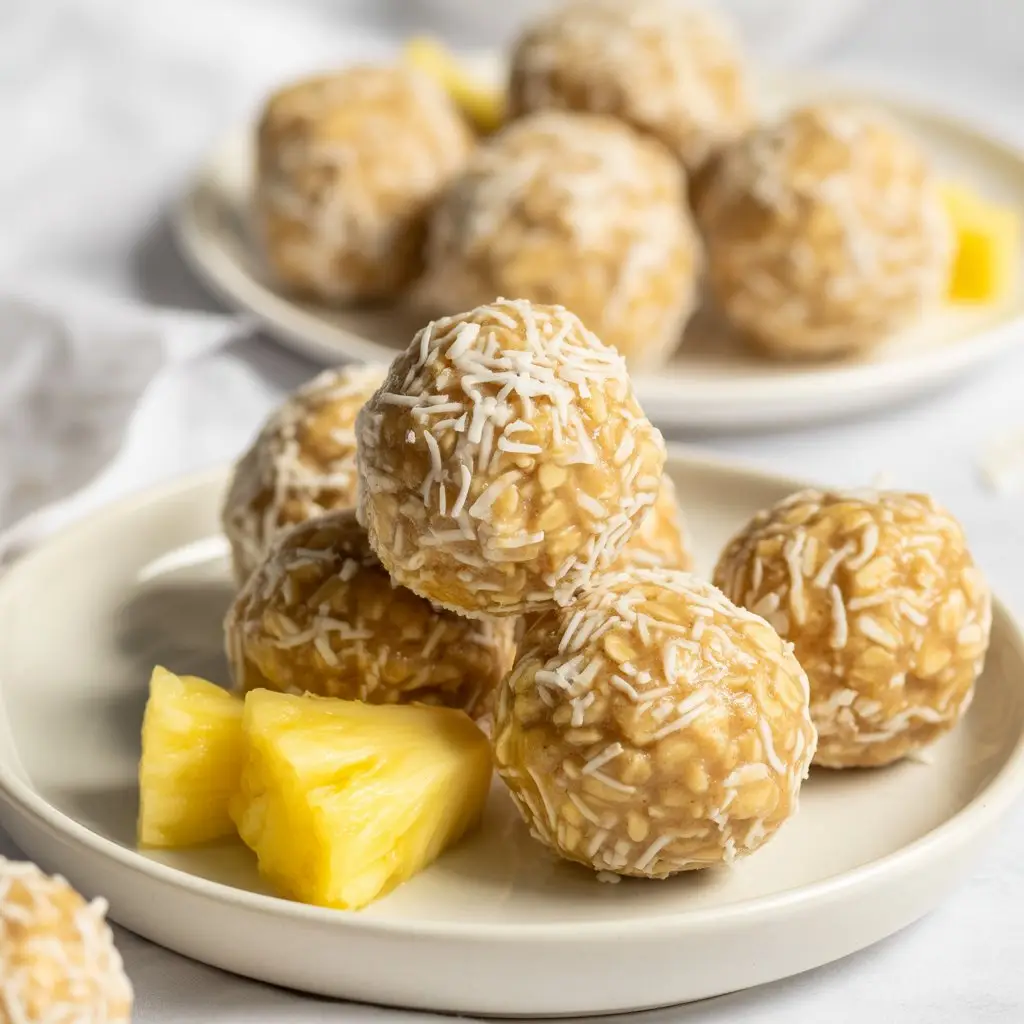
These Pineapple Coconut No-Bake Balls are exactly that. They are my “I can’t afford a trip to Hawaii right now” treat. They’re sweet, they’re tropical, and the best part is you don’t even have to turn on your oven. Seriously.
It’s a super simple recipe that tastes like you put in a ton of effort. So let’s make a little bite of paradise. It’s easier than you think.
What You’ll Need
Here’s the simple list of ingredients to grab. Nothing too wild or hard to find, I promise.
- 1 cup rolled oats (the old-fashioned kind, not instant)
- 1 cup shredded coconut, unsweetened (plus more for rolling)
- 1/2 cup vanilla protein powder
- 1/4 cup almond flour
- 1/4 cup crushed pineapple, drained really well
- 1/4 cup coconut oil, melted
- 2 tablespoons maple syrup or honey
- 1 teaspoon vanilla extract
- A tiny pinch of salt
Tools Required For The Job
You don’t need any fancy chef equipment for this one. Just the basics.
- A large mixing bowl
- A food processor (optional, but helpful for a finer texture)
- Measuring cups and spoons
- A spatula or wooden spoon
- A baking sheet lined with parchment paper
- Your hands!
How to Make Pineapple Coconut No-Bake Balls
Alright, let’s get down to it. This process is so quick you’ll be done before your favorite show’s intro is over.
Step 1: Get Your Oats Ready
If you have a food processor, pulse the rolled oats a few times until they have a coarse, flour-like consistency. If you don’t have one, no worries! The balls will just have a chewier, heartier texture, which is also amazing.
Step 2: Mix The Dry Stuff
In a large bowl, combine your processed oats, 1 cup of shredded coconut, vanilla protein powder, almond flour, and that tiny pinch of salt. Give it all a good stir to make sure everyone is acquainted.
Step 3: Add The Wet Stuff
Now, add the drained crushed pineapple, melted coconut oil, maple syrup (or honey), and vanilla extract to the bowl. This is where the magic starts to happen.
Step 4: Get Mixing
Use your spatula to mix everything together until a thick, sticky dough forms. It might seem a little crumbly at first, but just keep mixing. The ingredients will come together. If it feels too dry, add a tiny bit more melted coconut oil. If it’s too wet, a little more almond flour should do the trick.
Step 5: Chill Out
Cover the bowl and pop it in the refrigerator for about 15-20 minutes. This step is super important! It helps the coconut oil solidify a bit, making the dough much easier to handle and roll.
Step 6: Roll ‘Em Up
Once the dough is chilled, take it out of the fridge. Scoop out about a tablespoon of the mixture at a time and roll it between your palms to form a small ball. Place the finished balls on your parchment-lined baking sheet.
Step 7: The Final Touch
Pour some extra shredded coconut onto a plate. Roll each ball in the coconut until it’s fully coated. This not only looks pretty but adds an extra layer of coconutty goodness.
Step 8: Set and Serve
Place the finished balls back in the fridge for another 30 minutes to let them set completely. After that, they’re ready to eat!
Pro Tips From My Kitchen
I’ve made these a bunch of times, and I’ve learned a few things along the way. Here are some tips to make sure yours turn out perfectly.
- Drain That Pineapple Well: I can’t stress this enough. Press the crushed pineapple against a fine-mesh sieve to get as much juice out as possible. Too much liquid will make your dough soggy and impossible to roll.
- Toast Your Coconut: For a deeper, nuttier flavor, spread your shredded coconut on a baking sheet and toast it in the oven at 350°F (175°C) for just a few minutes until it’s golden brown. Let it cool completely before using it. It’s a game-changer.
- Use a Cookie Scoop: If you want all your energy balls to be the same size (I get it, I’m a perfectionist sometimes), use a small cookie scoop. It makes the process faster and ensures they are all uniform.
- Don’t Skip the Chill Time: I know it’s tempting to just start rolling right away, but chilling the dough is the secret to non-sticky, perfectly formed balls. Trust the process!
Possible Substitutions and Variations
One of the best things about this recipe is how forgiving it is. You can swap things out based on what you have or your dietary needs. Here are a few ideas.
| Ingredient | Substitution Idea | Notes |
|---|---|---|
| Vanilla Protein Powder | Collagen peptides or more almond flour | Adjust liquid if needed. |
| Almond Flour | Oat flour or finely chopped cashews | Cashews will add more flavor. |
| Maple Syrup | Honey, agave nectar, or date paste | Taste may vary slightly. |
| Coconut Oil | Melted butter or a nut butter | Nut butter adds protein. |
Fun Flavor Variations
- Piña Colada Twist: Add a 1/2 teaspoon of rum extract for that classic cocktail flavor.
- Extra Zesty: Mix in the zest of one lime for a bright, citrusy kick that cuts through the sweetness.
- Go Nutty: Add 1/4 cup of finely chopped macadamia nuts or almonds for some extra crunch.
Nutritional Info and Healthy Swaps
While I’m not a nutritionist, here’s a rough idea of what you’re getting. It’s a treat that actually has some good stuff in it, like fiber and protein.
This is just an estimate per ball, and it can change based on your specific ingredients.
| Nutrient | Estimated Amount |
|---|---|
| Calories | ~90-110 kcal |
| Protein | ~4g |
| Fat | ~6g |
| Carbohydrates | ~7g |
Meal Pairing & Serving Ideas
These little guys are pretty versatile. They’re not just a dessert.
- Afternoon Pick-Me-Up: Grab one or two with a cup of green tea when that 3 PM slump hits.
- Post-Workout Snack: The protein makes them a great, quick refuel after the gym.
- Light Dessert: Serve them after a light, summery meal like grilled chicken salad or fish tacos.
Make-Ahead and Storage Tips
These are perfect for making ahead of time. In fact, I think they taste even better the next day when the flavors have had a chance to meld together.
Just store them in an airtight container in the refrigerator. They’ll stay fresh and delicious for up to a week.
You can also freeze them! Place them on a baking sheet in a single layer and freeze until solid. Then, transfer them to a freezer-safe bag or container. They’ll last for up to 3 months. Just let them thaw for a few minutes before eating.
Frequently Asked Questions (FAQ)
Here are some questions that might pop into your head. I’ve got you covered.
Q1. Can I use fresh pineapple instead of crushed?
Ans: Yes, you can! Just make sure you dice it very finely. You’ll still need to drain it well to remove excess juice. You can pulse it a few times in the food processor to get a “crushed” texture.
Q2. My mixture is too sticky to roll. What did I do wrong?
Ans: Nothing! It probably just needs a little more time in the fridge. Pop it back in for another 15 minutes. If it’s still too sticky, your pineapple might have been a bit too wet. Try adding a tablespoon of almond flour or protein powder to help absorb some of the moisture.
Q3. Are these gluten-free?
Ans: They can be! Just make sure you use certified gluten-free rolled oats. Oats are often processed in facilities with wheat, so cross-contamination can be an issue if you have Celiac disease or a serious intolerance.
Q4. My mixture seems too dry and crumbly. How can I fix it?
Ans: This is an easy fix. The mix is likely just thirsty. Add a teaspoon of melted coconut oil or maple syrup at a time and mix until it comes together. Don’t add too much at once, or you’ll end up with the sticky problem!
Wrapping Up
So there you have it. A simple, no-fuss recipe for a little taste of the tropics, right in your own kitchen. It’s proof that you don’t need a complicated recipe or a ton of time to make something seriously delicious.
It’s all about finding those small moments of joy, and for me, these little pineapple coconut balls are one of them.
I really hope you give them a try. If you do, I’d love to hear about it! Drop a comment below and let me know how they turned out, or if you tried any fun variations. Your ideas might just inspire my next batch!