I saw one of these in a fancy bakery case once and immediately thought, “Nope. Not a chance. That’s for professionals.”
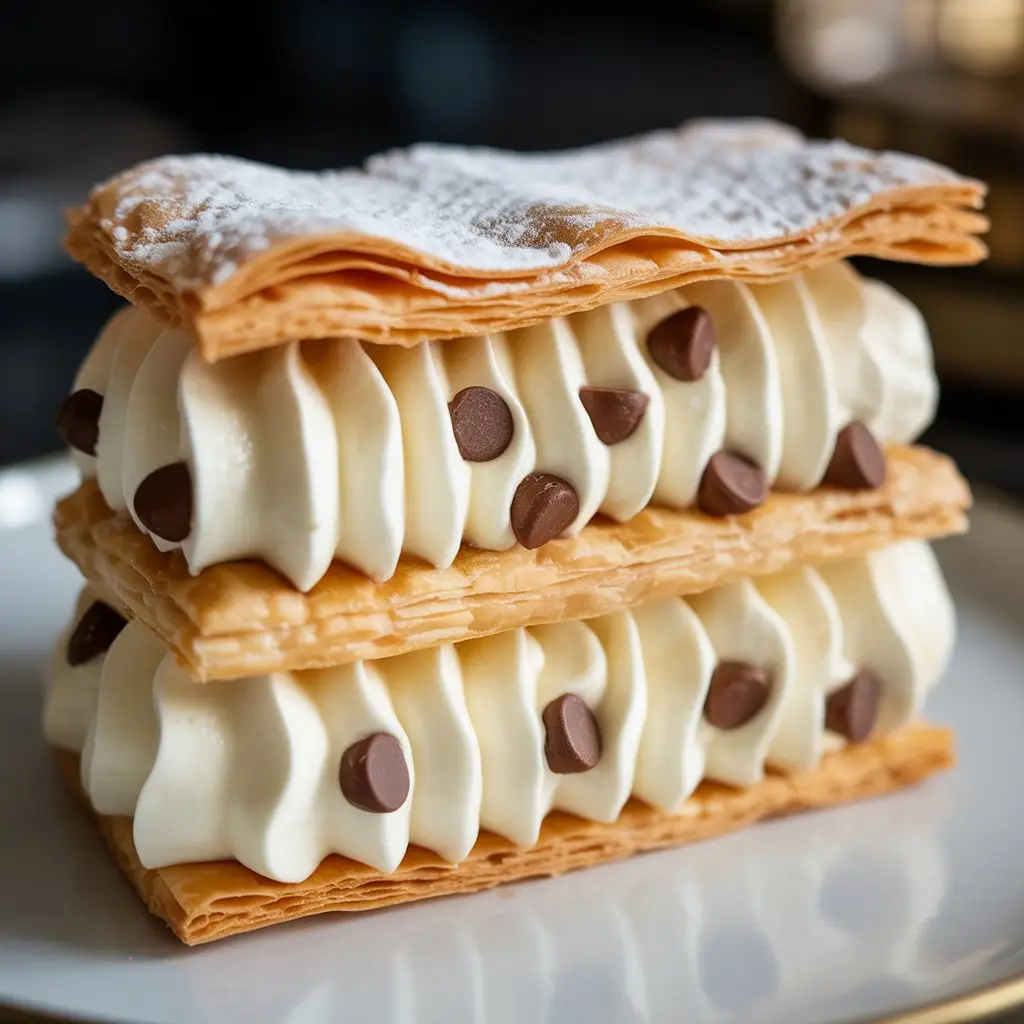
It just looked so… perfect. Layers of flaky pastry, creamy filling, a dusting of sugar. It felt like something you needed a special degree to even attempt.
Well, I’m here to tell you that’s a bunch of nonsense. We are going to make that fancy-looking thing, and we are going to do it with stuff you can get at a regular grocery store.
This recipe is my little secret weapon. It’s for when you want to seriously impress someone (or just yourself) without spending eight hours in the kitchen getting frustrated.
Because what feels better than putting a dessert on the table that makes everyone’s jaw drop, and you know it was actually pretty simple? It’s a total power move.
So let’s get into it. Let’s make something awesome.
What You’ll Need
Here’s the rundown of everything for this masterpiece. Don’t let the list scare you; it’s mostly simple stuff.
For the Puff Pastry:
- 1 sheet of frozen puff pastry, thawed (about 9-10 ounces). This is our HERO. It does all the hard work for us.
- 1 large egg, beaten with 1 tablespoon of water (this is our egg wash for that golden-brown shine).
- 2 tablespoons of granulated sugar, for sprinkling.
For the Cannoli Filling:
- 15 ounces whole milk ricotta cheese. It HAS to be whole milk. The low-fat stuff is too watery and will make a sad, runny filling.
- 8 ounces mascarpone cheese, softened. This makes it extra rich and smooth. It’s like the ricotta’s cooler, richer cousin.
- 3/4 cup powdered sugar, plus more for dusting.
- 1 teaspoon vanilla extract.
- 1/2 teaspoon ground cinnamon.
- 1/4 teaspoon orange zest (optional, but it adds a little something special).
- 1/2 cup mini semi-sweet chocolate chips.
Pro Tips
I’ve made my share of mistakes so you don’t have to. Here are a few things that will make this whole process go WAY smoother.
1. DRAIN YOUR RICOTTA.
I’m putting this in all caps because it’s that important. Ricotta holds a lot of water. If you don’t get it out, your filling will be a soupy mess. Line a strainer with a cheesecloth or a couple of coffee filters, dump the ricotta in, and let it drain in the fridge for at least a few hours, or even overnight. You’ll be shocked at how much liquid comes out.
2. Don’t Overwork the Pastry.
Puff pastry is delicate. You want to handle it as little as possible while it’s thawed. Unfold it, cut it, and get it on the baking sheet. If it gets too warm and sticky, pop it back in the fridge for 10-15 minutes to chill out. A cold pastry is a happy, puffy pastry.
3. The “Docking” Trick is Your Friend.
Docking just means poking holes in the pastry with a fork before you bake it. This stops it from puffing up like a giant balloon in the middle. You want it to rise in even, flat layers, not a giant dome. So, poke it all over, but leave a small border around the edges untouched.
4. Assemble Just Before Serving.
This is a big one. The magic of a Napoleon is the contrast between the crispy pastry and the creamy filling. If you assemble it hours ahead of time, the pastry will absorb moisture from the filling and get soft. It’ll still taste good, but you’ll lose that amazing crunch. Bake the pastry and make the filling ahead, but put it all together right before you serve.
Tools Required for the Job
You don’t need a bunch of high-tech gadgets. Just some basic kitchen stuff.
| Tool | What It’s For |
|---|---|
| Baking Sheet | For baking the pastry, obviously. |
| Parchment Paper | Stops everything from sticking. A lifesaver. |
| Pizza Cutter or Sharp Knife | For clean, easy cuts on the pastry. |
| Electric Mixer | To get that filling perfectly smooth and creamy. |
| Piping Bag with a Star Tip | Makes you look like a pro when adding the filling. |
| Fine-Mesh Sieve | For that perfect, snow-like dusting of powdered sugar. |
Possible Substitutions and Variations
Don’t have something? Want to mix it up? I got you.
- No Mascarpone? You can use 4 ounces of full-fat cream cheese instead. It will have a slightly tangier taste, but it’s still delicious. Make sure it’s very soft before you beat it.
- Flavor Twists: Instead of vanilla, try 1/2 teaspoon of almond extract. Or skip the cinnamon and orange zest and add a tablespoon of instant espresso powder for a coffee-flavored kick.
- Topping Ideas: Instead of just mini chocolate chips, you could fold in chopped pistachios or finely chopped candied fruit. A drizzle of melted chocolate or caramel on top would be amazing too.
- For a Gluten-Free Version: You can find gluten-free puff pastry in the freezer section of many stores. Just follow the package directions for baking, as they can sometimes vary.
Make-Ahead Tips
You can totally break this up to make life easier.
The puff pastry can be baked up to a day in advance. Once it’s completely cool, store it in an airtight container at room temperature. Don’t put it in the fridge, or it might get soggy.
The cannoli filling can be made up to 2 days ahead. Keep it in an airtight container in the fridge. Just give it a quick stir before you’re ready to pipe it.
How to Make This Awesome Dessert: Step by Step
Step 1: Prep Your Oven and Pastry
First things first, get your oven preheating to 400°F (200°C). Line a large baking sheet with parchment paper.
Step 2: Cut the Pastry
Gently unfold your thawed puff pastry sheet on a lightly floured surface. Using a pizza cutter or a sharp knife, cut it into three equal rectangles. They don’t have to be perfect, just close enough.
Step 3: Dock and Bake
Place the three pastry rectangles on your prepared baking sheet. Take a fork and poke holes all over the surface of each piece. This is the docking part we talked about. Brush the tops with your egg wash and sprinkle generously with the granulated sugar.
Step 4: The Secret to Flat Pastry
Here’s a little trick. Place another sheet of parchment paper on top of the pastries, and then place another baking sheet on top of that. This weight helps them rise evenly and not get too puffy. Bake for 15-20 minutes, then remove the top baking sheet and parchment. Bake for another 5-10 minutes, until they are deep golden brown and crispy.
Step 5: Cool it Down
Let the pastry rectangles cool on the baking sheet for a few minutes before moving them to a wire rack to cool completely. This is SUPER important. Don’t even think about putting warm pastry and cold filling together.
Step 6: Make the Cannoli Filling
While the pastry cools, make the filling. In a large bowl, use an electric mixer to beat the drained ricotta and softened mascarpone cheese until they’re smooth. There should be zero lumps.
Step 7: Sweeten it Up
Add the powdered sugar, vanilla extract, cinnamon, and orange zest (if you’re using it). Mix on low speed until it’s all combined, then turn it up to medium and beat for another 2 minutes until it’s light and fluffy. Gently fold in the mini chocolate chips with a spatula.
Step 8: Time to Assemble!
Lay one of the cooled pastry rectangles on your serving platter. Transfer the cannoli filling to a piping bag fitted with a star tip. Pipe rows of filling to cover the pastry. Place the second pastry rectangle on top and gently press down. Pipe another layer of filling. Top with the final pastry rectangle.
Step 9: The Final Touch
Use a fine-mesh sieve to dust the top with a beautiful, even layer of powdered sugar. And that’s it. You did it. Step back and admire your work.
Nutritional Info and Healthy Swaps
Let’s be real, this is a dessert. But here’s a rough idea of what you’re looking at, plus some ways to tweak it.
Estimated Nutritional Breakdown (per serving)
| Nutrient | Approximate Amount |
|---|---|
| Calories | 450-550 kcal |
| Fat | 30-35g |
| Carbohydrates | 35-40g |
| Protein | 8-10g |
Disclaimer: These are just estimates! The actual numbers will change based on your specific ingredients.
Ingredient Swaps for Different Needs
- To Reduce Sugar: You can reduce the powdered sugar in the filling to 1/2 cup. You can also use a sugar substitute like monk fruit or erythritol, but check the conversion rates.
- Meal Pairing: This is a rich dessert, so it’s perfect after a lighter meal. Or, just have it with a strong cup of coffee or an espresso. That’s a meal, right?
- Cooking Time Efficiency: Make the filling while the pastry is baking. By the time the pastry is cool, your filling will be ready to go. Maximize that downtime!
Tips for Leftovers and Storage
If you somehow have leftovers, here’s the best way to handle them.
Store any leftover Napoleon in an airtight container in the fridge for up to 2 days. Be warned: the pastry will soften over time. It loses the crunch but it still tastes incredible. Think of it as evolving.
I wouldn’t recommend freezing the assembled dessert. The texture just gets weird when it thaws.
Frequently Asked Questions (FAQ)
Q1. Why did my puff pastry not puff up?
Ans: A few things could be the culprit. Your oven might not have been hot enough when you put the pastry in. Or, the pastry might have been too warm and soft before baking. Lastly, make sure your puff pastry isn’t expired; old pastry doesn’t rise as well.
Q2. Can I make this without a piping bag?
Ans: Totally. You can just spread the filling with a spatula. It won’t have those pretty defined shapes, but it will taste exactly the same. You can also use a large Ziploc bag and just snip off one of the corners.
Q3. My filling seems a little grainy. What did I do wrong?
Ans: This usually happens for two reasons. Either the ricotta wasn’t drained enough, or you used a brand that has a grainier texture. Beating it well with the mascarpone usually smooths it out, but starting with a creamy, well-drained ricotta is key.
Q4. Is this the same as a mille-feuille?
Ans: It’s very similar! “Mille-feuille” is French for “a thousand sheets,” and it traditionally uses a pastry cream filling. Our version here is an Italian-inspired twist using that delicious cannoli filling. So, it’s a Napoleon-style dessert with a different attitude.
Wrapping Up
See? That wasn’t so scary. You took a few simple ingredients and turned them into something that looks like it belongs in a magazine.
The best part is that first bite—the crunch of the pastry, the cool and creamy filling, the little pops of chocolate. It’s seriously good.
So go on and give it a try. I promise you can do this.
When you make it, I’d love to hear how it went! Drop a comment below and tell me about it, or ask any questions you have. I’m here to help.

