There’s a specific smell that just screams ‘cozy’ to me. It’s that mix of warm apples, cinnamon, and something toasty, like butter and oats browning in the oven. It’s the kind of smell that makes a house feel like a home.
But let’s be real, sometimes baking feels like a huge commitment. So many bowls, precise measurements, and the fear of a sunken cake or a tough pie crust. I’ve been there, and honestly, I don’t always have the patience for it.
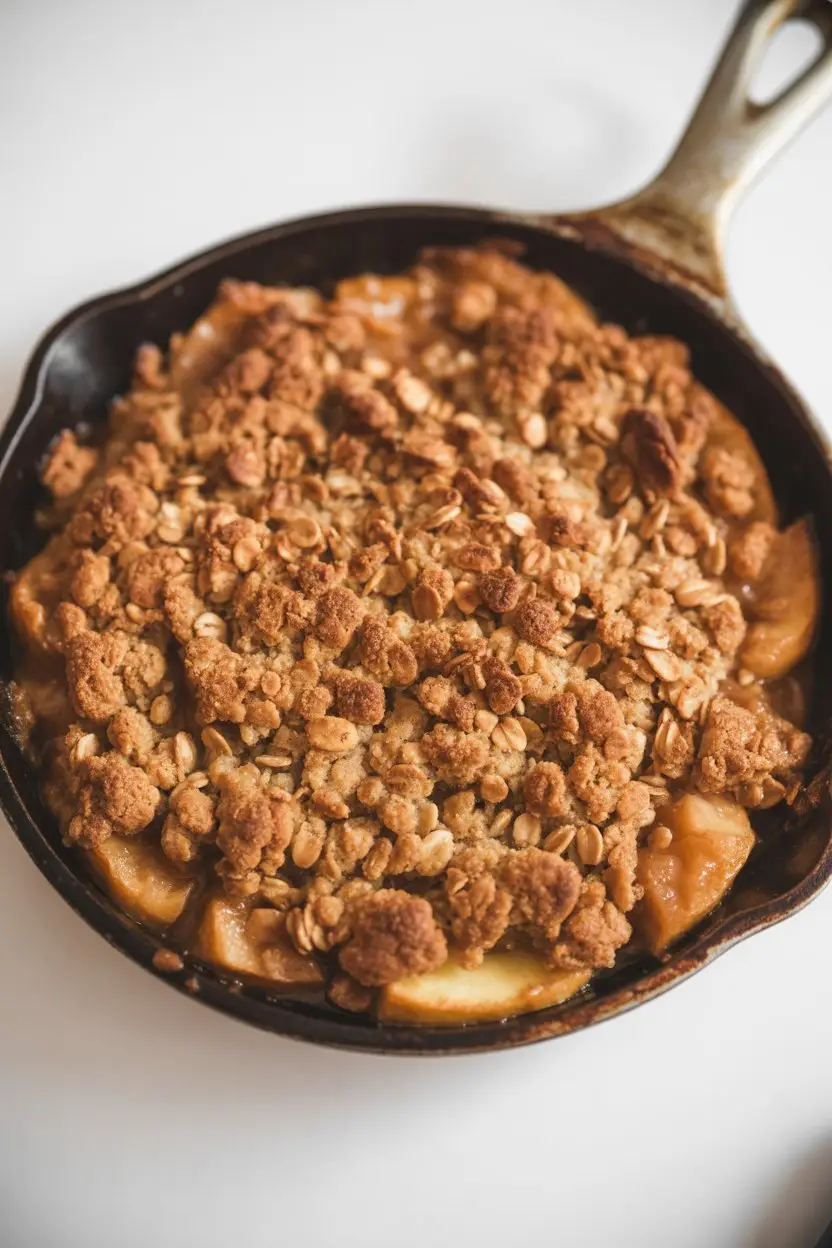
That’s where this Skillet Apple Crisp comes in. It’s the dessert equivalent of your favorite comfy sweatshirt. It’s a little rustic, gloriously messy, and incredibly forgiving. You pretty much toss things in a pan and let the magic happen. It’s less about perfection and more about creating something genuinely delicious and comforting without a ton of stress.
So, if you want that amazing, homey smell and a dessert that tastes like a warm hug, you’re in the right place. Let’s make something awesome.
What You’ll Need
I like to break the ingredients down into two parts. It just makes it feel less overwhelming, you know?
For the Apple Filling:
- Apples: About 6 medium-sized ones. We’ll talk more about which kinds to use later.
- Lemon Juice: Just a tablespoon. From a bottle is fine, no judgment here.
- Brown Sugar: 1/4 cup, packed.
- Cinnamon: 1 teaspoon. Don’t skip this.
- Nutmeg: 1/4 teaspoon. It adds that extra little something.
- Butter: 2 tablespoons, for cooking the apples.
For the Oatmeal Crumble Topping:
- Old-Fashioned Rolled Oats: 1 cup. Not the instant kind.
- All-Purpose Flour: 1/2 cup.
- Brown Sugar: 1/2 cup, packed.
- Cinnamon: 1/2 teaspoon.
- Salt: A pinch, maybe 1/4 teaspoon. It makes the sweet flavors pop.
- Cold Butter: 1/2 cup (that’s one stick), cut into small cubes. It has to be cold!
The Tools You’ll Actually Use
No fancy gadgets needed. You probably have all this stuff already.
- A 10-inch cast-iron skillet (or any oven-safe skillet)
- A couple of mixing bowls
- A knife and cutting board
- Measuring cups and spoons
- A spoon or spatula for stirring
Pro Tips From Someone Who’s Messed This Up Before
I’ve made my share of mistakes so you don’t have to. Here are a few things I’ve learned.
- Don’t Overmix the Topping: When you’re mixing the butter into the crumble, stop when it looks like coarse crumbs with some pea-sized butter bits still visible. If you mix it into a smooth paste, you lose the “crisp” and it just becomes a cookie on top. Still tasty, but not what we’re going for.
- Taste Your Apples: Apples vary a lot in sweetness and tartness. If you’re using super sweet apples like Gala, maybe dial back the sugar a tiny bit. If you’re using tart Granny Smiths, you might want to stick to the recipe as is. A little taste test before you cook them goes a long way.
- Cook the Apples First: The step where you pre-cook the apples in the skillet for a few minutes is important. It gives them a head start so they don’t come out crunchy and raw after baking. You want them to be tender, not mush. This ensures they’re perfectly soft when the topping is golden brown.
- Cold Butter is Your Friend: I said it in the ingredients, but it’s worth repeating. For the topping to be crumbly and crisp, the butter has to be cold. When those little cold butter pockets melt in the oven, they create steam, which makes the topping light and crispy instead of dense and greasy.
Let’s Get Cooking: Step-by-Step Instructions
Step 1: Get Your Oven Ready
Preheat your oven to 375°F (190°C). Getting this done first is always a good move.
Step 2: Make the Crumble Topping
In a medium bowl, mix together the oats, flour, brown sugar, cinnamon, and salt. Add the cold, cubed butter. Using your fingertips or a pastry cutter, work the butter into the dry ingredients until it looks like clumpy, coarse sand. Don’t overdo it. Pop this bowl in the fridge while you do the next part.
Step 3: Prep the Apples
Peel, core, and slice your apples into about 1/4-inch thick slices. You don’t have to be perfect. Put them in a large bowl and toss them with the lemon juice, 1/4 cup of brown sugar, cinnamon, and nutmeg. The lemon juice helps keep them from turning brown.
Step 4: Sauté the Apples
Melt the 2 tablespoons of butter in your cast-iron skillet over medium heat. Add the apple mixture and cook for about 5-7 minutes, stirring occasionally. You just want them to start getting a little bit soft.
Step 5: Add the Topping
Remove the skillet from the heat. Take your crumble topping out of the fridge and sprinkle it evenly over the apples. Make sure you cover everything.
Step 6: Bake It!
Place the skillet on a baking sheet (this catches any potential bubble-overs) and bake for 25-30 minutes. You’ll know it’s done when the topping is golden brown and the apple filling is bubbly and thick around the edges.
Step 7: Let It Rest
This is maybe the hardest part. Let the apple crisp cool in the skillet for at least 10-15 minutes before serving. It’s ridiculously hot, and letting it rest helps the filling set up a bit so it’s not a runny mess.
Ingredient Swaps & Variations
This recipe is super flexible. Here are a few ideas if you want to change things up or don’t have something on hand.
| Original Ingredient | Substitution | Why It Works |
|---|---|---|
| Apples | Pears or Peaches | Similar texture when cooked. |
| All-Purpose Flour | Almond Flour | Great gluten-free option. |
| Brown Sugar | Maple Syrup or Coconut Sugar | Adds a different flavor profile. |
| Butter | Cold Coconut Oil | Makes it dairy-free/vegan. |
Can I Make This Ahead of Time?
Yes, you can! It’s best to prep the components separately.
You can make the crumble topping up to 3 days ahead and keep it in an airtight container in the fridge. You can also slice the apples and toss them with the sugar and spices a day in advance. Just keep them in a covered container in the fridge. When you’re ready, just sauté the apples and assemble.
Nutritional Stuff (The Guesstimate)
Look, I’m not a nutritionist, and this is dessert. But if you’re curious, here’s a general idea. This can vary a lot based on your specific ingredients and apple size.
| Nutrient | Approximate Amount (per serving) | A Quick Note |
|---|---|---|
| Calories | 350-450 kcal | Depends heavily on sugar/butter. |
| Fat | 15-20g | Mostly from the butter in the topping. |
| Carbohydrates | 50-60g | From apples, sugar, and oats. |
| Fiber | 5-7g | Thanks, apples and oats! |
What to Serve It With
You can absolutely eat this on its own, scooped right out of the skillet. But if you want to take it to the next level, a big scoop of vanilla bean ice cream melting on top is pretty much non-negotiable in my book. A dollop of whipped cream or even some plain Greek yogurt for a tangy contrast works great, too.
Dealing with Leftovers (If You Have Any)
If you somehow have leftovers, just cover the skillet with foil (or transfer to an airtight container) and store it in the fridge for up to 4 days.
To reheat, you can pop it back in the oven at 350°F for about 10-15 minutes until it’s warmed through and the top gets crispy again. The microwave works in a pinch, but the topping will be soft, not crisp.
Cooking Time Breakdown
This helps you see just how quick this whole thing is.
| Task | Estimated Time |
|---|---|
| Prep Time (Topping & Apples) | 15 minutes |
| Cook Time (Sauté & Bake) | 35 minutes |
| Total Time | About 50 minutes |
Your Questions, Answered (Hopefully)
Q1. Seriously, which apples are the best to use?
Ans: Honestly, a mix is your best bet for flavor and texture. I love using a combination of a firm, tart apple like Granny Smith and a sweeter, softer one like Honeycrisp or Braeburn. The Granny Smiths hold their shape, while the others break down a bit to create a nice sauce. If you only have one kind, that’s totally fine too. Just try to use an apple that’s good for baking, not one that turns to mush, like a Red Delicious.
Q2. I don’t have a cast-iron skillet. What can I use instead?
Ans: No problem at all. Any 10-inch oven-safe skillet will work. If you don’t have an oven-safe skillet, you can sauté the apples in a regular pan on the stove, then transfer them to an 8×8 or 9×9 inch baking dish, add the topping, and bake from there.
Q3. My crumble topping came out soggy, not crisp. What did I do wrong?
Ans: This usually happens for two reasons. Either the butter wasn’t cold enough when you mixed the topping, or you might have overmixed it into a paste. The little bits of cold butter are what create that crispy texture. Next time, make sure your butter is straight from the fridge and stop mixing as soon as you get those coarse crumbs.
Wrapping Up
So there you have it. A simple, no-fuss skillet apple crisp that delivers on all the cozy, comforting flavors you could want, without the stress of a complicated baking project.
It’s more than just a recipe; it’s a feeling. It’s the perfect thing to make on a chilly evening, for a casual get-together with friends, or just for yourself because you deserve a treat.
I really hope you give this a try. It’s one of my absolute favorites, and I think it might become one of yours, too. When you make it, drop a comment below and tell me how it went or if you tried any fun variations. I’d love to hear about it!