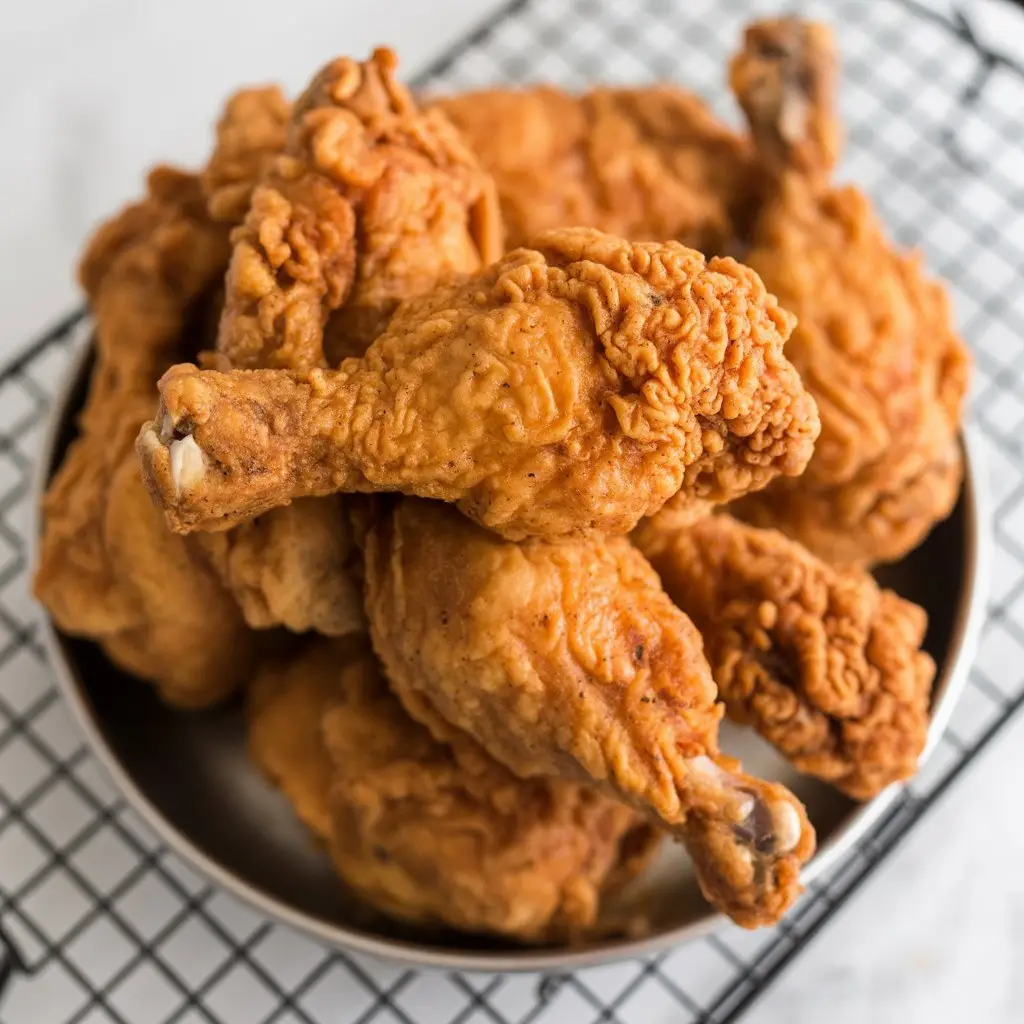
I have a memory burned into my brain. It’s of my grandmother’s kitchen, the air thick with the smell of hot oil and spices, and a golden-brown pile of fried chicken resting on a wire rack. It looked like something out of a food magazine.
For years, I was too scared to even try making it myself. My attempts were… let’s just say they were humbling. Sometimes the batter would slide right off in the pan, leaving me with a sad, naked piece of chicken. Other times, it would be soggy instead of crispy.
It was a mess. A delicious-smelling, but structurally-failed mess.
But after a lot of trial and error (and calling my aunt for emergency advice), I finally cracked the code. It’s not about some ancient family secret. It’s about technique. And I’m going to lay it all out for you, plain and simple.
So, if you’ve ever wanted to pull off that impossibly crispy, perfectly seasoned, stays-on-the-chicken fried chicken, you’re in the right place. We’re going to do this together.
What You’ll Need
This isn’t a long, complicated grocery list. Most of this stuff is probably already hanging out in your pantry, which is honestly a huge win.
- For the Chicken: 3 lbs bone-in, skin-on chicken pieces (thighs, drumsticks, wings, and breasts all work)
- For the Marinade: 2 cups buttermilk, 1 tbsp hot sauce (optional, but recommended)
- For the Dry Dredge:
- 2 cups all-purpose flour
- 1/2 cup cornstarch
- 2 tbsp salt
- 1 tbsp black pepper
- 2 tbsp paprika (not smoked, just regular)
- 1 tbsp garlic powder
- 1 tbsp onion powder
- 1 tsp cayenne pepper (adjust to your spice preference)
- For Frying: 48 oz vegetable or peanut oil
Pro Tips
Before we get our hands dirty, let me give you a few pieces of advice that I wish someone had told me from the start. These are the game-changers.
- Don’t Over-mix the Dredge. When you add a bit of the buttermilk marinade to your dry flour mix, just give it a quick, gentle toss with a fork. You WANT little lumps and shaggy bits. These are what create that ultra-craggy, super-crispy crust. A perfectly smooth flour mix will give you a flat, less exciting crust.
- The Post-Dredge Rest is Crucial. After you’ve coated the chicken, let it sit on a wire rack for at least 15-20 minutes. This gives the batter time to hydrate and essentially “glue” itself to the chicken skin. Skipping this step is the number one reason batter falls off during frying.
- Oil Temperature is Everything. Seriously. Get a thermometer. You’re looking for a steady 325-350°F (165-175°C). If the oil is too hot, the outside will burn before the inside is cooked. If it’s too cold, the chicken will absorb a ton of oil and become greasy and soggy. Don’t just guess.
- Pat Your Chicken Dry. Before the chicken even sees the buttermilk, pat every single piece completely dry with paper towels. A dry surface helps the marinade and then the batter stick so much better. It’s a small step that makes a huge difference.
Tools Required
You don’t need a professional kitchen, just a few key items.
-
- Two large bowls (one for the marinade, one for the dredge)
- A large, heavy-bottomed pot or Dutch oven
- A deep-fry or candy thermometer
- Tongs
- A wire rack placed over a baking sheet
– Paper towels
Substitutions and Variations
Look, recipes are a guideline, not a law. Here’s how you can switch things up if you need to or just want to experiment.
| Ingredient | Substitution | Notes |
|---|---|---|
| Buttermilk | Milk + Vinegar/Lemon Juice | Use 1 tbsp per cup of milk. Let sit 5 mins. |
| All-Purpose Flour | Gluten-Free All-Purpose Blend | Ensure it contains xanthan gum for binding. |
| Cayenne Pepper | Chipotle Powder or Smoked Paprika | Adds a smoky heat instead of a sharp one. |
| Chicken Pieces | Boneless, Skinless Thighs | They cook faster, so watch them closely. |
Want to get creative? Try adding a tablespoon of dried herbs like thyme or oregano to your flour mixture for a different flavor profile.
The Step-by-Step Instructions
Alright, let’s do this. Just follow along, one step at a time.
Step 1: Pat your chicken pieces completely dry with paper towels. Place them in a large bowl.
Step 2: Pour the buttermilk and hot sauce over the chicken, making sure every piece is submerged. Cover the bowl and let it marinate in the fridge for at least 4 hours, or even better, overnight. This tenderizes the chicken and adds flavor.
Step 3: In your second large bowl, whisk together the all-purpose flour, cornstarch, salt, pepper, paprika, garlic powder, onion powder, and cayenne pepper. Mix it well so the seasoning is evenly distributed.
Step 4: Here’s the trick for that shaggy crust. Drizzle 2-3 tablespoons of the buttermilk marinade from the chicken bowl into your dry flour mixture. Use a fork to toss it together until you have small, crumbly bits throughout the flour. Don’t overdo it.
Step 5: Take a piece of chicken from the buttermilk, letting the excess drip off. Dredge it thoroughly in the flour mixture, pressing the flour onto the chicken to make sure it’s completely coated. Place the coated piece on a wire rack.
Step 6: Repeat with all the chicken pieces. Now, let the chicken rest on the wire rack for 15-20 minutes. Don’t skip this. Go wash your hands or get your pot ready.
Step 7: Pour your oil into the Dutch oven until it’s about 2 inches deep. Attach your thermometer to the side and heat the oil over medium-high heat until it reaches 350°F (175°C).
Step 8: Gently place a few pieces of chicken into the hot oil using your tongs. Do not crowd the pan! This will drop the oil temperature and make your chicken soggy. Fry in batches of 3-4 pieces at a time.
Step 9: Fry for about 6-8 minutes on each side, until the crust is deep golden brown and the internal temperature reaches 165°F (74°C). Dark meat like thighs will take a bit longer than white meat like breasts.
Step 10: Once cooked, remove the chicken from the oil and let it drain on the wire rack (not paper towels, which can make the bottom soggy). Let the oil come back up to temperature before adding the next batch.
Nutrition, Pairings, and Efficiency
Let’s be real, this is fried chicken. It’s a treat, not a health food. But we can still be smart about it.
Meal Pairing Suggestions
| Side Dish | Why It Works |
|---|---|
| Creamy Mashed Potatoes | Soft texture balances the crunch. |
| Collard Greens | The slight bitterness cuts through the richness. |
| Buttermilk Biscuits | Perfect for sopping up any juices. |
| Vinegar-Based Coleslaw | Acidity provides a fresh contrast. |
Cooking Time Efficiency
The best way to be efficient is to use the “downtime” wisely. While the chicken is marinating, you can prep your sides. While it’s resting after being dredged, you can heat up your oil and tidy your workspace. It makes the whole process feel less chaotic.
Tips for Leftovers and Storage
If you somehow have leftovers, first of all, congratulations on your self-control.
Store the cooled chicken in an airtight container in the refrigerator for up to 3 days.
To reheat, do not use the microwave unless you enjoy sad, rubbery chicken skin. The best way is to place it on a wire rack on a baking sheet and heat it in an oven or toaster oven at 375°F (190°C) for about 15 minutes, or until warmed through and crispy again. An air fryer also works wonders here.
Frequently Asked Questions
Q1. Why did my batter fall off in the pan?
Ans: This is the most common problem. It’s usually one of two things: you either didn’t let the coated chicken rest long enough before frying, or you crowded the pan, causing the pieces to knock against each other and scrape the batter off.
Q2. Can I make this in an air fryer?
Ans: Yes, but it’s a different result. It won’t be as deeply crispy as deep-fried chicken. After dredging, spray the chicken generously with cooking oil spray. Air fry at 380°F (193°C) for about 20-25 minutes, flipping halfway through, until cooked and golden.
Q3. My chicken was cooked outside but raw inside. What happened?
Ans: Your oil was too hot. The crust cooked way too fast before the heat had time to penetrate and cook the meat. This is why a thermometer is your best friend. Keep it steady around 350°F.
Q4. Can I reuse the frying oil?
Ans: You can. Let it cool completely, then strain it through a coffee filter or cheesecloth to remove all the little bits. Store it in a sealed container in a cool, dark place. You can typically get 2-3 uses out of it before it starts to taste off.
Wrapping Up
There you have it. The roadmap to making fried chicken that will make you ridiculously proud. It’s not about being a perfect chef; it’s about following a few key steps that set you up for success.
The feeling of pulling that first perfectly golden, crunchy piece of chicken out of the pot is just unbeatable. You made that. With your own two hands.
So give it a shot. And when you do, come back and leave a comment. Tell me how it went, if you made any changes, or if you have any questions. I’d genuinely love to hear about it.