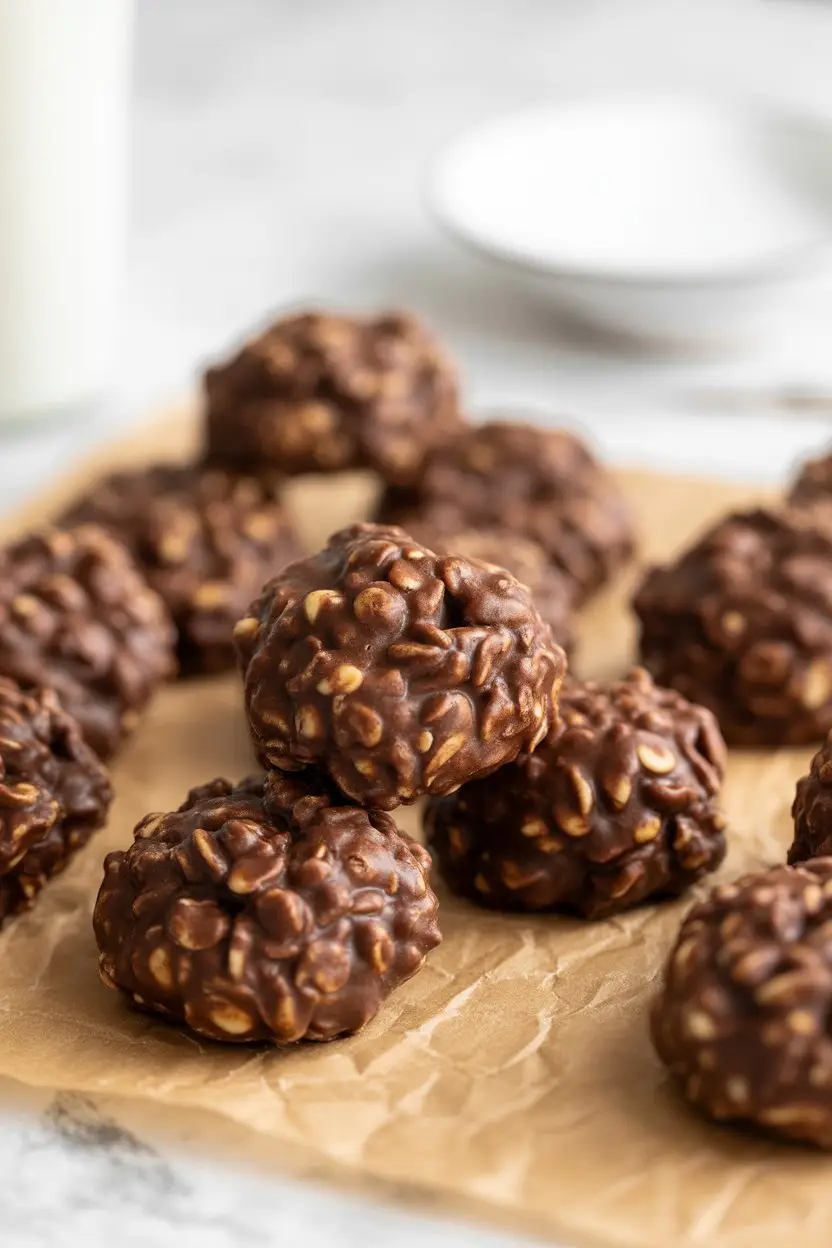
There are days when you need a cookie. Not want. Need. And on those days, the last thing you want to do is preheat an oven, find the baking sheets, and wait.
I’ve been there. It’s 9 PM, I’ve had a day, and the only thing that sounds good is a rich, fudgy, peanut buttery cookie. This is the recipe for that moment.
It’s the one my grandma made, the one that feels like a hug. It’s almost ridiculously simple, and honestly, it’s pretty hard to mess up. Though, trust me, I’ve found ways.
So let’s skip the fancy stuff and make something that just tastes good and feels good. No oven required.
What You’ll Need
This is all the stuff you’ll need to grab. Most of it is probably already in your pantry, which is why this recipe is a lifesaver.
- 2 cups Granulated Sugar
- 1/2 cup (1 stick) Unsalted Butter
- 1/2 cup Milk (any kind works)
- 4 tablespoons Unsweetened Cocoa Powder
- 1/2 cup Creamy Peanut Butter
- 1 tablespoon Vanilla Extract
- 3 cups Old-Fashioned Rolled Oats
- Pinch of Salt
Tools Required
No fancy mixers or gadgets. Just the basics.
- Medium Saucepan
- Measuring Cups and Spoons
- Spatula or Wooden Spoon
- Parchment Paper or Wax Paper
- Two Spoons or a Small Cookie Scoop
Pro Tips
I’ve made these cookies hundreds of times. Here are a few things I’ve learned, mostly by messing them up first.
1. The One-Minute Boil is Serious
This is the most important part. Once the mixture of sugar, butter, milk, and cocoa comes to a full, rolling boil, you start a timer for exactly 60 seconds. Not 50 seconds. Not 90 seconds. One minute.
If you boil it too long, your cookies will be dry and crumbly. If you don’t boil it long enough, they’ll be gooey and will never set properly. Set a timer on your phone. Don’t guess.
2. Have Everything Ready (Mise en Place)
This is a fancy French term for “get your stuff together.” Before you even turn on the stove, measure out your peanut butter, vanilla, and oats. The cooking process is fast, and the mixture starts to set as soon as you take it off the heat.
You don’t want to be scrambling to open a jar of peanut butter while your perfect chocolate lava is cooling down in the pan.
3. Creamy Peanut Butter is Your Friend
I love natural peanut butter for sandwiches, but for this recipe, good old-fashioned creamy peanut butter (like Jif or Skippy) works best. It has emulsifiers that help the cookies hold their shape and gives them that classic fudgy texture.
Natural peanut butter can sometimes separate and make the cookies a little oily. You can use it, but the texture might be a bit different.
How to Make The Cookies: Step by Step
Alright, let’s get this done. It’s fast, so read through this once before you start.
Step 1: Lay out a couple of large sheets of parchment paper or wax paper on your counter. This is where your cookies will cool. Make sure you have enough space.
Step 2: In your medium saucepan, combine the sugar, butter, milk, and cocoa powder. Turn the heat to medium and stir it all together as the butter melts.
Step 3: Keep stirring occasionally until the mixture comes to a full rolling boil. A rolling boil is one that you can’t stir away. Once it hits that point, start your timer for exactly one minute. Stir continuously during this minute.
Step 4: After exactly one minute, immediately remove the saucepan from the heat. Don’t just turn the burner off, move the pan.
Step 5: Stir in the peanut butter, vanilla extract, and the pinch of salt. Mix until the peanut butter is completely melted and everything is smooth. Work quickly!
Step 6: Dump in all 3 cups of the old-fashioned oats. Stir until every oat is coated in that chocolatey-peanut-buttery goodness.
Step 7: Using two spoons or a small cookie scoop, drop tablespoon-sized mounds of the mixture onto your prepared parchment paper. They don’t spread much, so you can place them fairly close together.
Step 8: Now for the hardest part: waiting. Let the cookies sit at room temperature for at least 30-45 minutes to set completely. They should be firm to the touch and no longer glossy.
Substitutions and Variations
It’s hard to mess these up, and they are pretty flexible. If you want to switch things up or have dietary needs, here are some ideas.
| Original Ingredient | Swap Suggestion | Notes |
|---|---|---|
| Unsalted Butter | Coconut Oil or Vegan Butter | Makes it dairy-free/vegan. |
| Cow’s Milk | Almond, Soy, or Oat Milk | Works perfectly. |
| Creamy Peanut Butter | Almond Butter, SunButter | Great for allergies. |
| Old-Fashioned Oats | Quick-Cook Oats | Results in a softer, chewier cookie. |
You can also add things! A half-cup of shredded coconut, some mini chocolate chips, or chopped nuts stirred in with the oats can be amazing.
Helpful Breakdowns
A little extra info for planning purposes. Because sometimes you just need to know.
Nutritional Estimate
This is just an estimate, so don’t take it as gospel. It can change based on your specific ingredients and how big you make your cookies. This is for one cookie, assuming you make about 3 dozen.
| Nutrient | Approximate Amount |
|---|---|
| Calories | 110 kcal |
| Fat | 5g |
| Carbohydrates | 15g |
| Protein | 2g |
Time Efficiency Tips
Want to make these even faster? It’s possible.
| Tip | Why It Works |
|---|---|
| Pre-measure Everything | Prevents panic when the mixture is ready. |
| Use a Cookie Scoop | Faster and more uniform than using two spoons. |
| Cool in the Fridge | Cuts setting time down to 15-20 minutes. |
Leftovers and Storage
If you somehow have leftovers, here’s what to do.
Store the cookies in an airtight container. They’re fine at room temperature for about 3-4 days. If you want them to last longer (up to a week), you can keep them in the fridge. I actually like them cold from the fridge, they get extra chewy.
You can also freeze them. Just place them in a single layer in a freezer-safe bag or container. They’ll last for a couple of months. Let them thaw on the counter for a few minutes before eating.
Frequently Asked Questions
Here are answers to some questions I get asked a lot.
Q1. My cookies are dry and crumbly. What did I do wrong?
Ans: You almost certainly boiled the mixture for too long. That one-minute timer is critical. Boiling for even 30 extra seconds cooks out too much moisture, and the cookies won’t be fudgy.
Q2. Help! My cookies are a sticky mess and won’t set.
Ans: This is the opposite problem. You probably didn’t boil the mixture long enough. It needs to reach that full, rolling boil and stay there for the full 60 seconds to get hot enough to set properly. Also, high humidity can sometimes affect them, but it’s usually the boil time.
Q3. Can I use a different kind of oats?
Ans: Yes. Old-fashioned rolled oats give the best chewy texture. Quick-cook oats will give you a softer, less chewy cookie. I would avoid steel-cut oats, as they won’t soften enough and will be crunchy.
Q4. How do I make these gluten-free?
Ans: Super easy. Oats are naturally gluten-free, but they are often processed in facilities with wheat. Just make sure you buy oats that are certified gluten-free, and you’re good to go.
Q5. Can I use less sugar?
Ans: You can try, but I wouldn’t reduce it by more than a quarter cup. The sugar isn’t just for sweetness here; it’s a huge part of the chemical structure that makes the cookies set. Reducing it too much can lead to gooey cookies.
Wrapping Up
So that’s it. It’s a simple recipe, but it’s one of those that just works. It’s perfect for when you need a dessert fast, or when you just want something comforting without a lot of fuss.
Go give them a try. They’re pretty forgiving, and the reward is a plate full of delicious, fudgy cookies.
And when you make them, come back and leave a comment. I’d love to hear how they turned out for you, or if you discovered any cool new variations.