Have you ever just craved a cookie? Not just one, but a whole tray’s worth, without the hassle of scooping out perfect little circles one by one? I’ve been there. More times than I can count.
That’s where the beauty of a slab comes in. It’s the ultimate baking hack for when you want maximum deliciousness with minimum effort.
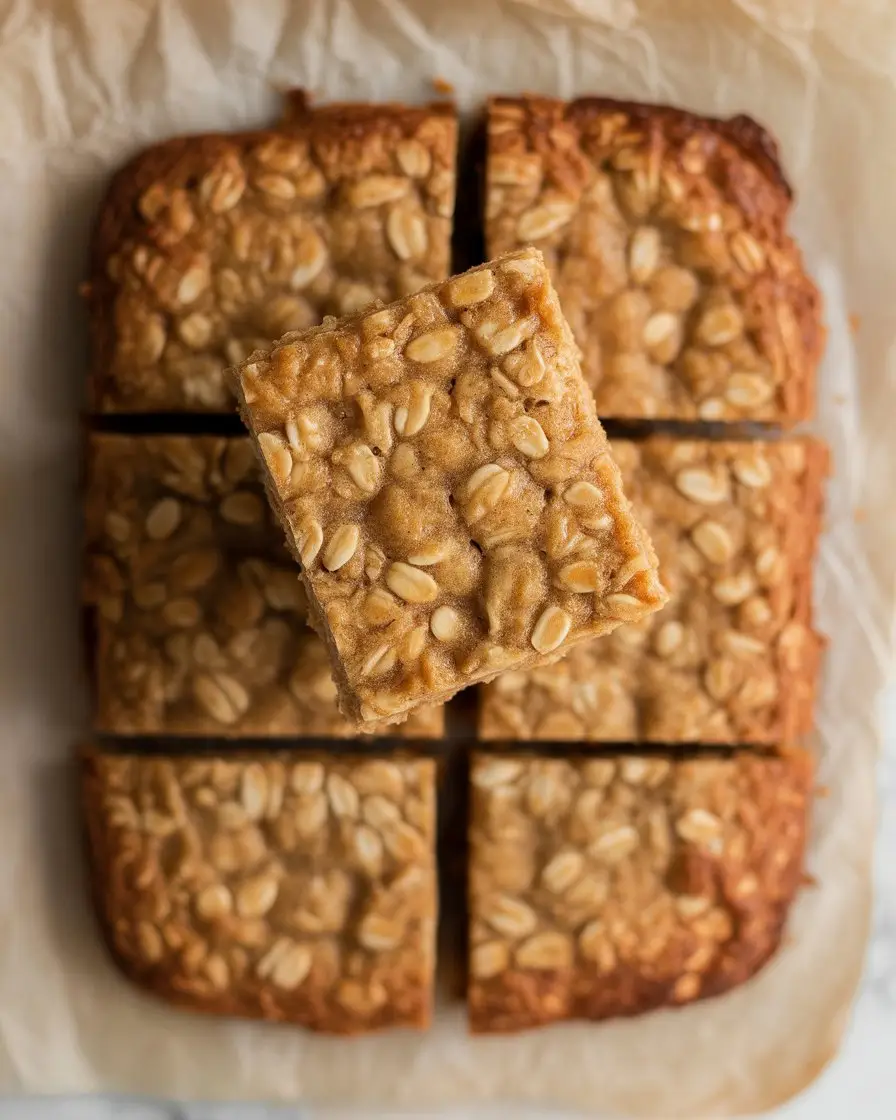
And we’re not just making any slab. We’re talking about an Anzac Biscuit Slab, but with a secret weapon: condensed milk. It takes the classic oaty, coconutty, golden-syrupy goodness and turns it into this incredibly chewy, dense, and frankly, addictive treat.
It’s the kind of thing you make when friends are coming over, or when you just need a week’s supply of “I deserve this” sitting on your counter. So let’s get into it.
What You’ll Need
Here’s the simple shopping list. Nothing too wild or hard to find, which is exactly how we like it.
- 1 cup all-purpose flour
- 1 cup rolled oats (not the quick-cooking kind)
- 1 cup desiccated coconut
- 3/4 cup brown sugar, packed
- 150g (about 10.5 tablespoons) unsalted butter
- 1/2 can (about 200g) sweetened condensed milk
- 2 tablespoons golden syrup
- 1/2 teaspoon baking soda
Tools Required
You don’t need a bunch of fancy gadgets. Here’s the basic gear:
- A large mixing bowl
- A small saucepan
- A wooden spoon or spatula
- Measuring cups and spoons
- An 8×8 inch (20×20 cm) square baking pan
- Parchment paper
Pro Tips
I’ve made this enough times to have learned a few things, usually the hard way. Here are some tips so you can get it right the first time.
- Press It Down Firmly. I mean, really pack it in there. Use the back of a spoon or even the bottom of a glass. This is what stops it from being a crumbly mess and helps create that dense, chewy texture we’re aiming for. A loose pack equals a biscuit that falls apart when you look at it.
- Don’t Scorch the Butter Mixture. When you’re melting the butter, condensed milk, and golden syrup, keep the heat on low to medium. You just want it to melt and combine into a smooth liquid. If you boil it too hard, the sugar can burn, and it’ll taste… well, burnt. No one wants that.
- Patience is a Virtue (Especially for Cooling). This is the hardest part for me. You HAVE to let the slab cool completely in the pan before you try to cut it. I know, it’s torture. But if you cut it while it’s warm, you’ll have a gooey mess instead of clean squares. Trust me. Let it sit on the counter for a couple of hours.
- Lining the Pan is Non-Negotiable. Leave some parchment paper hanging over the sides of the pan to create little “handles.” This makes it SO much easier to lift the entire slab out once it’s cooled. It saves you from the tragedy of trying to pry the first piece out with a knife and ruining it.
Substitutions and Variations
Want to mix things up? This recipe is pretty forgiving. Here are a few ideas.
| To Swap Out | Try This Instead | What to Expect |
|---|---|---|
| Golden Syrup | Maple Syrup or Honey | Changes the classic flavor slightly. |
| All-Purpose Flour | Gluten-Free All-Purpose Blend | Makes it gluten-free. Texture might be a bit different. |
| Brown Sugar | Coconut Sugar | A less refined option, slightly different caramel notes. |
| Plain Recipe | Add 1/2 cup chocolate chips or dried cranberries | Adds pockets of flavor and texture. Delicious. |
Make-Ahead Tips
You can totally prep this in advance. Life is busy, I get it.
Mix all the dry ingredients (flour, oats, coconut, sugar) and store them in an airtight container at room temperature for up to a week. When you’re ready to bake, you just have to do the wet-ingredient-melting step, mix, and bake. It cuts the prep time in half.
How to Make the Condensed Milk Anzac Biscuit Slab
Alright, let’s do this. It’s way easier than it sounds.
Step 1: Preheat your oven to 160°C (320°F). Line your 8×8 inch square pan with parchment paper, leaving some overhang on the sides to use as handles later.
Step 2: In a large bowl, mix together the flour, rolled oats, desiccated coconut, and brown sugar. Make a little well in the center.
Step 3: In your small saucepan, combine the butter, condensed milk, and golden syrup. Heat it gently over low-medium heat, stirring until the butter is fully melted and everything is smooth and combined. Don’t let it boil.
Step 4: Take the saucepan off the heat. Stir in the baking soda. It will foam up a bit, which is totally normal and kind of cool to watch.
Step 5: Pour this hot, foamy liquid into the well you made in your dry ingredients. Mix everything together with a wooden spoon or spatula until it’s just combined. Don’t overmix it.
Step 6: Tip the mixture into your prepared baking pan. Spread it out evenly and press it down really firmly with the back of the spoon. Remember the pro tip! This is important.
Step 7: Bake for 25-30 minutes, or until it’s a beautiful golden brown all over. The edges might look a little darker, and that’s okay.
Step 8: Here comes the hard part. Remove the pan from the oven and let it cool completely on a wire rack. Don’t even think about touching it for at least 2 hours. Once it’s totally cool, use the parchment paper handles to lift the slab out and cut it into squares.
The Nitty Gritty: Nutrition, Pairings, and More
For those who like the details, here’s a quick breakdown.
| Recipe Breakdown | |
|---|---|
| Nutrition (Approx.) | Per square (if cut into 16): ~200 calories, 25g carbs, 10g fat, 3g protein. It’s a treat, not a health food! |
| Serving Suggestion | Perfect with a cup of black tea or coffee. Or a giant glass of cold milk. Classic. |
| Cooking Time Tip | This is a “one bowl, one pan” recipe. The cleanup is super fast, which is a huge win. |
Leftovers and Storage
If you somehow have leftovers, first of all, I’m impressed by your self-control.
Store the cut squares in an airtight container at room temperature. They’ll stay perfectly chewy and delicious for up to a week. I don’t recommend putting them in the fridge, as they can get a bit too hard.
Frequently Asked Questions (FAQ)
Q1. Why did my slab turn out super crumbly?
Ans: You probably didn’t press the mixture down firmly enough in the pan before baking. That compaction is key to getting it all to stick together. Give it a really good press next time!
Q2. Can I make this without condensed milk for a more traditional Anzac?
Ans: Yes, but it becomes a different recipe. A traditional Anzac biscuit uses boiling water mixed with the baking soda instead of condensed milk. It will be much crispier and less chewy.
Q3. My slab seems too gooey in the middle. What happened?
Ans: It probably just needed a few more minutes in the oven. Ovens can vary a lot. Next time, bake it until the center feels firm to a light touch. Also, make sure you let it cool completely, as it firms up a lot during the cooling process.
Q4. Can I freeze the Anzac slab?
Ans: Absolutely! It freezes beautifully. Cut it into squares, then place them in a single layer on a baking sheet to freeze solid. Once frozen, you can transfer them to a freezer bag or container. They’ll last for up to 3 months. Just thaw at room temperature for an hour or so before eating.
Wrapping Up
So there you have it. An incredibly simple, outrageously delicious recipe that feels both nostalgic and brand new at the same time. It’s the perfect thing to bake when you don’t really feel like baking.
It’s chewy, sweet, and satisfying in a way that just hits the spot.
Go on and give it a shot. I’d love to hear how it turns out for you. If you make any fun variations or have questions, drop a comment below. I’m always curious to see how you make it your own.