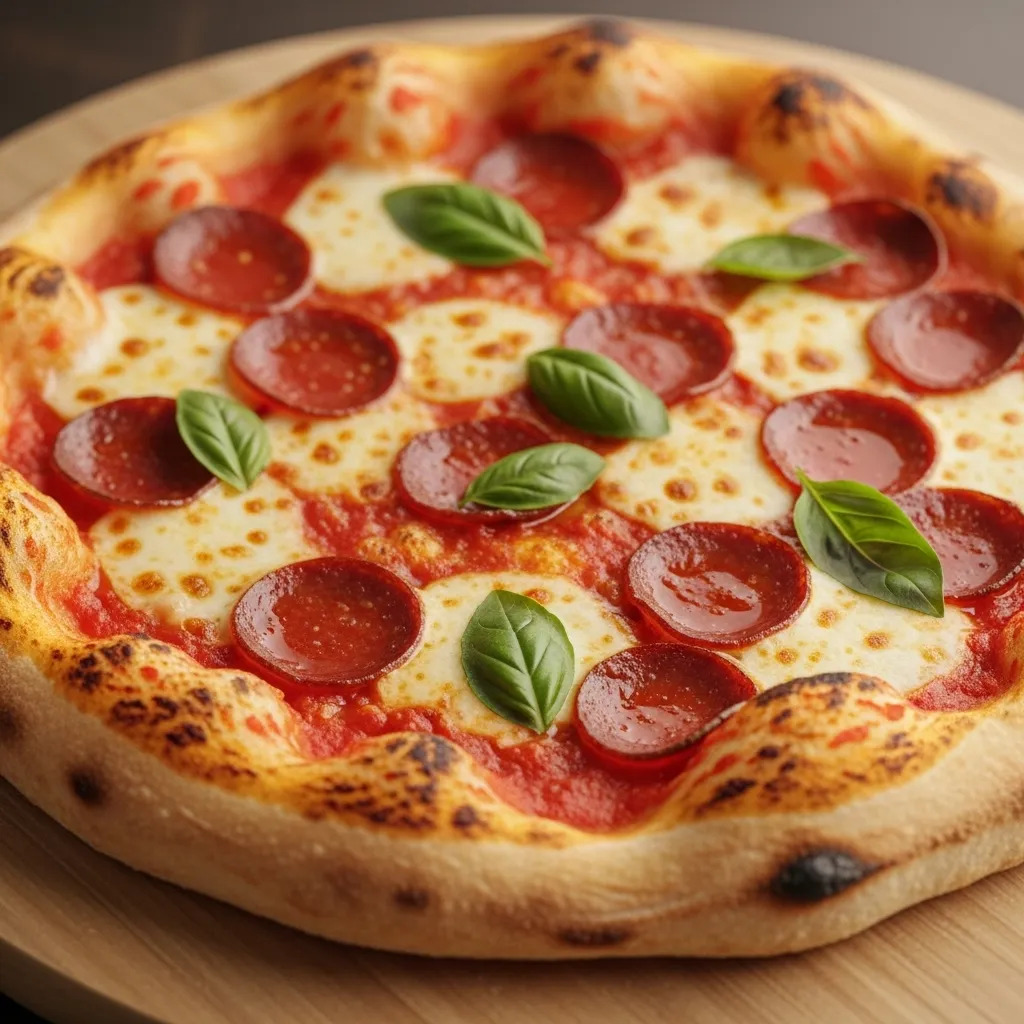
I think we can all agree that there’s pizza, and then there’s PIZZA. The kind with a crust that’s perfectly crisp on the bottom but soft and chewy on the inside.
The kind that doesn’t come from the freezer aisle or a cardboard box.
For a long time, I thought that kind of pizza was reserved for restaurants with fancy brick ovens. The idea of making my own dough felt… complicated. Yeast? Kneading? Proofing? It all sounded like a science project I was destined to fail.
But then I stumbled upon a method so straightforward, so forgiving, that it completely changed my pizza nights. It just makes you feel good to create something so delicious from such simple stuff.
So let’s get you making some seriously amazing pizza from scratch. I promise, it’s way easier than you think.
What You’ll Need
The ingredient list is wonderfully short. You probably have most of this in your kitchen right now.
- Warm water (about 110°F or 43°C)
- Active dry yeast
- Granulated sugar
- All-purpose flour
- Olive oil
- Salt
Tools Required
No fancy equipment needed here. Just the basics.
- Large mixing bowl
- Measuring cups and spoons
- A fork or whisk
- Plastic wrap or a clean kitchen towel
- Baking sheet or pizza stone
The Easiest Pizza Dough Instructions
Alright, here we go. Don’t overthink it, just follow along.
Step 1: Wake Up The Yeast
In your large mixing bowl, combine 1 ½ cups of warm water, 2 ¼ teaspoons of active dry yeast (that’s one standard packet), and 1 teaspoon of sugar. Give it a gentle stir with a fork.
Now, walk away for about 5-10 minutes. When you come back, it should look foamy or bubbly. This is called “blooming,” and it just means your yeast is alive and ready to work. If it doesn’t foam, your water might have been too hot or too cold, or the yeast is old. It’s better to start over if you don’t see any action.
Step 2: Add The Rest
To the bubbly yeast mixture, add 2 tablespoons of olive oil and 1 teaspoon of salt. Then, start adding the flour. Put in about 3 ½ cups of all-purpose flour.
Step 3: Mix It Up
Use a sturdy spoon or your hands to mix everything together until a shaggy, rough-looking dough forms. You just want to get all the flour incorporated. It won’t look pretty yet, and that’s totally fine.
Step 4: Knead The Dough
Turn the dough out onto a lightly floured surface. Knead it for about 5-7 minutes. To knead, just push the dough away from you with the heel of your hand, fold it over, give it a quarter turn, and repeat.
You’re looking for the dough to become smooth and elastic. If you’re using a stand mixer, use the dough hook attachment and let it go on low speed for about 5 minutes.
Step 5: Let It Rise
Lightly grease the inside of your mixing bowl with a little olive oil. Form your dough into a ball, place it in the bowl, and turn it over once to coat it in the oil. This prevents a “skin” from forming.
Cover the bowl with plastic wrap or a damp kitchen towel. Place it in a warm, draft-free spot in your kitchen for about 1 to 1.5 hours, or until it has doubled in size.
Step 6: Get Ready To Bake
Gently punch the dough down to release the air. Transfer it to your floured surface and divide it in half if you want to make two 12-inch pizzas. Or keep it as one for a larger pizza.
Let the dough rest for about 10 minutes. This little rest makes it much easier to roll or stretch out without it shrinking back on you. Then, shape it, top it, and bake in a preheated oven at 450°F (232°C) until golden and bubbly.
Pro Tips
Here are a few things I learned along the way that make a big difference.
- Water Temperature is Key. Too hot, and it will kill the yeast. Too cold, and it won’t wake it up. It should feel like warm bathwater. If you have a thermometer, 105-115°F is the sweet spot.
- Don’t Go Crazy With Flour. When kneading, only add a tiny bit of flour to the surface at a time. Adding too much extra flour can make your dough dense and dry. A slightly sticky dough is better than a dry one.
- The “Windowpane Test”. To check if you’ve kneaded enough, take a small piece of dough and gently stretch it between your fingers. If you can stretch it thin enough to see light through it without it tearing, it’s ready. If it tears easily, knead for another minute or two.
- Let The Oven Preheat Fully. A super hot oven is crucial for a great pizza crust. Let it preheat for at least 30 minutes. If you have a pizza stone, let it heat up with the oven. This gives you that awesome crispy bottom.
| Ingredient | Substitution/Variation | Notes |
|---|---|---|
| All-Purpose Flour | Bread Flour | Creates a chewier crust. |
| All-Purpose Flour | Half Whole Wheat | Adds nutty flavor. May need more water. |
| Sugar | Honey or Maple Syrup | Works just as well to feed the yeast. |
| Herbs | Add to Dry Ingredients | Try dried oregano or garlic powder. |
Make Ahead Tips
This is one of the best parts. You can make this dough when you have time and use it later.
After the dough has risen, you can punch it down and store it in an airtight container or a zip-top bag in the refrigerator for up to 3 days. The flavor actually gets better with this slow, cold fermentation.
For freezing, wrap the dough ball tightly in plastic wrap, then place it in a freezer bag. It will keep for up to 3 months. To use it, just thaw it in the refrigerator overnight, then let it sit on the counter for about 30 minutes before shaping.
Nutrition, Pairings, and More
The nutritional info can vary wildly based on your toppings, but the dough itself is pretty simple. For one serving (assuming 1/8th of the total recipe), you’re looking at basic carb and calorie counts from the flour.
For a healthier twist, try using half whole wheat flour or top your pizza with tons of veggies. A simple side salad is a perfect pairing to get some extra greens in. It balances out the meal perfectly.
To be efficient, you can prep all your pizza toppings while the dough is rising. That way, once it’s ready, you can assemble and bake right away.
| Pairing Type | Specific Idea |
|---|---|
| Salad | Caesar or a simple garden salad. |
| Appetizer | Garlic knots (using the same dough!). |
| Drink | A light beer or a simple red wine. |
Leftovers and Storage
If you somehow have leftover pizza, just store it in an airtight container or wrap it tightly in the fridge for up to 4 days.
To reheat, the best way is in a hot skillet on the stove to crisp up the bottom, or in an air fryer. The microwave works in a pinch, but it can make the crust a bit soft.
Frequently Asked Questions
Q1. Why didn’t my dough rise?
Ans: This is almost always a yeast issue. Your yeast might have been expired, or the water was too hot (which kills it) or too cold (which doesn’t activate it). Also, make sure your rising spot isn’t too cold or drafty.
Q2. My dough is way too sticky. What did I do wrong?
Ans: You probably didn’t do anything wrong! Humidity can affect dough. If it’s unmanageably sticky after kneading for a few minutes, add flour just one tablespoon at a time until it’s smooth and only slightly tacky to the touch.
Q3. Can I make this gluten-free?
Ans: You can try swapping with a 1-to-1 gluten-free flour blend, but be aware that the texture will be different. Gluten is what gives pizza dough its signature stretch and chew, so GF versions behave more like a batter or a dense bread. Follow the package directions on the GF flour for best results.
Q4. How thin should I roll the dough?
Ans: That’s totally up to you. For a classic New York-style thin crust, aim for about 1/4-inch thick. If you like a thicker, chewier crust, you can leave it closer to 1/2-inch thick. Just be aware that thicker crusts may need a little more baking time.
Wrapping Up
And that’s really all there is to it. You’re now equipped to make incredible, homemade pizza dough that will blow any store-bought version out of the water.
The first time you pull that golden, bubbly pizza out of your own oven, you’ll feel like a rockstar. It’s such a satisfying feeling.
So give it a shot. I’d love to hear how it turns out for you. If you have any questions or discover a cool new variation, drop a comment below and let me know!