I have to admit, some weeks just hit you like a ton of bricks. You know the kind. The ones where all you want to do is pack a bag and fly somewhere with a beach and zero responsibilities.
Well, I can’t exactly give you a plane ticket, but I can give you the next best thing.
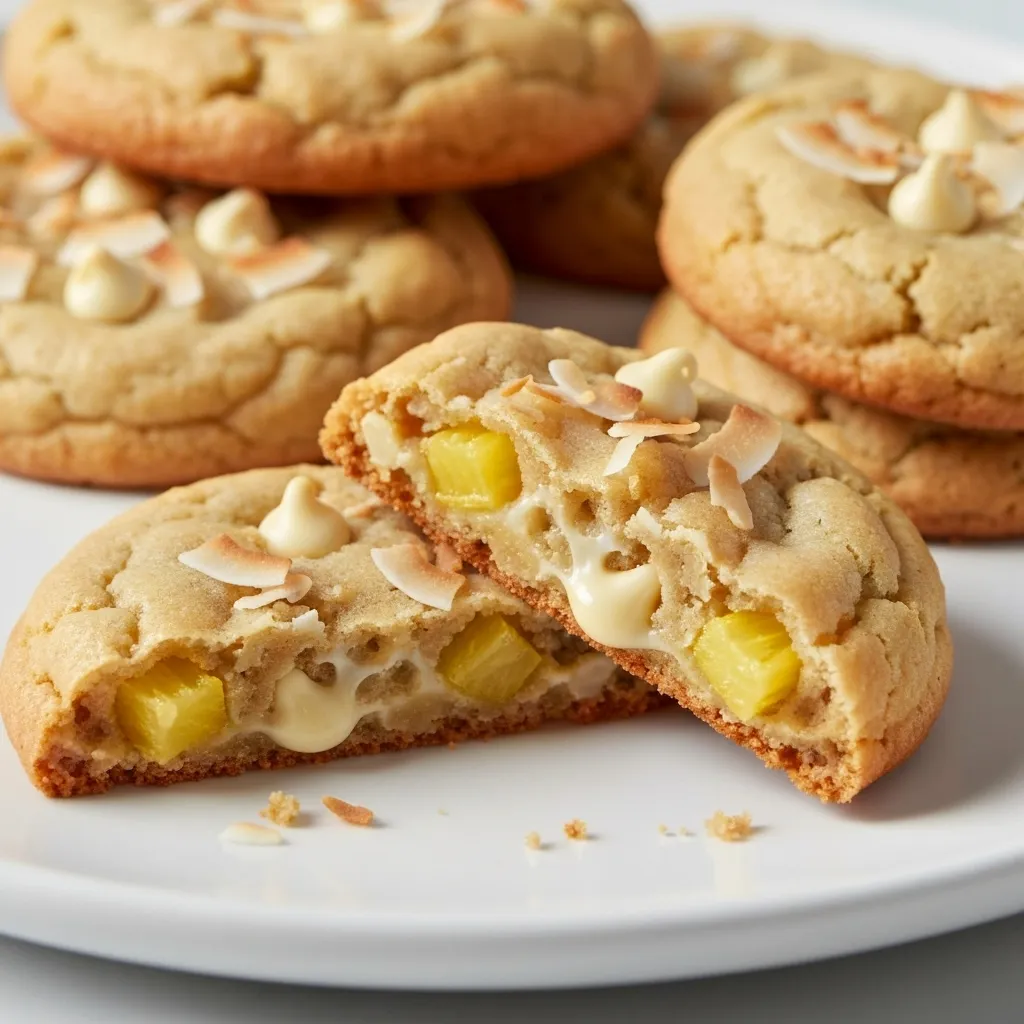
These cookies are basically a tropical vacation you can hold in your hand. They’re soft, chewy, and packed with pineapple and coconut. They just taste like sunshine.
Honestly, baking these is almost as therapeutic as a day at the beach. Almost. The smell that fills your house is just incredible. It’s a little escape, and we could all use one of those right now.
So let’s get to it. Let’s bake a little bit of happiness.
What You’ll Need
Here’s the simple list of ingredients to make this happen. Nothing too crazy, I promise.
- 2 ¼ cups all-purpose flour
- 1 teaspoon baking soda
- ½ teaspoon salt
- 1 cup (2 sticks) unsalted butter, softened
- ¾ cup granulated sugar
- ¾ cup packed light brown sugar
- 2 large eggs
- 1 teaspoon vanilla extract
- 1 cup sweetened shredded coconut (plus a little extra for topping)
- 1 (8 ounce) can crushed pineapple, drained VERY well
- 1 cup white chocolate chips (optional, but so good)
Tools Required
You probably have all this stuff already. No need for fancy gadgets.
- Mixing bowls (a large one and a medium one)
- Whisk
- Electric mixer (handheld or stand)
- Spatula
- Measuring cups and spoons
- Baking sheets
- Parchment paper
- Cookie scoop (or a spoon)
- Wire cooling rack
How to Make These Tropical Treats
Alright, let’s walk through this step-by-step. It’s easier than you think.
Step 1: First thing’s first, get that oven preheating to 375°F (190°C). Line a couple of baking sheets with parchment paper. This stuff is a lifesaver for cleanup.
Step 2: Grab a medium bowl. Whisk together the flour, baking soda, and salt. Just give it a quick mix to combine everything. Set it aside for now.
Step 3: In a large bowl, beat the softened butter with the granulated sugar and brown sugar. Use your electric mixer and go at it until it’s light and fluffy, maybe 2-3 minutes. Don’t skip this part; it’s what makes the cookies airy.
Step 4: Add the eggs one at a time, beating well after each one. Then, mix in the vanilla extract. Your kitchen should be starting to smell amazing.
Step 5: Now, slowly add your dry flour mixture to the wet mixture. Mix on low speed just until it’s combined. Please, don’t overmix! We want tender cookies, not tough ones.
Step 6: This is where the magic happens. Get your super-drained pineapple, the shredded coconut, and the white chocolate chips (if you’re using them). Gently fold them into the dough with a spatula. Just a few turns until everything is distributed.
Step 7: Drop rounded tablespoons of dough (or use a cookie scoop) onto your prepared baking sheets. Leave a couple of inches between them because they will spread out a bit.
Step 8: If you want to be a little extra, sprinkle a tiny bit more shredded coconut on top of each dough ball before baking. It gets all toasty and nice.
Step 9: Bake for 10-12 minutes, or until the edges are golden brown. The centers should still look a little soft when you pull them out. They’ll finish cooking on the hot pan.
Step 10: Let the cookies cool on the baking sheet for about 5 minutes before moving them to a wire rack to cool completely. This is the hardest part, I know. The waiting.
Pro Tips
I’ve made these a bunch of times and have learned a few things. Hopefully, these help you get them perfect on the first try.
- Drain That Pineapple Like You Mean It: I cannot stress this enough. Put the crushed pineapple in a fine-mesh sieve and press down on it with a spoon. Get as much liquid out as possible. Too much juice will make your dough runny and your cookies cakey and flat.
- Toast the Coconut: This is an optional step but it’s a game-changer. Spread the coconut on a baking sheet and toast it at 350°F (175°C) for 5-7 minutes until it’s light golden brown. It brings out a nutty, deeper flavor that is just incredible.
- Chill the Dough: If you have the time, chilling the cookie dough for at least 30 minutes before baking does wonders. It helps control spreading and deepens the flavor. I know it’s annoying to wait, but it’s often worth it.
- Don’t Overbake: The biggest mistake people make with cookies is baking them for too long. Pull them out when the edges are set and golden, but the middle still looks a little underdone. They will set up perfectly as they cool.
Possible Substitutions and Variations
Don’t have something? Or just want to mix it up? No problem.
| Ingredient | Substitution/Variation |
|---|---|
| White Chocolate Chips | Macadamia nuts are amazing in these. |
| Light Brown Sugar | Dark brown sugar for a richer, molasses flavor. |
| Vanilla Extract | A splash of rum extract enhances the tropical vibe. |
| Sweetened Coconut | Unsweetened coconut works fine if you prefer less sugar. |
Make Ahead Tips
You can definitely prepare the cookie dough ahead of time. Just make it, wrap it tightly in plastic wrap, and store it in the fridge for up to 3 days.
You can also freeze the dough. Scoop the dough balls onto a baking sheet, freeze them for an hour until solid, then transfer them to a freezer bag. They’ll keep for up to 3 months. You can bake them straight from frozen; just add 2-3 extra minutes to the baking time.
Nutrition, Diets, and Pairings
Here’s a quick look at some extra details. Because it’s good to know.
| Category | Suggestion |
|---|---|
| Nutrition (Approx.) | Around 150-180 calories per cookie. |
| Gluten-Free Swap | Use a 1-to-1 gluten-free all-purpose flour blend. |
| Dairy-Free Swap | Use plant-based butter sticks and dairy-free white chocolate. |
| Pairing Suggestion | A cold glass of milk. Or a piña colada. I’m not judging. |
| Efficiency Tip | Measure out all your ingredients before you start mixing (mise en place). |
Tips for Leftovers and Storage
If you somehow have leftovers, which is a big “if” in my house, here’s what to do.
Store the cookies in an airtight container at room temperature. They’ll stay soft and delicious for up to 4-5 days.
A little trick: putting a slice of bread in the container with them can help keep them soft. The cookies will absorb moisture from the bread. It sounds weird, but it works.
Frequently Asked Questions
Q1. Why did my cookies spread out so much and get flat?
Ans: Ah, the classic flat cookie problem. This usually happens for two reasons. Your butter was way too soft (it should be soft but still cool to the touch, not melty), or you didn’t drain the pineapple enough. Extra liquid is the enemy of a puffy cookie.
Q2. Can I use fresh pineapple instead of canned?
Ans: You can, but it’s a bit more work. You’ll need to dice it very finely and then cook it down a little on the stovetop to remove some of the moisture. Then, drain it just like you would the canned stuff. Canned is just way easier here.
Q3. My cookies turned out hard. What did I do wrong?
Ans: This is almost always from overmixing the flour or overbaking. Mix the flour in just until you don’t see any more white streaks. And remember to pull them from the oven when they still look a little soft in the center. They will firm up as they cool.
Wrapping Up
So there you have it. A simple recipe for a cookie that tastes like an escape. It’s chewy, sweet, and has that perfect tropical flavor combination.
Don’t worry about making them look perfect. The best cookies are the ones that look a little rustic and homemade. They’re made with love, and you can taste it.
I really hope you give these a try. When you do, come back and leave a comment below. I’d love to hear how they turned out for you, or if you discovered any fun variations of your own!