I have a thing for recipes that look fancy but are secretly super easy. You know, the kind you can make on a Tuesday night when you’re tired, but it still feels like a special treat.
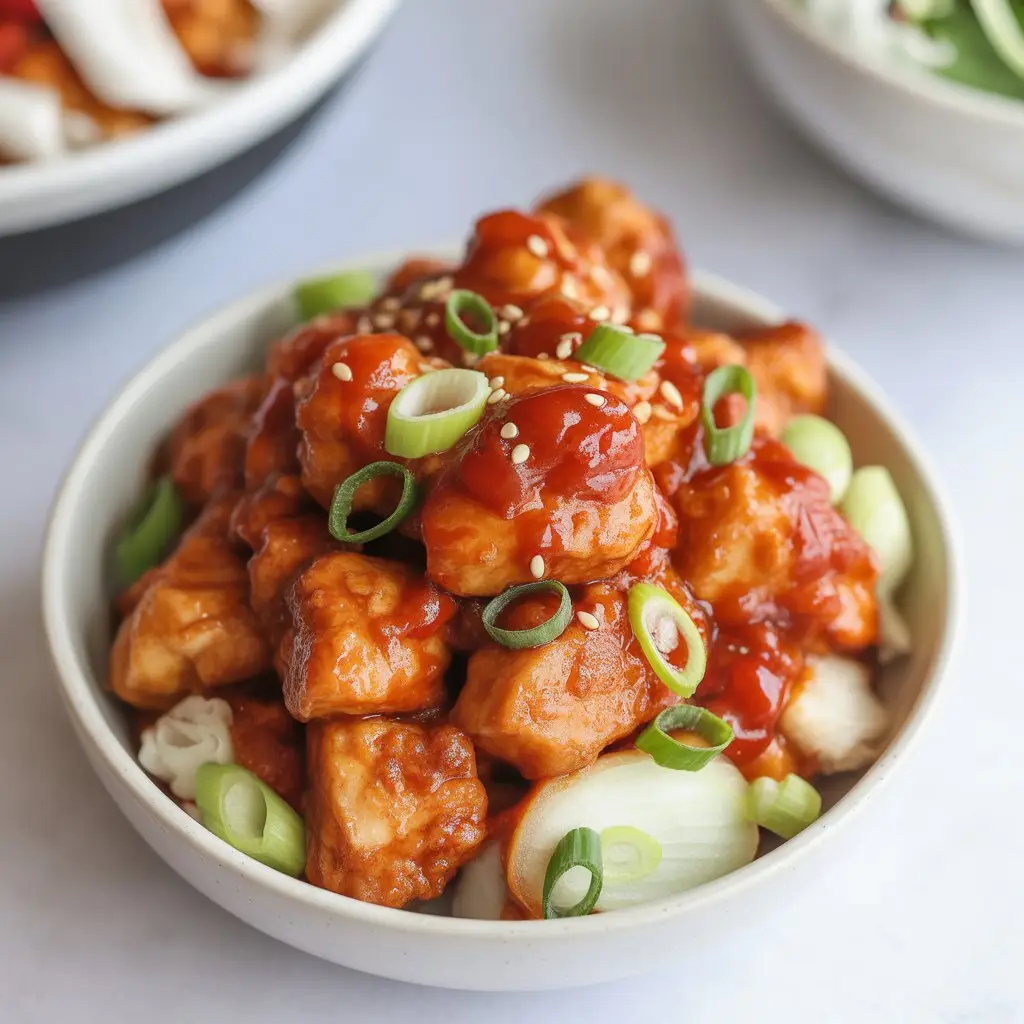
This Sweet Chili Chicken is exactly that. It’s my go-to for when I want something packed with flavor without spending an hour in the kitchen.
It’s that perfect mix of sweet, spicy, and savory that hits all the right notes. Honestly, it’s better than most takeout I’ve had, and you know exactly what’s going into it. No mystery ingredients here.
So if you’re looking for a quick dinner that will seriously impress you (and anyone else lucky enough to be eating with you), you’ve come to the right place. Let’s get into it.
What You’ll Need
Breaking this down into two parts makes it feel less intimidating. You just need stuff for the chicken and stuff for that amazing sauce. Simple.
For the Chicken:
- 1.5 lbs boneless, skinless chicken breasts, cut into 1-inch cubes
- 1/2 cup cornstarch
- 1/2 teaspoon salt
- 1/4 teaspoon black pepper
- 2 large eggs, beaten
- 3-4 tablespoons vegetable or canola oil, for frying
For the Sweet Chili Sauce:
- 1/2 cup water
- 1/4 cup rice vinegar
- 1/4 cup granulated sugar
- 3 tablespoons soy sauce (use tamari for gluten-free)
- 2 cloves garlic, minced
- 1 teaspoon grated fresh ginger
- 1-2 teaspoons chili garlic sauce (like Sambal Oelek), or to your taste
- 1 tablespoon cornstarch mixed with 2 tablespoons of cold water (this is your slurry!)
Tools Required
You don’t need any wild kitchen gadgets for this. Just the basics.
- Large skillet or wok
- Two shallow bowls (for the chicken coating)
- One small bowl or saucepan (for the sauce)
- Whisk
- Tongs or a slotted spoon
- Measuring cups and spoons
- Cutting board and knife
How to Make Sweet Chili Chicken
Follow these steps and you’ll be golden. Don’t rush the process, especially the part about not crowding the pan. It makes a huge difference.
Step 1: Prep the Chicken Station
Get your assembly line ready. In one shallow bowl, whisk the eggs. In a second shallow bowl, mix together the 1/2 cup of cornstarch, salt, and pepper.
Step 2: Coat the Chicken
Pat your chicken pieces completely dry with a paper towel. This is a crucial step for getting a crispy coating! Dip each piece of chicken first in the egg, letting any excess drip off. Then, dredge it in the cornstarch mixture, making sure it’s fully coated. Set the coated pieces on a clean plate.
Step 3: Cook the Chicken
Heat the oil in your large skillet over medium-high heat. Once the oil is shimmering hot, carefully add the chicken in a single layer. Don’t overcrowd the pan! Cook in batches if you have to. Cook for about 3-4 minutes per side, until golden brown and cooked through.
Step 4: Rest the Chicken
Use tongs or a slotted spoon to remove the cooked chicken from the skillet and place it on a wire rack or a paper towel-lined plate to drain. Let it rest while you make the sauce.
Step 5: Make the Sauce
In a small saucepan, combine the water, rice vinegar, sugar, soy sauce, minced garlic, grated ginger, and chili garlic sauce. Bring it to a simmer over medium heat, stirring until the sugar dissolves.
Step 6: Thicken the Sauce
Give your cornstarch slurry (the 1 tablespoon of cornstarch mixed with 2 tablespoons of cold water) a quick re-stir. Slowly pour it into the simmering sauce while whisking constantly. Continue to let it simmer for another 1-2 minutes until it thickens up nicely. It should be thick enough to coat the back of a spoon.
Step 7: Combine and Serve
Pour that beautiful, glossy sauce all over the crispy chicken. Gently toss everything together until every piece is coated in deliciousness. Serve it up immediately, maybe with some chopped green onions or sesame seeds on top.
Pro Tips
I’ve made this recipe a ton of times, and I’ve learned a few things that really take it to the next level.
1. Don’t Crowd the Pan. Seriously.
I know I mentioned it before, but it’s the most important tip. If you put too much chicken in the skillet at once, it will steam instead of fry. You’ll end up with soggy, sad chicken instead of that crispy perfection we’re aiming for. Cook in two or even three batches if needed. It’s worth the extra few minutes.
2. The Double-Coat Method
If you want ridiculously crispy chicken, try this. After the first dip in the egg and cornstarch, let the chicken sit for a minute. Then, dip it back in the egg and back in the cornstarch again. This double layer creates an extra-crunchy crust that holds up really well against the sauce.
3. Control the Sauce Thickness
The cornstarch slurry is what thickens the sauce. If your sauce gets too thick, just whisk in a tablespoon of water at a time until it reaches the consistency you like. If it’s too thin, you can make a tiny bit more slurry (like 1/2 tsp cornstarch and 1 tsp water) and add it in. You have total control here.
4. Sauce at the Last Second
For maximum crispiness, don’t pour the sauce over the chicken until you are literally about to serve it. The longer the sauced chicken sits, the softer the coating will get. Tossing it right at the end ensures you get that perfect crunch in every bite.
Substitutions and Variations
One of the best things about cooking at home is making a recipe your own. Here are a few swaps and additions that work great.
| Ingredient | Substitution/Variation | Notes |
|---|---|---|
| Chicken Breast | Chicken Thighs or Shrimp | Thighs are juicier. Shrimp will cook much faster. |
| Granulated Sugar | Honey or Maple Syrup | This will slightly change the flavor profile, but it’s delicious. |
| Rice Vinegar | Apple Cider Vinegar | Adds a slightly fruitier tang to the sauce. |
| Add-in Idea | Steamed Broccoli or Bell Peppers | Toss steamed or stir-fried veggies in with the chicken at the end. |
Make Ahead Tips
If you want to get a head start on dinner, you totally can.
You can coat the chicken in the cornstarch mixture and store it in an airtight container in the fridge for up to 24 hours. You can also mix up all the sauce ingredients (except the cornstarch slurry) and keep that in a jar in the fridge.
When you’re ready to cook, just give the sauce a shake, cook the chicken, and then finish the sauce on the stove. It cuts the active prep time down to almost nothing.
Nutritional Info, Diet Swaps, and Pairings
Let’s break down some of the other stuff you might be wondering about.
Estimated Nutritional Breakdown
This is just an estimate per serving, assuming the recipe makes about 4 servings. It can change based on the exact ingredients you use.
| Nutrient | Estimated Amount |
|---|---|
| Calories | ~450 kcal |
| Protein | ~35g |
| Carbohydrates | ~40g |
| Fat | ~18g |
Ingredient Swaps for Different Diets
- Gluten-Free: This one is easy. Just swap the soy sauce for tamari or a gluten-free soy sauce alternative. Cornstarch is naturally gluten-free, so you’re good to go there.
- Lower Sugar: You can replace the granulated sugar with a zero-calorie sweetener that measures 1:1 with sugar. The flavor might be slightly different, but it works.
Meal Pairing Suggestions
This chicken is amazing on its own, but it’s a full meal with a simple side.
- Steamed Rice: Jasmine or basmati rice is perfect for soaking up any extra sauce.
- Steamed Veggies: Broccoli, snap peas, or bok choy add a nice, healthy crunch.
- Quinoa: A great, protein-packed alternative to rice.
- Side Salad: A simple salad with a ginger or sesame dressing works really well.
Leftovers and Storage
If you somehow end up with leftovers, they are still pretty great the next day.
Store any leftover chicken in an airtight container in the refrigerator for up to 3 days.
The best way to reheat it is in an oven or an air fryer at around 375°F (190°C) for 5-10 minutes. This will help re-crisp the coating a bit. Microwaving works in a pinch, but the chicken will be softer.
FAQ
Q1. My sauce is too thin! How do I fix it?
Ans: This is an easy fix. Just make another small cornstarch slurry (mix 1/2 teaspoon of cornstarch with 1 teaspoon of cold water) and slowly whisk it into the simmering sauce. Let it cook for another minute, and it should thicken right up.
Q2. Can I make this in an air fryer?
Ans: Yes! Coat the chicken as directed. Spray the air fryer basket with oil, and place the chicken in a single layer. Cook at 400°F (200°C) for about 10-12 minutes, flipping halfway through, until golden and cooked. Then, just toss it with the sauce you made on the stovetop.
Q3. Is this recipe really spicy? My kids don’t like a lot of heat.
Ans: You have total control over the spice. The heat comes from the chili garlic sauce. I suggest starting with just 1 teaspoon. You can always taste the sauce and add more if you want. For a completely mild version, you can leave it out entirely.
Q4. Can I use flour instead of cornstarch for the coating?
Ans: You can, but the texture will be different. Cornstarch creates a lighter, crispier coating that is more common in this style of dish. All-purpose flour will result in a coating that is a bit denser, more like traditional fried chicken. I definitely recommend sticking with cornstarch if you can.
Wrapping Up
So there you have it. A takeout-style meal that is surprisingly simple to make in your own kitchen. It’s a recipe that feels a little indulgent but is quick enough for any night of the week.
I really hope you give this Sweet Chili Chicken a try. It’s one of my absolute favorites, and I think it might become one of yours too.
If you do make it, I’d love to hear how it went! Drop a comment below and let me know if you made any fun variations or have any questions.