I once tried to be fancy for a game day party. I made some complicated, multi-layered dip that, by the time I got there, had settled into something that looked suspiciously like a brown puddle. It was… humbling.
That experience taught me a valuable lesson: sometimes, the best food is the easiest food. The kind of food that everyone instantly recognizes and loves.
And let’s be real, who doesn’t love pizza?
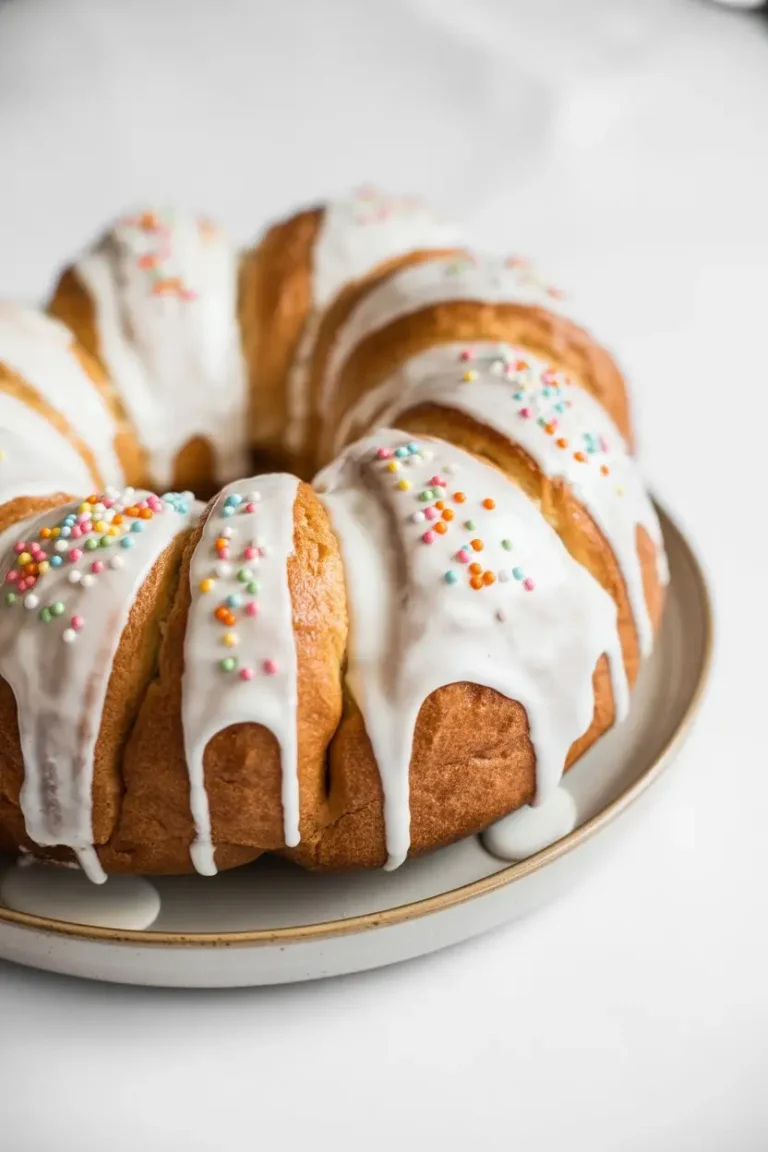
This Pizza Monkey Bread is my go-to redemption recipe. It’s bubbly, cheesy, garlicky, and basically impossible to screw up. It’s the perfect pull-apart appetizer that makes you look like a hero with minimal effort.
So, if you want to bring something to your next get-together that people will actually crowd around, this is it. Let’s make something awesome.
What You’ll Need
Here’s the simple stuff you’ll need to grab. Nothing too wild or hard to find, I promise.
- 2 cans (16.3 ounces each) refrigerated biscuit dough (like Pillsbury Grands!)
- 1 cup shredded mozzarella cheese (low-moisture, part-skim is your friend here)
- 1/2 cup mini pepperoni slices
- 1/2 cup (1 stick) unsalted butter, melted
- 2 cloves garlic, minced (or 1/2 teaspoon garlic powder if you’re feeling lazy)
- 1 teaspoon Italian seasoning
- 1/4 cup grated Parmesan cheese
- Warm marinara sauce, for dipping
Tools Required
You don’t need a professional kitchen for this. Just a few basics.
- Bundt Pan (a 10 or 12-cup one works best)
- Cutting board and knife (or kitchen shears)
- Large mixing bowl
- Small bowl (for the butter mixture)
- Measuring cups and spoons
Pro Tips
I’ve made this more times than I can count. Here are a few things I’ve learned that make a real difference.
1. Parchment Paper is Your Best Friend. Seriously. Before you grease your bundt pan, trace the bottom onto a piece of parchment paper, cut it out, and place it in the bottom of the pan. This guarantees the cheesy, gooey bottom won’t stick. Cleanup will be a breeze. You’ll thank me later.
2. Don’t Go Crazy on the Sauce (Inside). It’s tempting to stuff each biscuit with a ton of sauce, but don’t. It can make the inside doughy and prevent it from cooking properly. The dipping sauce on the side is where the magic happens. Let it shine.
3. Let It Rest. This is maybe the hardest part. When it comes out of the oven, it smells incredible and you’ll want to flip it immediately. DON’T. Let it rest in the pan for about 10 minutes. This lets the cheese set up a bit and helps the whole thing release from the pan in one glorious piece, not a pile of cheesy sadness.
4. Shake, Don’t Stir. When you’re coating the biscuit pieces in the big bowl with the butter mixture, put a lid on it (or another plate) and gently shake it. It coats everything more evenly than stirring and it’s way less messy. Plus, it’s kinda fun.
Substitutions and Variations
This recipe is super forgiving. Feel free to mix things up based on what you have or what you like.
| Ingredient | Substitution Idea | Notes |
|---|---|---|
| Refrigerated Biscuits | Pizza Dough | Roll out and cut into pieces. Might need a bit longer to bake. |
| Mozzarella Cheese | Provolone or an Italian Cheese Blend | Provolone adds a sharper flavor. The blend is great too! |
| Mini Pepperoni | Cooked Sausage, Diced Ham, or Veggies | Make sure any meat is pre-cooked and veggies are diced small. |
| Marinara Sauce | Pesto, Ranch, or Alfredo Sauce | Ranch dip is a surprisingly amazing choice. Just try it. |
How to Make Pizza Monkey Bread: Step-by-Step
Alright, let’s get to the good part. It’s really just a few simple steps.
Step 1: Preheat your oven to 350°F (175°C). Liberally grease a 10 or 12-cup bundt pan with non-stick spray or butter. Don’t forget that parchment paper trick for the bottom!
Step 2: Open your cans of biscuit dough. Using a knife or kitchen shears (I find shears are way faster), cut each biscuit into four equal pieces. Just quarter them up.
Step 3: In a large bowl, combine the biscuit pieces, 1/2 cup of the mozzarella cheese, and the mini pepperoni. Gently toss them together so everything is a little bit mixed.
Step 4: In a separate small bowl, melt your butter. Stir in the minced garlic and Italian seasoning. Pour this glorious butter mixture all over the biscuit pieces in the large bowl.
Step 5: Gently toss (or shake!) everything together until the biscuit pieces are evenly coated in that herby, garlicky butter. Try not to eat them raw. It’s a challenge.
Step 6: Transfer half of the coated biscuit mixture into your prepared bundt pan. Sprinkle the remaining 1/2 cup of mozzarella and the 1/4 cup of Parmesan cheese over the top. Then, add the rest of the biscuit mixture on top of the cheese layer.
Step 7: Bake for 35-45 minutes, or until the top is deep golden brown and the dough in the center is cooked through. You can gently check with a knife to make sure it’s not raw inside.
Step 8: This is the important rest step! Let the pan cool on a wire rack for 10 minutes. Place a large serving platter over the top of the bundt pan and, using oven mitts, carefully and quickly flip it over. Lift the pan off and reveal your masterpiece.
Step 9: Serve it immediately with a bowl of warm marinara sauce for dipping. Watch it disappear.
Nutritional Breakdown & Dietary Swaps
Let’s be clear: this is a treat. It’s not health food. But sometimes, you need food for the soul, and this is definitely it.
If you do want to make a few tweaks, you have options. But don’t stress about it too much.
| For This Diet | Try This Swap |
|---|---|
| Lower Fat | Use turkey pepperoni and reduced-fat mozzarella cheese. |
| Vegetarian | Skip the pepperoni and add diced bell peppers, olives, or mushrooms. |
| Gluten-Free | Use a gluten-free refrigerated biscuit or pizza dough. Bake times may vary! |
Meal Pairing: Honestly, this IS the meal for a lot of people. But if you’re serving it as part of a spread, it goes great with a simple green salad with a light vinaigrette to cut through the richness.
Make-Ahead Tips
Planning a party can be chaotic. You can totally prep this ahead of time.
You can assemble the entire thing in the bundt pan, cover it tightly with plastic wrap, and refrigerate it for up to 24 hours. When you’re ready to bake, take it out of the fridge for about 30 minutes to come to room temperature, then bake as directed. It might need an extra 5-10 minutes in the oven.
Leftovers and Storage
If by some miracle you have leftovers, they’re still pretty great the next day.
Store any remaining monkey bread in an airtight container in the refrigerator for up to 3 days.
To reheat, the air fryer is your best option. A few minutes at 350°F will make it crispy and gooey again. The microwave works in a pinch, but it can get a little soft. Still delicious, just a different texture.
Frequently Asked Questions
Q1. My monkey bread was doughy in the middle. What went wrong?
Ans: This usually happens for two reasons. Either it was underbaked, or the biscuit pieces were packed too tightly in the pan. Make sure to bake until a knife inserted in the center comes out clean, and don’t press the pieces down when you add them to the pan.
Q2. Can I make this in a different pan, like a 9×13 inch baking dish?
Ans: Yes! You totally can. It won’t have the classic “ring” shape, but it will taste just as good. Spread the coated biscuit pieces in a greased 9×13 inch dish. The bake time will likely be shorter, so start checking it around the 25-30 minute mark.
Q3. Why did my monkey bread stick to the pan?
Ans: You might not have greased the pan enough, or you skipped the 10-minute resting period. That rest is key for the cheese to firm up just enough to release cleanly. The parchment paper circle at the bottom is the ultimate insurance policy against this!
Q4. The top of my bread started to get too dark before the inside was cooked. How can I fix that?
Ans: If you notice it browning too quickly, just loosely tent a piece of aluminum foil over the top of the pan for the remainder of the baking time. It will deflect the direct heat and let the inside catch up.
Wrapping Up
So there you have it. A ridiculously easy, super satisfying recipe that is pretty much guaranteed to be a hit. It’s more of a method than a strict recipe, so have fun with it and make it your own.
It’s the perfect food for sharing, laughing, and not worrying about making something fancy.
If you decide to make it, I’d love to hear how it went! Drop a comment below and let me know what crazy variations you came up with or if you have any questions. Now go make something delicious.