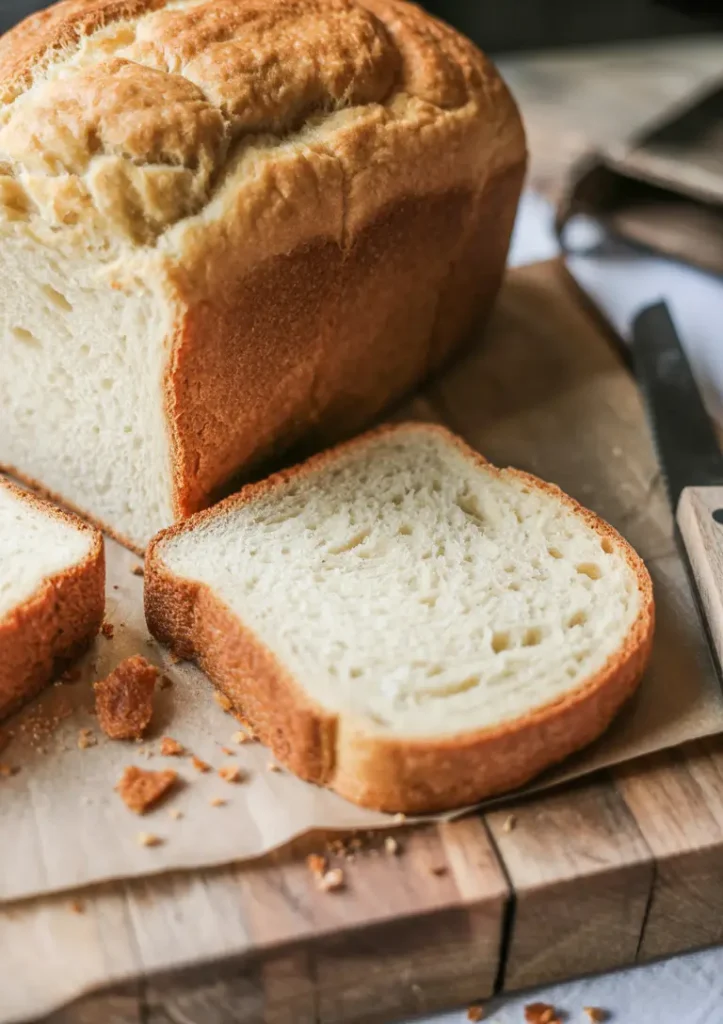
There’s something borderline magical about the smell of warm, fresh bread filling up your kitchen. It’s that “I’ve got my life together” kind of vibe—even if the rest of your day is a mess.
But making bread by hand? Kinda intimidating. Kneading. Rising. Waiting. Then more rising. It’s a process.
Which is why the bread machine? Game-changer. You dump in the ingredients, push a button, and go live your life. Later? You’ve got an actual loaf. Like, real bread. Not the store-bought kind with preservatives and weird plastic packaging. Actual homemade bread. From your kitchen. And yes, it will make you feel accomplished.
This recipe? It’s the easiest way to get that homemade magic without needing a single baking class or flour-dusted apron. No exotic ingredients. No complicated rituals. Just a reliable, easy-to-make loaf that’s soft, flavorful, and ready when you are.
Let’s make bread. Like, real bread.
What You’ll Actually Need
Not a grocery list that takes a 2-hour Target run. Just the essentials.
| Ingredient | Amount | Notes |
|---|---|---|
| Lukewarm water | 1½ cups | Around 105°F (just warm, not boiling) |
| Olive oil | 2 tbsp | Extra virgin, or whatever’s in your pantry |
| Maple syrup | 2 tbsp | Or honey, agave, etc. |
| Whole wheat flour | 2 cups | Adds fiber, makes it feel wholesome |
| All-purpose flour | 2 cups | Softens things up a bit |
| Salt | 1½ tsp | Skipping this is how bland bread happens |
| Instant yeast | 1½ tsp | Bread machine or rapid-rise works best |
You’re not building a rocket. Just bread.
Quick Note on Equipment
This one’s built for a bread machine. Sure, you can knead by hand or use a stand mixer and do the rising and shaping and babysitting yourself, but that’s not this. This is the hands-off, put-your-feet-up version.
So if you’ve got a bread machine, even one that’s been living in the back of a cabinet under your juicer and electric wok? Dust it off. This is its moment.
You’ll also want:
- Measuring cups and spoons (accuracy matters here)
- A wire cooling rack (so your bread doesn’t sweat)
- A bread knife or serrated knife (because hacking into your loaf with a butter knife is pain)
- Optional: kitchen thermometer, if you’re unsure about water temp
How to Actually Make It
Step-by-step, no fluff. Here’s how you go from “I kinda want bread” to “Wait I MADE this?”
- Make sure your bread pan is clean, the paddle’s in, and the machine is ready to go.
- Pour in your lukewarm water, olive oil, and maple syrup.
- Dump in your flours—don’t mix. Just layer.
- Sprinkle the salt over one side of the flour. Sprinkle yeast over the other.
- Secure the pan in the machine and close the lid.
- Choose your bread cycle. If there’s a “whole wheat” setting, use that. If not, just pick the basic bread cycle.
- Press start. Walk away. Go live your life.
- When the bread is done, remove the pan, carefully turn out the loaf, and place it on a cooling rack.
- Wait at least 10–15 minutes before slicing. Not optional unless you enjoy gummy bread.
That’s it. Bread = done.
What Makes This Work
The combo of flours gives you the best of both worlds—fiber and flavor from whole wheat, and softness and structure from all-purpose. Maple syrup adds the tiniest hit of sweetness and helps the yeast do its thing. Olive oil keeps it moist and gives the crust just the right chew. And salt? Without it, bread tastes like a sad sponge. We don’t do sad sponges here.
Substitutions (Because Life Happens)
| If You’re Out Of | Use This Instead | Heads-Up |
|---|---|---|
| Olive oil | Coconut oil, avocado oil | Adds a different flavor, but still solid |
| Maple syrup | Honey, agave, brown rice syrup | Keep it natural for best yeast performance |
| Whole wheat flour | White whole wheat flour | Lighter texture, same benefits |
| All-purpose flour | Bread flour | Slightly more chewy and bakery-style |
| Instant yeast | Active dry yeast | Activate it first in warm water before adding |
Pro Tips That Make a Big Difference
- Peek during kneading, not baking
Open the lid in the first 5–10 minutes. If the dough looks like a thick paste? Add a tablespoon of flour. If it’s stiff and dry? A splash of water. Fix early, not late. - Water temp is a dealbreaker
Too hot and you’ll kill your yeast. Too cold and it won’t wake up. Go for “warm bath” temp. If you’re not sure, use a thermometer. Aim for 100–110°F. - Layer the ingredients right
Always go liquids first, then flour, then salt and yeast on opposite sides. It keeps the yeast from going rogue too soon. - Fresh yeast = happy bread
Old yeast is like a tired roommate. You ask it to do one thing and it just… doesn’t. Store yeast in an airtight container in the fridge. - Let it cool
Slicing hot bread feels right in the moment. Until you realize you’ve just turned the center into a doughy mess. Hold off. Let it set.
Storage & Leftovers
Room temp? Store in an airtight bag or container. Good for 2–3 days.
Freezer? Slice first, wrap in foil or parchment, and store in a freezer bag. Toast straight from frozen and pretend it’s fresh. It basically is.
Avoid the fridge. It dries bread out like nobody’s business.
A Little Nutrition Info (Per Slice, 12-slice loaf)
| Nutrient | Approximate Value |
|---|---|
| Calories | 180 |
| Carbs | 33g |
| Protein | 5g |
| Fat | 3g |
| Fiber | 3g |
| Sugar | 2g |
Not too heavy. Not too light. A happy place in the middle.
What to Eat It With
Honestly? Almost anything.
- Toast it, top it with peanut butter and banana slices
- Pair it with soups—tomato, lentil, even something creamy
- Avocado + red pepper flakes = always a win
- Use it for grilled sandwiches, crusty and golden
It’s the kind of bread that plays well with others.
FAQs You Might Actually Have
What if I don’t have instant yeast?
You can use active dry yeast. Just mix it with the warm water and maple syrup first and let it sit for 5–10 minutes until it bubbles. Then continue as usual.
Why is my bread super dense?
Could be old yeast, not enough liquid, or too much flour. Also, weather. Yeah, humidity affects bread dough. Weird but true.
My crust is rock hard—what now?
Brush the top with olive oil or butter as soon as it’s done baking. Softens right up.
Can I double the recipe?
Not unless your bread machine says it can handle it. Otherwise, you’ll be cleaning sticky, overflown dough off your ceiling.
Do I have to use both flours?
Nope. You can go all whole wheat (more dense), or all all-purpose (lighter). But the blend gives the best of both.
Wrap Up
So here’s the part where you either save this for later or say, “You know what? I’m doing this today.”
I vote today.
Because fresh bread isn’t just about feeding yourself—it’s about doing something simple and kind and weirdly satisfying. And when it’s this easy? You don’t need an excuse.
Try it. Play with the flours. Toast it. Slather on whatever you want. Just promise me one thing—if you make it, come back and tell me how it went. What worked. What didn’t. What you ate it with. What you’ll try next time.
Because once you start making your own bread… yeah. You’re not going back.