I remember the first time I saw an Impossible Pie at a family get-together. It was sitting there on the dessert table, looking all innocent.
It looked like a normal custard pie. But my aunt, who brought it, swore she just dumped everything into a blender, poured it, and baked it. The crust just… made itself.
My brain kind of broke a little bit. A pie that creates its own crust, filling, and topping all in one go? It sounds like some kind of kitchen wizardry.
But it’s real. And it’s one of the most forgiving, simple, and surprisingly delicious things you can ever make. It’s the perfect recipe for when you want something impressive without, you know, actually putting in a ton of effort.
So let’s make some magic. It’s honestly way easier than you think.
What You’ll Need
Here’s the simple rundown of what you need to grab. Nothing too wild or hard to find, which is why I love this thing.
- 1/2 cup all-purpose flour (or Bisquick, if you have it)
- 3/4 cup granulated sugar
- 4 large eggs
- 2 cups whole milk
- 1/2 cup (1 stick) unsalted butter, melted
- 1 teaspoon vanilla extract
- 1 cup shredded sweetened coconut
- A pinch of salt
- A sprinkle of nutmeg (optional, but awesome)
The Tools for the Job
You REALLY don’t need much. That’s the beauty of it.
- A blender (this is the key to making it SO easy)
- A 9-inch pie dish
- Measuring cups and spoons
- An oven, obviously
How to Make the Impossible Happen
Get ready for what might be the simplest instructions you’ve ever followed for a dessert that looks this good.
Step 1: First thing’s first, get your oven preheating to 350°F (175°C). Lightly grease your 9-inch pie dish so nothing sticks later. You’ll thank yourself.
Step 2: Now for the hard part. Just kidding. Literally put all the ingredients—flour, sugar, eggs, milk, melted butter, vanilla, and salt—into your blender. Don’t add the coconut just yet.
Step 3: Blend everything on medium speed for about 15 to 20 seconds. You just want it to be smooth and combined. Don’t go crazy and blend it for minutes on end.
Step 4: Once it’s blended, add the cup of shredded coconut. Now, just PULSE the blender a few times. Like, 3 or 4 quick pulses is all you need just to mix the coconut in. You don’t want to pulverize it.
Step 5: Carefully pour the batter from the blender into your greased pie dish. It will be very thin and liquidy. Don’t panic. This is normal. This is where the magic is about to start.
Step 6: If you’re using it, sprinkle a little nutmeg over the top. It adds a nice warmth to the flavor.
Step 7: Bake for 40 to 50 minutes. The top should be golden brown and the center should be mostly set. It might have a very slight jiggle, but it shouldn’t look like a soupy mess.
Step 8: This is a big one. Let it cool on a wire rack for at least 30 minutes before you even think about slicing it. Then, for best results, chill it in the refrigerator for at least 2 hours. This helps the custard set up perfectly.
Pro Tips From My Kitchen
I’ve made this pie a LOT. And I’ve messed it up a few times, so you don’t have to. Here are a few things I’ve learned.
- Don’t Over-Blend: I know I said it before, but it’s the most common mistake. Over-blending makes the texture tough. You want to mix, not obliterate.
- The Chill is Crucial: Seriously, don’t skip the chilling step. Trying to serve this pie warm is a recipe for a sloppy, falling-apart slice. Patience pays off.
- Check for Doneness: The best way to check if it’s done is to insert a knife about an inch from the center. If it comes out clean, you’re good to go. The center will finish setting as it cools.
- Room Temperature Ingredients: If you have time, let your eggs and milk come to room temperature before blending. It helps everything combine more smoothly and bake more evenly.
Substitutions and Variations
This is where you can get a little wild. The basic recipe is a fantastic starting point, but feel free to play around.
Go Savory: Yes, you can make a savory version! Swap the sugar for about 1/2 cup of grated Parmesan cheese, ditch the vanilla and coconut, and add a cup of your favorite fillings. Some ideas:
- 1 cup cooked, crumbled bacon and 1/2 cup shredded cheddar
- 1 cup chopped broccoli and 1/2 cup shredded Swiss cheese
- 1 cup sautéed mushrooms and onions with a pinch of thyme
Flavor Twists: Try adding a teaspoon of lemon zest for a brighter flavor. Or, use almond extract instead of vanilla for a totally different vibe. A little cinnamon in the batter is also amazing.
Chocolate Lover’s Version: Add about 3 tablespoons of unsweetened cocoa powder to the blender with the flour. It makes a rich, chocolatey custard pie. It’s SO good.
Nutritional Info and Diet Swaps
Let’s be real, it’s a custard pie with butter and sugar. It’s a treat. But if you’re curious, here’s a general idea and some ways to tweak it.
A typical slice will have around 250-350 calories, depending on the exact ingredients you use. Here are a few simple swaps.
| For This Diet | Try This Swap | Quick Note |
|---|---|---|
| Gluten-Free | Use a 1-to-1 GF flour blend | Works surprisingly well! |
| Dairy-Free | Use unsweetened almond milk & vegan butter | The texture might be slightly less rich. |
| Lower Sugar | Reduce sugar to 1/2 cup | It will be less sweet, more custardy. |
Meal Pairing and Time Saving
So what do you serve this thing with? And how can you make the process even faster?
For the classic sweet pie, it’s a perfect dessert after a simple weeknight dinner like roasted chicken or a hearty soup. It doesn’t need anything else, but a dollop of whipped cream or some fresh berries never hurts.
If you make the savory version, it’s basically a quiche without the fuss. It’s a fantastic light lunch or brunch dish when served with a simple green salad.
| Pairing Type | Suggestion | Why It Works |
|---|---|---|
| Sweet Pie | Fresh raspberries | Cuts through the richness. |
| Sweet Pie | A cup of black coffee | The perfect afternoon snack combo. |
| Savory Pie | A simple arugula salad | Keeps the meal light and fresh. |
Time-Saving Tip: The prep time for this is already basically zero. The biggest time-saver is to make it the day before you need it. It actually tastes better after a night in the fridge, so you’re just making it more delicious AND saving time.
Leftovers and Storage
If you somehow have leftovers, storing this pie is super easy.
Just cover the pie dish tightly with plastic wrap or transfer slices to an airtight container. It will keep in the refrigerator for up to 4 days.
I actually think it tastes even better on day two, once all the flavors have had a chance to really settle in and get to know each other.
Frequently Asked Questions
Q1. Why is it called Impossible Pie?
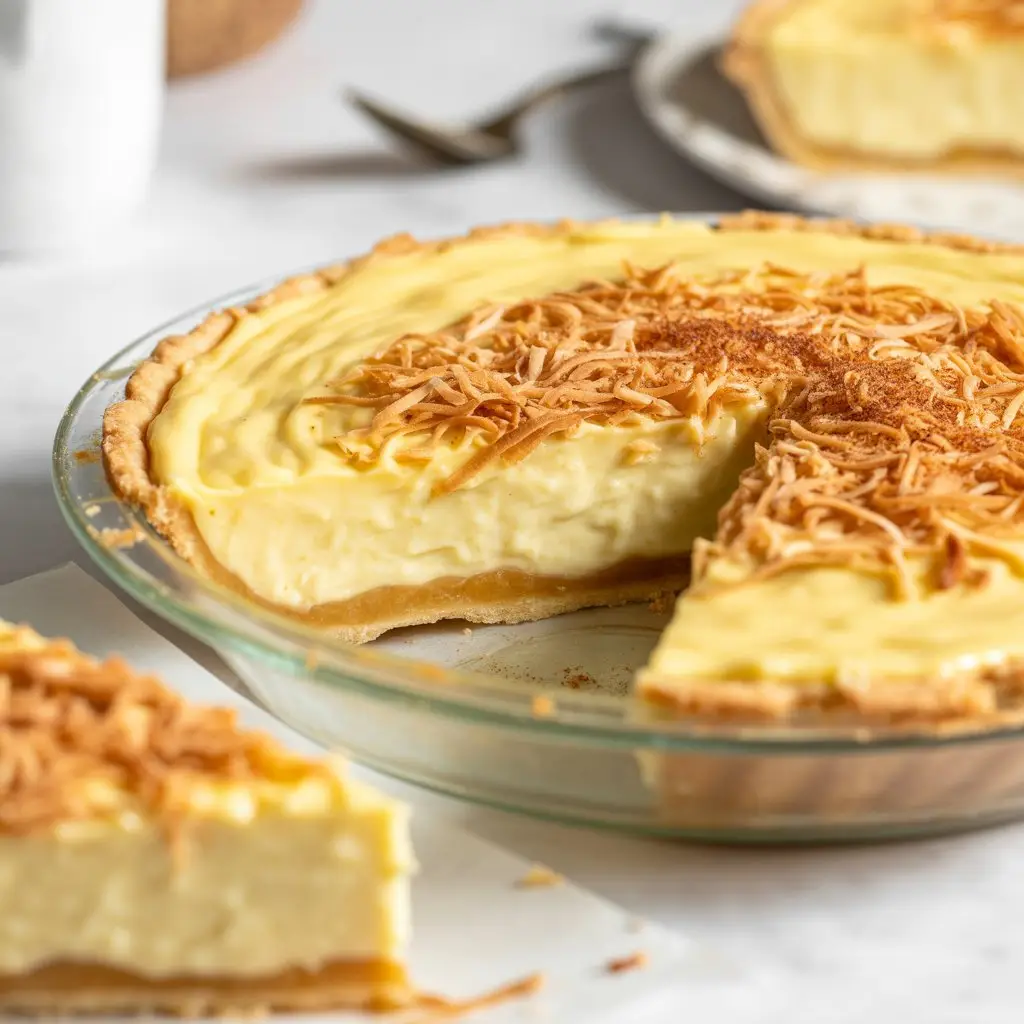
Ans: Because it’s “impossibly” easy! During baking, the heavier flour mixture sinks to the bottom to form a crust, the eggs and milk create a creamy custard filling in the middle, and the light coconut floats to the top to create a chewy, golden topping. All from one simple batter.
Q2. My pie came out soggy on the bottom. What did I do wrong?
Ans: This usually happens for two reasons. Either the oven wasn’t fully preheated, so the crust didn’t have a chance to set quickly, or the pie was slightly underbaked. Make sure your oven is at the right temp and give it those extra few minutes if it looks too jiggly.
Q3. Can I make this without a blender?
Ans: Absolutely. It’s just a little more work. You can use a whisk in a large bowl. Just make sure you whisk everything really well until it’s smooth before you gently stir in the coconut. A blender just makes it ridiculously fast.
Q4. I don’t like coconut. Can I leave it out?
Ans: You can! The pie will still work its magic and separate into layers. It will just be a plain, smooth custard pie without the chewy topping. Still delicious, just a different texture.
Wrapping Up
There you have it. A recipe that feels like a magic trick but is one of the most reliable and simple things you can make in your kitchen. It’s a throwback classic for a reason.
It’s proof that you don’t need complicated steps or a long list of fancy ingredients to make something genuinely wonderful.
So go ahead, give this crazy, magical pie a try. I promise you’ll be amazed at how it turns out.
And when you do, drop a comment below and let me know how it went! I’d love to hear about your experience or any fun variations you came up with.