Some of my favorite memories are tied up in the absolute chaos of holiday baking. You know the scene: flour on the dog, sugar in your hair, and your grandma insisting that you’re not kneading the dough with enough love.
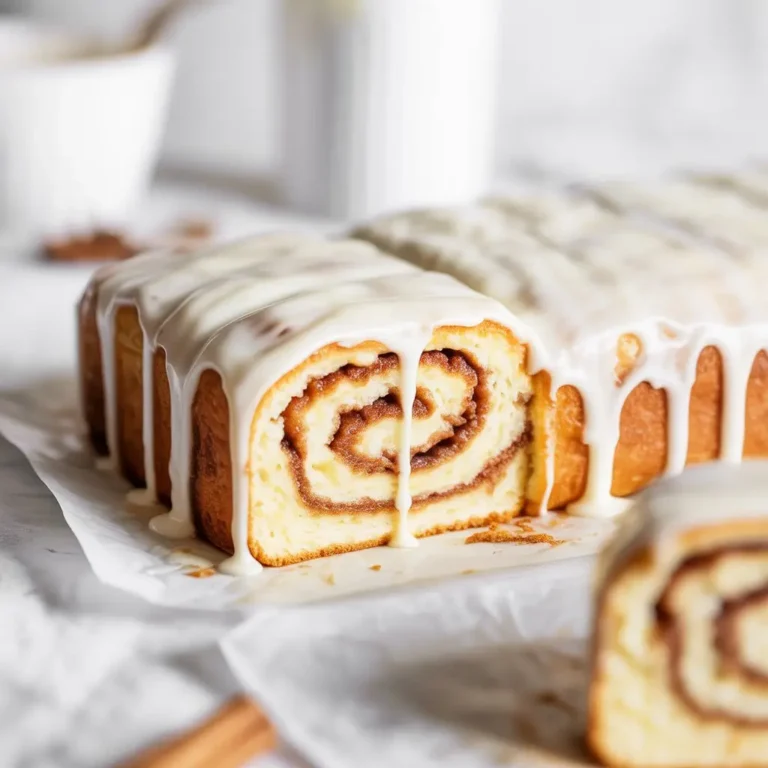
That’s what Pigna di Pasqua is for me. It’s this beautiful, slightly sweet Italian Easter bread that looks way more complicated than it actually is. It’s a tradition.
I know, I know. A yeasted dough can sound intimidating. I’ve had my share of doughs that refused to rise and looked more like a flatbread than a celebration cake. But trust me, we can do this.
This recipe breaks it all down. We’re going to walk through it together, and by the end, you’ll have a gorgeous, delicious Pigna that will make you feel like a rockstar baker.
What You’ll Need
First things first, let’s gather up all our ingredients. Getting everything measured out before you start is a game-changer. It makes the whole process feel less frantic and more like a peaceful baking session.
For the Dough:
- 4 cups (480g) all-purpose flour, plus more for dusting
- 1/2 cup (100g) granulated sugar
- 2 1/4 teaspoons (1 packet) active dry yeast
- 1/2 cup (120ml) whole milk, warmed
- 1/2 cup (113g) unsalted butter, softened to room temperature
- 3 large eggs, at room temperature
- 1 teaspoon vanilla extract
- Zest of 1 large lemon
- Zest of 1 large orange
- 1/2 teaspoon salt
For the Glaze and Topping:
- 1 cup (120g) powdered sugar
- 2-3 tablespoons milk or lemon juice
- 1/2 teaspoon vanilla extract
- Colorful sprinkles (nonpareils are traditional)
Pro Tips
Over the years, I’ve made every mistake in the book. So, let me save you some trouble with a few tips I learned the hard way. These are the little things that make a huge difference.
- Room Temperature is a Non-Negotiable. Seriously. Cold eggs or butter can shock the yeast and prevent your dough from getting that soft, pillowy texture. Take your eggs and butter out of the fridge at least an hour before you start.
- The Windowpane Test is Your Best Friend. How do you know if you’ve kneaded enough? After 8-10 minutes, take a small piece of dough and gently stretch it between your fingers. If you can stretch it thin enough to see light through it without it tearing, you’re golden. If it rips, knead for another couple of minutes.
- Don’t Rush the Rise. Yeast is a living thing and it works on its own schedule. Find a warm, cozy, draft-free spot for your dough to rise. My favorite trick? Turn your oven light on (but keep the oven OFF) and let the bowl sit in there. It creates the perfect warm environment.
- Glaze Consistency Matters. For the glaze, start with 2 tablespoons of liquid and whisk it into the powdered sugar. You want it thick enough to coat the cake but thin enough to drizzle. If it’s too thick, add more liquid a half-teaspoon at a time. Too thin? A bit more powdered sugar will fix it.
Tools Required for the Job
You don’t need a professional kitchen, but a few key tools will make your life a lot easier.
- Stand mixer with a dough hook attachment (or a large bowl and strong arms)
- Large mixing bowl (for rising)
- Small bowl (for activating yeast)
- Measuring cups and spoons
- Zester or fine grater
- Baking sheet
- Parchment paper
- Whisk
- Pastry brush (optional, for egg wash)
Possible Substitutions and Variations
One of the best things about home baking is making a recipe your own. This Pigna is pretty forgiving, so feel free to play around.
| Ingredient | Substitution/Variation | Notes |
|---|---|---|
| Citrus Zest | Anise extract or ground anise | Use 1 tsp of extract or ground spice. |
| Whole Milk | Plant-based milk (almond, soy) | Ensure it’s warmed, not hot. |
| Unsalted Butter | Dairy-free butter substitute | Keep it softened to room temp. |
| Topping | Toasted sliced almonds | Add with sprinkles after glazing. |
Make-Ahead Tips
Holiday schedules can be packed. The good news is you can prep this dough ahead of time so you’re not doing everything on Easter morning.
After the first rise, gently punch the dough down. Wrap it tightly in plastic wrap and place it in the refrigerator. It can stay in there for up to 24 hours.
When you’re ready to bake, take the dough out, let it sit on the counter for about 30 minutes to warm up slightly, then shape it and proceed with the second rise. The second rise might take a little longer since the dough is starting cold, so be patient.
How to Make Italian Pigna di Pasqua: Step-by-Step
Alright, let’s get our hands dirty. Just follow along, and you’ll be fine.
Step 1: Activate the Yeast
In a small bowl, combine the warm milk, yeast, and a teaspoon of the sugar. Give it a gentle stir and let it sit for 5-10 minutes. It should get foamy and bubbly. If it doesn’t, your yeast might be old, and you’ll need to start over with a fresh packet.
Step 2: Mix the Dough
In the bowl of your stand mixer, whisk together the flour, the rest of the sugar, and the salt. Add the softened butter, eggs, vanilla, lemon zest, orange zest, and the bubbly yeast mixture.
Step 3: Knead It
Using the dough hook attachment, mix on low speed until everything comes together. Then, increase the speed to medium and let it knead for about 8-10 minutes. The dough should be smooth, elastic, and pull away from the sides of the bowl. If kneading by hand, do it on a lightly floured surface for 10-15 minutes.
Step 4: The First Rise
Form the dough into a ball and place it in a large, lightly oiled bowl. Cover it with plastic wrap or a damp cloth. Let it rise in that warm, draft-free spot for 1.5 to 2 hours, or until it has doubled in size.
Step 5: Shape the Pigna
Gently punch the dough down to release the air. Transfer it to a lightly floured surface. You can shape it into a simple dome or get a little fancy. To braid it, divide the dough into three equal pieces, roll each into a long rope, and braid them together, pinching the ends to seal. Form the braid into a circle.
Step 6: The Second Rise
Place your shaped dough on a baking sheet lined with parchment paper. Cover it loosely with plastic wrap and let it rise again for another 45-60 minutes, until it’s visibly puffy.
Step 7: Bake It
Preheat your oven to 350°F (175°C). If you want a shinier crust, you can whisk an egg with a tablespoon of water and brush it over the dough. Bake for 25-30 minutes, or until it’s golden brown and sounds hollow when you tap the bottom.
Step 8: Cool and Glaze
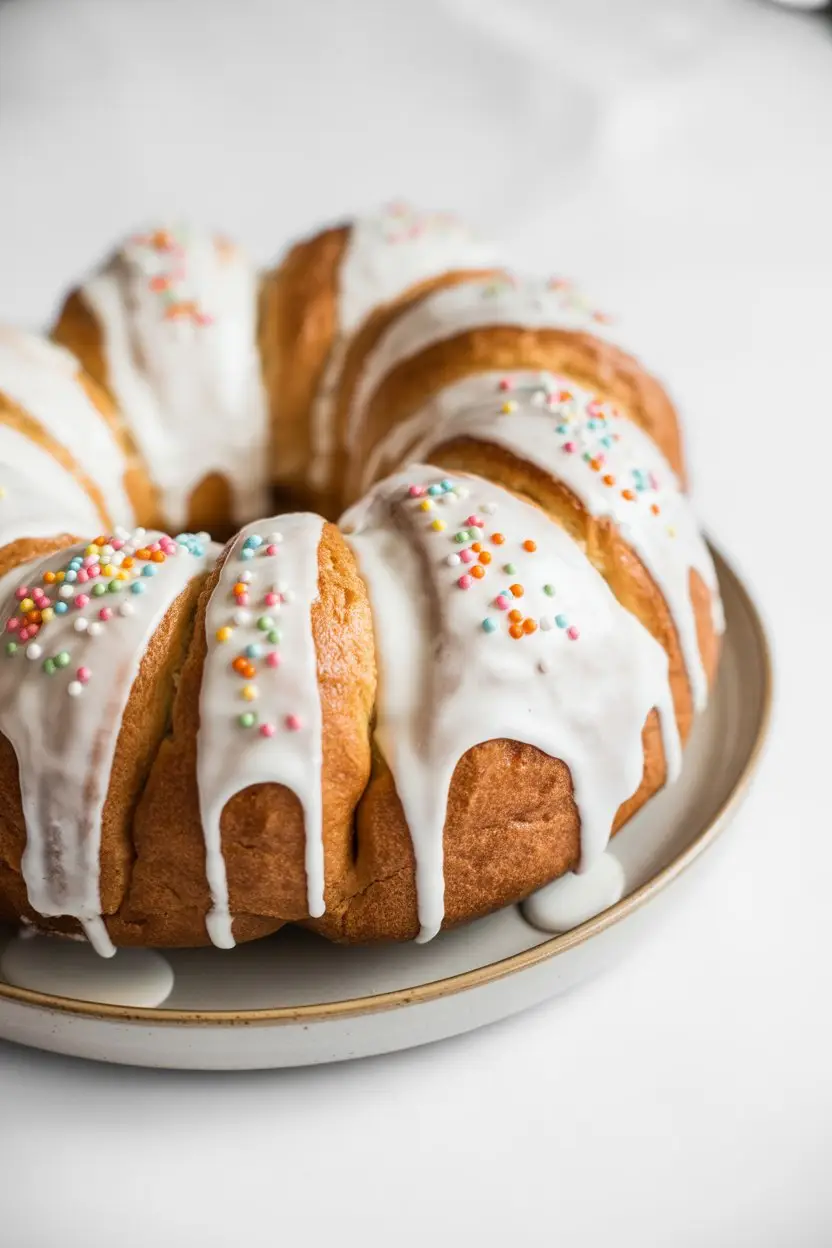
Let the Pigna cool completely on a wire rack. This is important! If you glaze it while it’s warm, the icing will just melt and run off. Once it’s cool, whisk together the powdered sugar, vanilla, and 2 tablespoons of milk or lemon juice. Drizzle it over the cake and immediately add your sprinkles.
Nutritional Info, Pairings, and More
Here’s a quick look at some extra details to help you out.
Nutritional Breakdown
This is just an estimate, but it gives you a general idea. The values are per serving, assuming the cake is cut into 12 slices.
| Nutrient | Estimated Amount |
|---|---|
| Calories | Approx. 350 kcal |
| Carbohydrates | 55g |
| Protein | 8g |
| Fat | 12g |
Ingredient Swaps for Different Diets
For a dairy-free version, use a good quality plant-based butter and a neutral-tasting plant milk like unsweetened almond or soy milk. A gluten-free Pigna is much trickier because the gluten structure is what makes it light and airy. If you try it, use a 1-to-1 gluten-free bread flour blend and be prepared for a denser result.
Meal Pairing Suggestions
This cake is perfect for an Easter brunch. It’s fantastic with a simple cup of coffee or tea. It’s not overly sweet, so it doesn’t feel out of place in the morning. It also works as a light dessert after a big Easter dinner.
Cooking Time Efficiency
The biggest tip is to use your downtime wisely. While the yeast is activating, you can zest your citrus and measure out the dry ingredients. While the dough is rising, you can wash the bowls you’ve already used. It keeps your kitchen from exploding into a total mess.
Leftovers and Storage
If you have any Pigna left over, which is a big “if,” store it in an airtight container at room temperature. It will stay fresh for about 3 days.
After a day or two, the slices might start to feel a little dry. My favorite way to bring them back to life is to toast them lightly and spread a little butter on top. It’s absolutely delicious.
Frequently Asked Questions
Q1. My dough didn’t rise! What did I do wrong?
Ans: This is the most common issue! It’s usually one of two things. Your yeast was either old (dead) or the milk was too hot and killed it. Your kitchen might also be too cold. Always check the expiration date on your yeast and make sure your milk is just warm to the touch, not hot.
Q2. Can I make this without a stand mixer?
Ans: Absolutely. People have been making bread by hand for centuries! It will just require some elbow grease. Once the dough comes together in the bowl, turn it out onto a lightly floured surface and knead for 10-15 minutes until it’s smooth and passes the windowpane test.
Q3. Why is my Pigna dry?
Ans: This usually comes down to two culprits: too much flour or over-baking. When you’re measuring flour, spoon it into your measuring cup and level it off instead of scooping directly from the bag. Scooping can compact the flour, causing you to use too much. Also, keep an eye on the baking time; ovens vary, so start checking it at the 25-minute mark.
Q4. Can I add other things to the dough?
Ans: For sure. Some people like to add a handful of golden raisins or chopped candied fruit. Just knead them in during the last minute or two of mixing so they get evenly distributed without getting crushed.
Wrapping Up
And there you have it. Making a Pigna di Pasqua is more about patience than skill. It’s about creating something with your hands and sharing it with people you care about. It’s about starting a tradition or carrying one on.
So please, give this a try. Don’t be afraid of the yeast! I really hope you have as much fun making it as I do.
When you’re done, I would love to hear how it went. Leave a comment below with your experience or any questions you still have. Let me know if you made any fun variations!