Think about that warm, gooey center of a cinnamon roll. You know the one. That perfect bite that makes you close your eyes for just a second.
Now, what if I told you that you could have that exact feeling, but in the form of an entire pie? A creamy, custardy, cinnamon-loaded pie that’s ridiculously simple to make.
Yeah, I was skeptical at first, too. Cinnamon… pie? It sounds a little weird, but trust me on this one. It’s like a hug for your soul, and your kitchen will smell absolutely incredible.
This isn’t your average apple or pumpkin pie. This is something special, and it’s about to become your new secret weapon for potlucks, holidays, or just a Tuesday night when you need a pick-me-up.
What You’ll Need
Here’s the breakdown of what you need to grab from the store. Nothing too wild, I promise.
For the Pie Crust:
- 1 1/4 cups all-purpose flour
- 1/2 cup (1 stick) cold unsalted butter, cut into small cubes
- 1/2 teaspoon salt
- 1/4 teaspoon sugar
- 3-5 tablespoons ice-cold water
For the Cinnamon Filling:
- 1 cup granulated sugar
- 1/2 cup packed light brown sugar
- 1/4 cup all-purpose flour
- 2 tablespoons ground cinnamon (yes, two whole tablespoons!)
- 1/2 teaspoon ground nutmeg
- 1/4 teaspoon salt
- 4 large eggs
- 1 1/2 cups heavy cream
- 1 teaspoon vanilla extract
Tools of the Trade
You probably have most of this stuff already hanging around your kitchen.
- 9-inch pie dish
- Mixing bowls (a large one and a medium one)
- Whisk
- Pastry blender or your fingers
- Rolling pin
- Measuring cups and spoons
How to Make This Amazing Cinnamon Pie
Alright, let’s get down to business. I’ll walk you through it step-by-step. Don’t worry, it’s easier than it looks.
Part 1: The Crust
Step 1: In a medium bowl, mix the flour, salt, and sugar. Just give it a quick whisk to combine everything.
Step 2: Add the cold, cubed butter. Use a pastry blender or your fingertips to cut the butter into the flour until it looks like coarse crumbs with some pea-sized butter bits still visible. Don’t overdo it!
Step 3: Sprinkle 3 tablespoons of ice water over the mixture. Gently mix with a fork until the dough starts to come together. If it’s too dry, add more water, one tablespoon at a time. It’s ready when you can squeeze a bit and it holds its shape.
Step 4: Form the dough into a flat disk, wrap it in plastic wrap, and chill it in the fridge for at least 30 minutes. This step is super important for a flaky crust, so don’t skip it.
Step 5: Preheat your oven to 425°F (220°C). On a lightly floured surface, roll out your chilled dough into a circle about 12 inches wide. Carefully transfer it to your 9-inch pie dish. Trim and crimp the edges however you like.
Step 6: Line the crust with parchment paper and fill it with pie weights or dried beans. Bake for 15 minutes. This is called blind baking, and it stops the bottom from getting soggy. After 15 minutes, carefully remove the paper and weights and bake for another 5-7 minutes, until the bottom is lightly golden. Set it aside to cool a bit.
Part 2: The Filling
Step 7: While the crust is baking, let’s make the filling. Reduce the oven temperature to 350°F (175°C).
Step 8: In a large bowl, whisk together the granulated sugar, brown sugar, flour, cinnamon, nutmeg, and salt. Breaking up any clumps of brown sugar is the main goal here.
Step 9: In a separate bowl, lightly beat the four eggs. Then, pour them into the dry ingredients and whisk until just combined. Don’t go crazy and overmix.
Step 10: Slowly whisk in the heavy cream and vanilla extract until the mixture is smooth. It should look like a delicious, creamy, cinnamon-y dream.
Part 3: Putting It All Together
Step 11: Place your pre-baked pie crust on a baking sheet (this makes it way easier to move without spilling). Pour the cinnamon filling into the crust.
Step 12: Carefully transfer the pie to the oven. Bake for 40-50 minutes. It’s done when the edges are set, but the center still has a slight jiggle to it when you gently shake the pan. It will firm up as it cools.
Step 13: This might be the hardest step. Let the pie cool completely on a wire rack for at least 2-3 hours. If you cut into it while it’s warm, you’ll have a soupy mess. Patience is a virtue, my friend.
Pro Tips From My Kitchen
I’ve made my share of sad, cracked pies. Here are a few things I’ve learned so you don’t have to.
- Cold is Key for the Crust: Make sure your butter and water are ice cold. This creates little pockets of steam when baking, which is what gives you that perfectly flaky crust instead of a tough one.
- Don’t Fear the Jiggle: The biggest mistake is overbaking. You want a slight wobble in the very center of the pie. It will set perfectly as it cools. If it’s completely firm when you pull it out, it might crack.
- A Crust Shield is Your Friend: If you notice the edges of your crust are browning too fast, you can make a simple shield out of aluminum foil. Just wrap a ring of foil around the edges to protect them while the center finishes baking.
- Fresh Spices Matter: That cinnamon in your pantry from three years ago? It’s probably not going to give you the punch you need. Using fresh, potent cinnamon makes a world of difference in the final flavor.
Substitutions and Variations
Want to mix things up? I get it. Here are some ideas.
- Graham Cracker Crust: Not in a crust-making mood? A store-bought or homemade graham cracker crust is a fantastic, no-fuss alternative.
- Spice It Up: Feel free to add a pinch of cardamom or ginger to the filling for a more complex spice profile.
- Add a Topping: A dollop of whipped cream is classic. You could also drizzle it with a simple powdered sugar glaze or some caramel sauce.
Ingredient Swaps for Different Diets
Need to adjust this for a specific diet? Here are some simple swaps you can make.
| Diet Type | Ingredient | Substitution |
|---|---|---|
| Gluten-Free | All-purpose flour | Use a 1-to-1 gluten-free baking flour blend for both the crust and filling. |
| Dairy-Free | Butter & Heavy Cream | Use solid vegan butter for the crust and full-fat coconut cream for the filling. |
| Lower Sugar | Sugars | You can reduce the sugar by about 1/4 cup, but it will affect the texture slightly. |
Meal Pairing and Efficiency
This pie is pretty rich, so it plays well with others. Here are some thoughts on serving it.
| Serve With | Why It Works |
|---|---|
| A scoop of vanilla ice cream | The cold creaminess cuts through the warm spice perfectly. A classic for a reason. |
| A strong cup of black coffee | The bitterness of the coffee balances the sweetness of the pie. |
| A dollop of unsweetened whipped cream | Adds a light, airy texture without piling on more sugar. |
For efficiency, make the pie crust a day or two ahead and keep it wrapped in the fridge. That way, on baking day, all you have to do is roll it out and whip up the filling.
Make-Ahead and Storage Tips
Planning is everything, right? Here’s how you can prep this pie in advance.
Make-Ahead: The pie dough can be made up to 2 days in advance and stored in the fridge. You can also freeze the unbaked dough disk for up to 3 months.
Leftovers and Storage: Once the pie has cooled completely, cover it loosely with plastic wrap and store it in the refrigerator for up to 4 days. It tastes great cold, but you can also let a slice sit out for 20 minutes to take the chill off before serving.
Frequently Asked Questions
Here are answers to a few questions that might pop into your head.
Q1. Why did my cinnamon pie crack on top?
Ans: This usually happens for two reasons: it was slightly overbaked, or it cooled down too quickly. Make sure to pull it from the oven when it still has that slight jiggle, and let it cool gradually at room temperature, not in a cold draft or the fridge.
Q2. Can I use a store-bought pie crust?
Ans: Absolutely! Life is busy. A good quality refrigerated or frozen pie crust will work just fine. Just follow the package directions for pre-baking it before you add the filling.
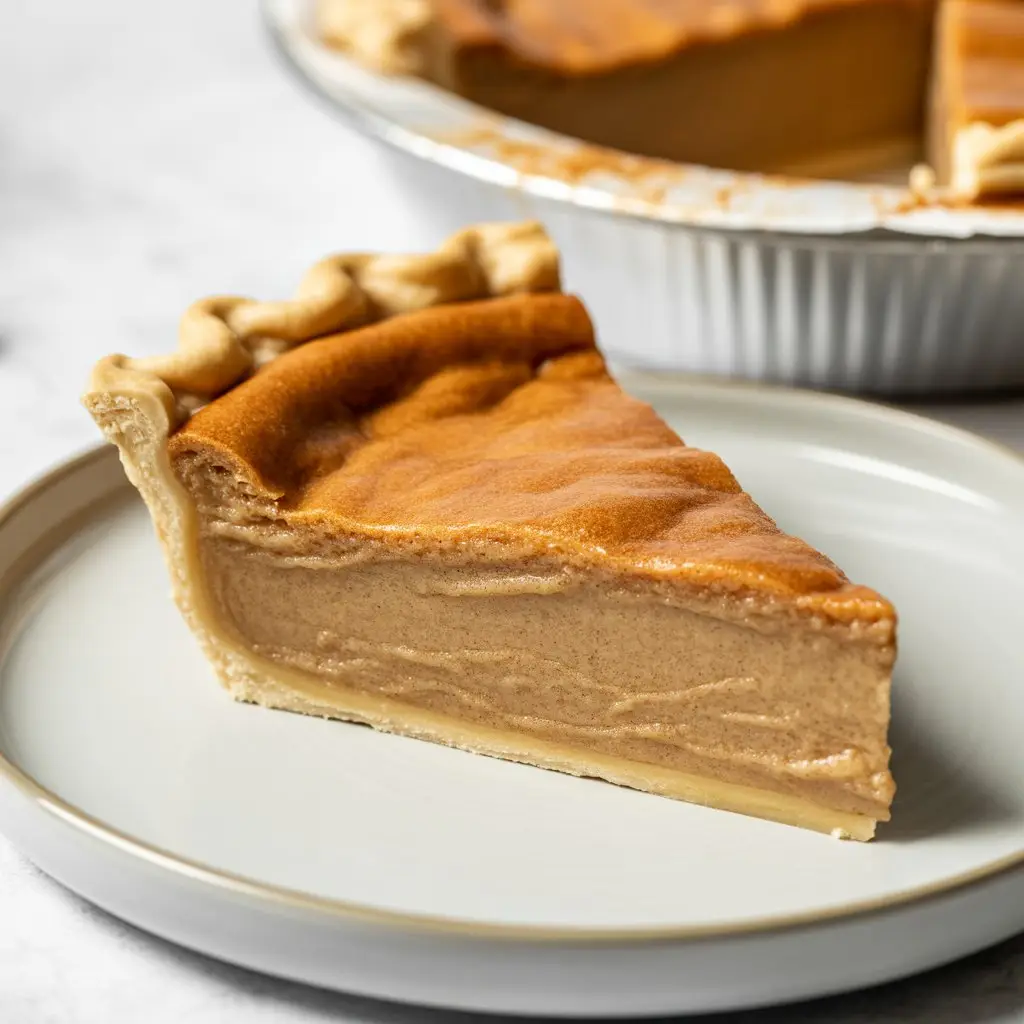
Q3. What is the texture of this pie supposed to be like?
Ans: It’s a custard pie. Think of the texture of a pumpkin or sweet potato pie—smooth, creamy, and firm, but not stiff. It’s not gooey or runny at all once it has fully cooled.
Q4. Can I freeze the finished pie?
Ans: Yes, but custard pies can sometimes get a little watery when they thaw. If you want to freeze it, let it cool completely, then wrap it very well in a double layer of plastic wrap and a layer of foil. It will last for about a month. Thaw it in the refrigerator overnight.
Wrapping Up
So there you have it. A pie that’s a little different, a lot delicious, and surprisingly easy to pull off. It’s the kind of dessert that gets people talking and asking for the recipe.
Go on, fill your kitchen with that amazing cinnamon smell. It’s one of the best parts of the whole process.
When you make it, I’d love to hear how it went. Drop a comment below and let me know if you tried any fun variations or if you have any questions. I’m always here to help!