There’s something about fall that makes me want to turn my kitchen into a full-on bakery. The crisp air, the cozy sweaters… it all just screams for warm, spiced cookies.
But I’ve had my share of baking fails. You know, the kind you see on those “Nailed It!” shows. I’d see these gorgeous, intricate leaf cookies on social media and think, “I can do that.”
Spoiler alert: I couldn’t. At least, not at first. My early attempts usually ended up looking like sad, brown blobs that had a vague, passing resemblance to a leaf if you squinted. A lot.
These cookies, though? These are different. This recipe is my go-to because it’s practically foolproof. The dough is forgiving, they hold their shape, and they taste like pure autumn comfort. So if you’ve ever felt a little intimidated by cut-out cookies, this one’s for you.
What You’ll Need
Let’s get all our ingredients in a row. It makes the whole process so much smoother when you’re not scrambling to find the baking powder mid-mix.
For the Cookies:
- 3 cups all-purpose flour
- 2 teaspoons baking powder
- 1 teaspoon ground cinnamon
- 1/2 teaspoon ground ginger
- 1/4 teaspoon salt
- 1 cup (2 sticks) unsalted butter, softened
- 1 cup granulated sugar
- 1 large egg
- 1 teaspoon vanilla extract
For the Easy Icing:
- 2 cups powdered sugar, sifted
- 2-3 tablespoons milk (or water)
- 1/2 teaspoon vanilla extract
- Red, yellow, and green gel food coloring
Tools Required
You don’t need a professional kitchen setup for these, I promise. Most of this stuff is probably already in your drawers.
- Large and medium mixing bowls
- Electric mixer (handheld or stand)
- Whisk
- Spatula
- Plastic wrap
- Rolling pin
- Leaf-shaped cookie cutters
- Baking sheets
- Parchment paper
- Wire cooling rack
- Small bowls (for mixing icing colors)
- Spoons or piping bags for icing
Pro Tips
I’ve made a few mistakes so you don’t have to. Here are some little things I’ve learned that make a huge difference.
1. Don’t Skip Chilling the Dough. Seriously.
I know, I know. Waiting is the absolute worst part of baking. But chilling the dough for at least an hour is the secret to cookies that don’t spread into unrecognizable shapes in the oven. It solidifies the butter, which means your perfect leaf shapes will stay sharp and defined.
2. Flour is Your Friend.
When you’re rolling out the dough and cutting the shapes, keep a little bowl of flour nearby. Lightly dust your work surface, your rolling pin, and even dip your cookie cutter in flour before each cut. This prevents the dough from sticking and makes transferring the delicate leaf shapes to the baking sheet way less stressful.
3. The “10-Second” Icing Rule.
For the perfect icing consistency, you want it to be not too thick, not too thin. After you mix it, lift your spoon and drizzle a line of icing back into the bowl. If the line disappears back into the rest of the icing in about 10 seconds, it’s perfect for “flooding” the cookie. If it’s too thick, add milk drop by drop. Too thin? Add a bit more powdered sugar.
4. Mix Just Enough.
When you combine the wet and dry ingredients, mix only until the flour is just incorporated. Over-mixing develops the gluten in the flour, which can make your cookies tough instead of tender and soft. We’re going for melt-in-your-mouth, not shoe-leather.
Full Instructions to Make the Cookies
Alright, let’s get down to business. We’ll take this one step at a time. It’s easier than it looks.
Part 1: Making the Cookie Dough
Step 1: In a medium bowl, whisk together the flour, baking powder, cinnamon, ginger, and salt. This is your dry mix. Set it aside for now.
Step 2: In a large bowl, use an electric mixer to beat the softened butter and granulated sugar together until they’re light and fluffy. This usually takes about 2-3 minutes. Don’t rush this part; it adds air to the dough.
Step 3: Beat in the egg and vanilla extract until they are just combined. Scrape down the sides of the bowl with a spatula to make sure everything is mixed in.
Step 4: Gradually add the dry mixture to the wet mixture in a few batches, mixing on low speed until just combined. Remember what I said about not over-mixing!
Step 5: Divide the dough in half, flatten each half into a disk, and wrap them tightly in plastic wrap. Now for the hard part: pop them in the refrigerator to chill for at least 1 hour. You can even leave it overnight.
Part 2: Baking the Cookies
Step 6: When you’re ready to bake, preheat your oven to 350°F (175°C) and line two baking sheets with parchment paper.
Step 7: Take one disk of dough out of the fridge. On a lightly floured surface, roll it out to about 1/4-inch thickness.
Step 8: Using your leaf-shaped cookie cutters, cut out the shapes and carefully place them on the prepared baking sheets, leaving about an inch of space between them.
Step 9: Bake for 9-11 minutes, or until the edges are lightly golden. They might look a little soft in the center, but they will firm up as they cool.
Step 10: Let the cookies cool on the baking sheet for a few minutes before moving them to a wire rack to cool completely. You absolutely must let them cool completely before icing, or you’ll have a melty mess.
Part 3: Icing and Decorating
Step 11: While the cookies are cooling, make the icing. In a medium bowl, whisk together the sifted powdered sugar, 2 tablespoons of milk, and the vanilla extract. Add more milk, one teaspoon at a time, until you reach that “10-second” consistency we talked about.
Step 12: Divide the icing into a few small bowls. Add a drop or two of gel food coloring to each bowl to create your fall colors—red, orange, yellow, and maybe a touch of green. Leave one bowl white if you like.
Step 13: Now for the fun part! You can either use a small spoon to spread the icing over each cookie or use piping bags for more control. I often just use a spoon and gently nudge the icing to the edges.
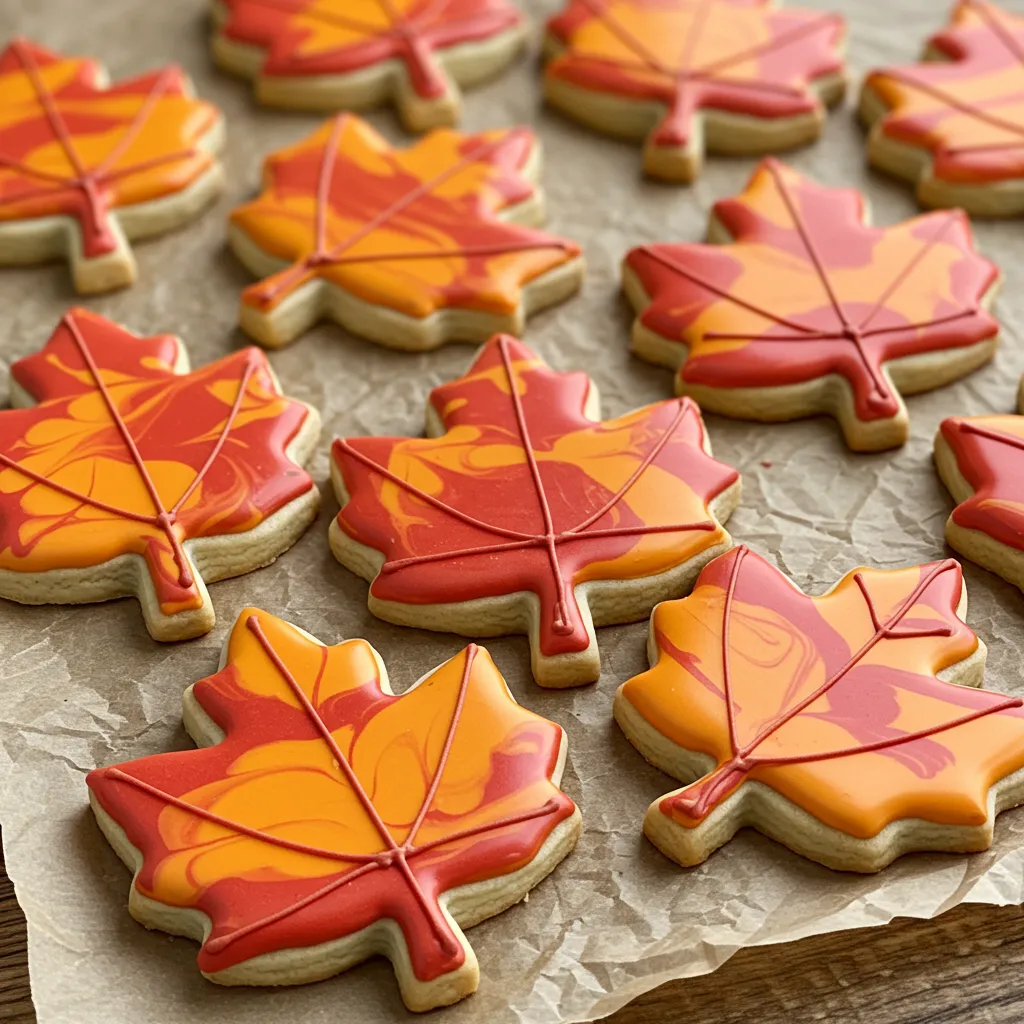
Step 14: To create a marbled or tie-dye effect, “flood” the cookie with one color (like yellow) and then immediately drop little dots of other colors (like red and orange) on top. Use a toothpick to gently swirl the colors together. Let the icing set completely, which can take a few hours.
Substitutions and Variations
Want to mix things up? This recipe is pretty flexible.
| Variation | How to Do It |
|---|---|
| Different Spices | Add 1/4 tsp of nutmeg or allspice to the dry ingredients for a deeper flavor. |
| Chocolate Leaves | Replace 1/4 cup of flour with 1/4 cup of unsweetened cocoa powder. |
| Almond Flavor | Swap the vanilla extract for almond extract for a nutty twist. |
Nutritional Info, Swaps, and Pairings
A little info for those who are curious. Please note these are just estimates!
| Nutrient (per cookie) | Estimated Amount |
|---|---|
| Calories | ~150 kcal |
| Fat | ~7g |
| Carbohydrates | ~20g |
| Protein | ~2g |
Dietary Swaps:
- For Gluten-Free: Use a 1-to-1 gluten-free baking flour blend in place of the all-purpose flour. Make sure it contains xanthan gum.
- For Vegan: Use a plant-based butter substitute and a flax egg (1 tablespoon ground flaxseed mixed with 3 tablespoons water) or other vegan egg replacer. Use a plant-based milk for the icing.
Meal Pairing Suggestions:
These cookies are amazing on their own, but they’re even better with a warm drink. Think a hot cup of coffee, a chai latte, or even just a simple glass of cold milk. They also make a great simple dessert after a hearty fall meal like chili or a pot roast.
Cooking Time Efficiency:
While the dough is chilling, you can get other things done! Wash the bowls you’ve already used, prepare your baking sheets, or mix the icing colors so they’re ready to go.
Make-Ahead Tips
Life gets busy, I get it. The great thing about this recipe is that you can break it up.
- The cookie dough can be made up to 3 days in advance and stored in the fridge.
- You can even freeze the dough disks for up to 3 months. Just let them thaw in the fridge overnight before you plan to roll them out.
- You can also bake the cookies and store them (un-iced) in an airtight container for a couple of days before you have time to decorate.
Leftovers and Storage
If you somehow have leftovers, here’s how to keep them fresh.
Once the icing is completely hard and set, store the cookies in an airtight container at room temperature. I like to place a sheet of parchment paper between the layers to prevent them from sticking or smudging. They should stay fresh for up to a week.
You can also freeze the decorated cookies for up to a month!
Frequently Asked Questions
Q1. Why did my cookies spread out and lose their shape?
Ans: This is almost always because the dough wasn’t cold enough. Make sure you chill it for at least a full hour. If your kitchen is warm, you can even pop the cut-out shapes on the baking sheet back into the fridge for 10 minutes before baking.
Q2. My dough is super crumbly and won’t come together. What did I do wrong?
Ans: Don’t panic! This can happen if you slightly mis-measure the flour or if your butter was a bit too cold. Just add a tiny splash of milk (like, a teaspoon at a time) and mix until it comes together.
Q3. Can I skip the icing?
Ans: Absolutely! These cookies are delicious on their own. The spices give them plenty of flavor. They’re great for a simpler, less sweet treat.
Q4. Do I have to use gel food coloring?
Ans: Gel is highly recommended because it’s very concentrated and won’t water down your icing. Liquid food coloring can change the icing’s consistency and make it too thin to set properly.
Wrapping Up
So there you have it. A recipe for fall leaf cookies that’s more fun than frustration. It’s about enjoying the process, making something delicious, and ending up with a treat that looks just as good as it tastes.
Give it a try. Even if you don’t think you’re a “baker,” you might just surprise yourself. And when you do, I’d love to hear about it. Leave a comment below and tell me how your cookies turned out or if you have any questions.