Some decisions are just too hard to make. Like, do you want banana pudding, or do you want cheesecake? It’s a dessert showdown where everybody wins, but you still have to pick a side.
But what if you didn’t have to choose?
What if you could take the creamy, dreamy comfort of banana pudding and smash it together with the rich, tangy perfection of cheesecake? That’s not a dream. That’s exactly what we’re making today.
This isn’t some super complicated, chef-level recipe. This is one of those desserts that looks impressive but is secretly pretty straightforward. It’s the perfect thing to bring to a party or just to have in your fridge for when a craving hits. You know the one.
So let’s get to it. Let’s make something awesome.
What You’ll Need
I like to break things down so it’s not just one giant, scary list. Think of it in three parts: the crust, the filling, and the good stuff on top.
For the Nilla Wafer Crust:
- 2 cups Nilla Wafer crumbs (about one 11-ounce box)
- 6 tablespoons unsalted butter, melted
- 2 tablespoons granulated sugar
For the Cheesecake Filling:
- 16 ounces cream cheese, softened to room temperature
- 1 cup granulated sugar
- 2 large eggs, at room temperature
- 1/4 cup sour cream, at room temperature
- 1 teaspoon vanilla extract
- 2 medium ripe bananas, mashed up
For the Pudding Topping:
- 1 package (3.4 ounces) instant vanilla pudding mix
- 1 1/2 cups cold milk
- 1 cup heavy whipping cream
- 1/4 cup powdered sugar
- 1 teaspoon vanilla extract
- 2 ripe bananas, sliced
- Nilla Wafers, for garnish (whole or crushed)
Tools Required
No need for anything too fancy here. Just your basic baking gear.
- 9×13 inch baking pan
- Parchment paper
- Food processor (or a zip-top bag and a rolling pin for the crust)
- Electric mixer (stand or handheld)
- Mixing bowls
- Spatula
- Measuring cups and spoons
Pro Tips
I’ve made this a few times, and I’ve learned some things. Let me save you some trouble.
- Room Temperature is a Rule, Not a Suggestion. Seriously. If your cream cheese, eggs, and sour cream are cold, your cheesecake filling will be lumpy. Set them on the counter for at least an hour before you start. It makes a HUGE difference.
- Don’t Overmix After Adding Eggs. When you add the eggs to the cheesecake filling, mix them on low speed just until they’re combined. If you beat too much air into it, your cheesecake is more likely to rise up like a souffle and then crack as it cools.
- Let It Chill Completely. I know, the waiting is the hardest part. But the cheesecake needs to chill for AT LEAST 4 hours, but overnight is even better. This lets it set up properly so you can get clean slices. If you rush it, you’ll have a soupy mess.
- Line Your Pan with Parchment. Let a little parchment paper hang over the sides of the 9×13 pan. This creates “handles” that let you lift the entire slab of cheesecake out of the pan easily for cutting. It’s a game-changer.
| Prep Time | Cook Time | Chill Time | Servings |
|---|---|---|---|
| 25 mins | 40 mins | 4+ hours | 16 squares |
How to Make Banana Pudding Cheesecake Squares
Alright, let’s do this. Just follow along step by step.
Step 1: Get the Oven and Pan Ready
Preheat your oven to 350°F (175°C). Take your 9×13 inch pan and line it with parchment paper, leaving some overhang on the longer sides to use as handles later. Give it a light spray with nonstick cooking spray.
Step 2: Make the Crust
Crush your Nilla Wafers into fine crumbs using a food processor. If you don’t have one, put them in a zip-top bag and smash them with a rolling pin or a heavy can. It’s surprisingly therapeutic.
In a medium bowl, mix the crumbs, melted butter, and sugar until it looks like wet sand. Press this mixture firmly and evenly into the bottom of your prepared pan. Bake it for 10 minutes, then set it aside to cool a bit.
Step 3: Make the Cheesecake Filling
In a large bowl, use an electric mixer to beat the softened cream cheese and sugar together until it’s completely smooth. Scrape down the sides of the bowl to make sure you get everything.
Add the eggs one at a time, mixing on low speed just until the yellow disappears. Then, mix in the sour cream, vanilla extract, and the mashed bananas until just combined. Remember, don’t overmix!
Pour this glorious filling over your pre-baked crust and spread it out evenly.
Step 4: Bake the Cheesecake
Bake for 35-40 minutes. The center should still have a slight wobble to it, but the edges should be set. Turn the oven off, crack the door open, and let the cheesecake cool in the oven for about an hour. This helps prevent cracks.
After an hour, take it out and let it cool completely on the counter. Then, cover it with plastic wrap and put it in the refrigerator to chill for at least 4 hours, or preferably overnight.
Step 5: Make the Topping
Once the cheesecake is fully chilled, you can make the topping. In a bowl, whisk the instant vanilla pudding mix and the cold milk together for about 2 minutes, until it starts to thicken. Let it sit for 5 minutes to fully set up.
In a separate, large bowl, beat the heavy whipping cream, powdered sugar, and vanilla with your electric mixer on high speed until stiff peaks form. This is your homemade whipped cream.
Gently fold about one-third of the whipped cream into the set pudding to lighten it up. Then, fold in the rest of the whipped cream until it’s all combined. Try not to knock all the air out.
Step 6: Assemble and Serve
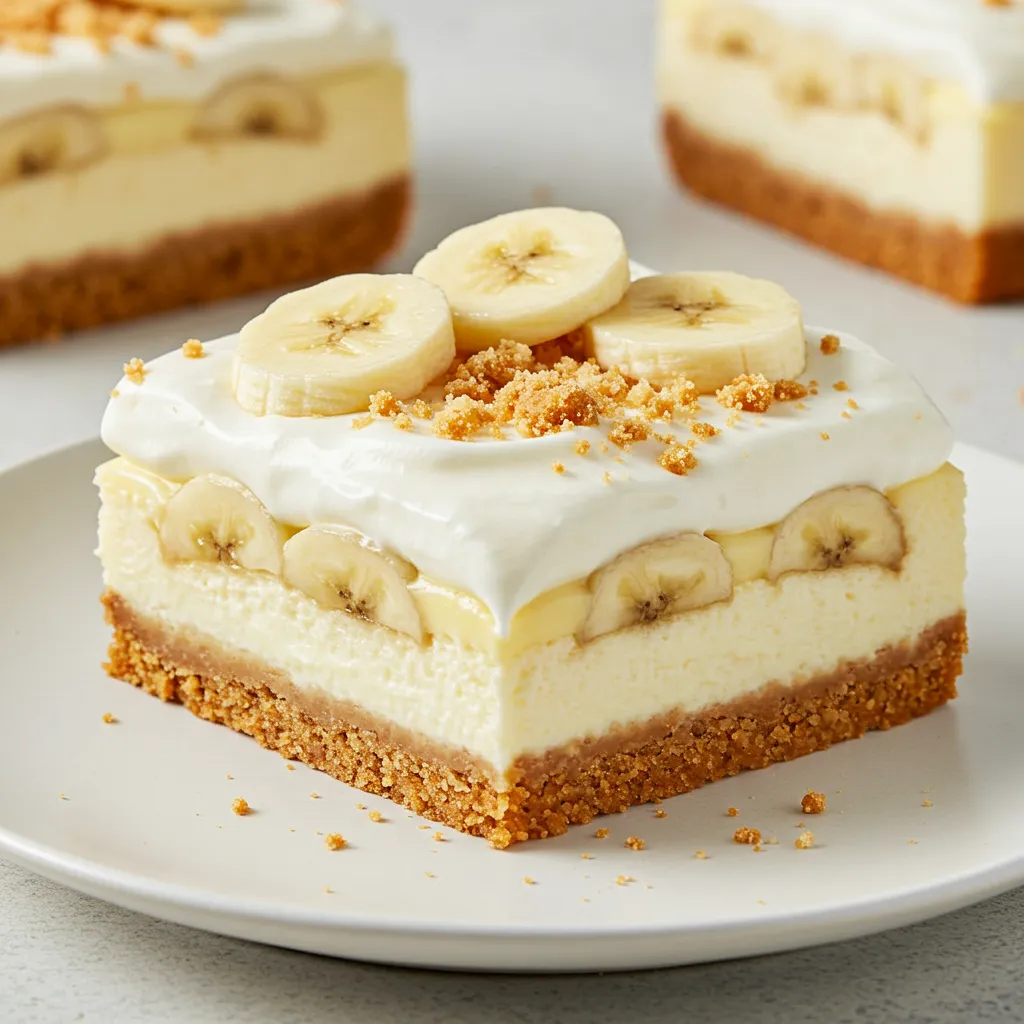
Use the parchment handles to lift the chilled cheesecake out of the pan. Spread the pudding topping evenly over the cheesecake. Arrange the sliced bananas on top of the pudding layer. Garnish with whole or crushed Nilla Wafers.
Cut into squares and serve immediately. Done!
Substitutions and Variations
Want to mix things up? I get it. Here are a few ideas.
| Variation Idea | How To Do It |
|---|---|
| Gluten-Free Crust | Use your favorite gluten-free vanilla wafers or shortbread cookies. |
| Caramel Drizzle | Drizzle a bit of salted caramel sauce over the top before serving. |
| Chocolate Chip | Fold 1/2 cup of mini chocolate chips into the cheesecake batter. |
| Different Crust | Try crushed shortbread cookies or even Golden Oreos for the base. |
Ingredient Swaps for Different Diets
If you’re trying to adjust this for a specific diet, it can be a little tricky with baking, but here are some pointers.
- For Lower Sugar: You can try using a sugar substitute like erythritol or monk fruit in the cheesecake filling. Be sure to check the conversion rate, as it’s not always 1:1. Also, use a sugar-free pudding mix.
- For Gluten-Free: As mentioned in the table, the easiest swap is a gluten-free cookie for the crust. The rest of the ingredients are naturally gluten-free, but always double-check your labels, especially for the pudding mix.
A full nutritional breakdown is tough because it depends on the exact brands you use, but this is a dessert. It’s meant to be an indulgence, not health food. Enjoy it!
Tips for Leftovers and Storage
If you somehow have leftovers, first of all, congratulations on your self-control.
Store any remaining squares in an airtight container in the refrigerator. They’ll be good for about 3 days. Keep in mind the bananas on top will start to brown after the first day, but they’ll still taste fine. It just won’t look as pretty.
I wouldn’t recommend freezing the finished dessert with the topping, as the pudding and fresh bananas don’t freeze and thaw very well. The texture gets weird.
Frequently Asked Questions
Q1. Why did my cheesecake crack?
Ans: This is the most common cheesecake problem! It’s usually caused by one of three things: overmixing the batter (too much air), the ingredients being too cold, or a drastic temperature change. Letting it cool slowly in the turned-off oven really helps prevent this.
Q2. Can I make this in a round springform pan?
Ans: Absolutely. A 9-inch or 10-inch springform pan will work perfectly. The baking time should be about the same. Just keep an eye on it.
Q3. The bananas on top turned brown so fast! How can I stop that?
Ans: Ah, the curse of the banana. To slow down the browning, you can lightly toss your banana slices in a tiny bit of lemon juice before putting them on top. It helps, but they will eventually brown. It’s best to add the banana slices and cookie garnish right before you plan to serve it.
Q4. Can I use cook-and-serve pudding instead of instant?
Ans: I’d stick with the instant pudding for this recipe. Cook-and-serve pudding has a different texture and requires a different preparation method that doesn’t blend as well into the whipped cream topping.
Wrapping Up
There you have it. A dessert that refuses to be put in a box, a perfect mashup of two classics. It’s creamy, it’s crunchy, it’s rich, and it’s just plain good.
Don’t be intimidated by the number of steps. Each one is simple. Just take it one part at a time, and you’ll end up with something you’ll be really proud of.
So go ahead, give it a try. And when you pull that amazing creation out of your fridge, come back and leave a comment. I’d love to hear how it went for you or if you came up with any cool variations of your own.